Alex Edwards
-

When I want to add sprinkles of interactivity to a web application, I'm a big fan of using HTMX. I like that it makes it easy to give interactions a smooth app-like feel, I like that it minimizes the amount of JavaScript that I have to write, and I like that it allows me to keep the consistency and safety of server-side HTML rendering with Go's html/template package. In this post I'm going to run through how I typically use HTMX in conjunction with Go. Although I'm going to talk a bit about how HTMX works, the main focus is going to be on the Go side of things. Specifically: Structuring and rendering HTML templates The patterns I use for sending back partial and full-page HTML responses to HTMX Managing redirects and errors when using HTMX The standard HTMX configuration settings that I use, and why To illustrate these things, we'll run through the build of a small application that ultimately implements a filter on a list of users like this: Note: If you're not already familiar with the basics of using HTMX, I recommend skimming through the HTMX docs before continuing. Also note: A lot of the patterns for working with HTML templates should also be a good fit for other HTML-over-the-wire tools like Unpoly and Hotwire too, if you prefer to use those. Project setup If you'd like to follow along, go ahead and run the following commands to create a skeleton structure for the project: $ go mod init example.com/htmx $ mkdir -p assets/static/css assets/static/img assets/static/js assets/html/partials assets/html/pages cmd/web $ touch assets/efs.go assets/html/base.tmpl assets/html/partials/images.tmpl assets/html/pages/home.tmpl cmd/web/main.go cmd/web/handlers.go cmd/web/html.go That should give you a file tree which looks like this: . ├── assets │ ├── efs.go │ ├── html │ │ ├── base.tmpl │ │ ├── pages │ │ │ └── home.tmpl │ │ └── partials │ │ └── images.tmpl │ └── static │ ├── css │ ├── img │ └── js ├── cmd │ └── web │ ├── handlers.go │ ├── html.go │ └── main.go └── go.mod Installing HTMX There are a few different ways to install HTMX, and you could load it from a CDN or install it using NPM, but I almost always download a copy and serve it as a static file from my web application. It's simple and avoids the downsides of using a CDN. For the purpose of this demo project, we'll also download Bamboo (a classless CSS framework) and an image of a gopher from github.com/egonelbre/gophers. Go ahead and run the following commands to download all three things into the assets/static folder: $ wget -P assets/static/js https://cdn.jsdelivr.net/npm/htmx.org@2.0.10/dist/htmx.min.js $ wget -P assets/static/css https://cdn.jsdelivr.net/npm/bamboo.css@1.4.0/dist/bamboo.min.css $ wget -O assets/static/img/gopher.png https://raw.githubusercontent.com/egonelbre/gophers/refs/heads/master/sketch/misc/standing-left.png The contents of assets/static should now look like this: assets/static ├── css │ └── bamboo.min.css ├── img │ └── gopher.png └── js └── htmx.min.js The HTML templates OK, now that the project skeleton and our static assets are in place, let's get to the main thrust of this post and talk about HTML templates. My starting point in almost all projects is an assets/html directory which has a folder structure like this: assets/html ├── base.tmpl ├── pages │ └── home.tmpl └── partials └── images.tmpl Under this structure: The assets/html/base.tmpl file contains the common HTML 'layout' markup for all web pages. The files in the assets/html/pages directory contain the page-specific content for individual web pages. The files in the assets/html/partials directory contain reusable chunks of HTML markup that can be used in different places. If you're following along, go ahead and add the following markup to the base.tmpl file: File: assets/html/base.tmpl {{define "base"}} <!doctype html> <html lang='en'> <head> <meta charset='utf-8'> <title>{{template "page:title" .}}</title> <meta name="viewport" content="width=device-width, initial-scale=1"> <link rel="stylesheet" href="/static/css/bamboo.min.css"> <script defer src="/static/js/htmx.min.js"></script> </head> <body> <h1><a href="/">Example website</a></h1> <main> {{template "page:content" .}} </main> </body> </html> {{end}} There are a few things to point out about this: In the <head> section we import the Bamboo CSS file and the HTMX JavaScript file. Note that when importing HTMX we use the defer attribute. This means that HTMX will be fetched by the browser in parallel as it is parsing the web page HTML, but the script won't be executed until the HTML is fully parsed and the DOM is built. There's an excellent blog post which describes how defer works and why it's the right choice here. When writing HTML templates, I like to give all of my templates explicit names by surrounding the markup in {{define}}...{{end}} actions — even if (like in this case) a file only contains one template and it's not strictly necessary. YMMV, but I prefer the consistency and clarity of being able to always refer to templates by defined names from my Go code, rather than using a mixture of defined names and filenames. Within the template, we use actions like {{template "page:title" .}} to inject the appropriate page-specific content in the right place. Talking of which, let's now add the page-specific content for the homepage to the assets/html/pages/home.tmpl file: File: assets/html/pages/home.tmpl {{define "page:title"}}Home{{end}} {{define "page:content"}} <button hx-get="/gopher" hx-swap="outerHTML"> Wanna see a cute gopher? </button> {{end}} In this page we have a <button> with two HTMX attributes: hx-get="/gopher" and hx-swap="outerHTML". These mean that when this button is clicked, HTMX will intercept the click, send a GET /gopher request to our application, and then replace the button in the DOM with whatever HTML our application sends back. Note: The colon character in the template name like {{define "page:title"}} is just an arbitrary separator and you could name it something else, like page_title, page-title, pageTitle or even just title if you prefer. But I like using : because it feels like a natural and clear way to 'namespace' template names. Lastly, let's add a template to the assets/html/partials/images.tmpl containing some HTML for displaying our downloaded gopher image, like so: File: assets/html/partials/images.tmpl {{define "partial:image:gopher"}} <img alt="Gopher" src="/static/img/gopher.png" width="{{.}}"> {{end}} Note that we're using width="{{.}}" in this markup, so that we can pass a dynamic value for the image width to the template. Embedding the assets Since file embedding was introduced in Go 1.16, I normally embed HTML files and static assets into a Go binary rather than reading them from disk at runtime. Let's update the assets/efs.go file to embed the contents of the assets/html and assets/static directories, and make them available in two global variables called HTMLFiles and StaticFiles respectively. Like so: File: assets/efs.go package assets import ( "embed" "io/fs" ) //go:embed "html" "static" var files embed.FS var ( HTMLFiles = sub(files, "html") StaticFiles = sub(files, "static") ) func sub(f embed.FS, dir string) fs.FS { sub, err := fs.Sub(f, dir) if err != nil { panic(err) } return sub } In this code, the //go:embed "html" "static" directive embeds the contents of the assets/html and assets/static directories into the files variable, which is an embed.FS rooted in the assets directory. I've then used a small sub() function to create two sub-filesystems with their roots in the html and static directories, and assigned them to the HTMLFiles and StaticFiles variables respectively. Doing this has two benefits: It provides a clear separation between the static and HTML files when we are using them from our Go code. Code that is intended to only work with our static files won't have unnecessary access to our HTML files, and vice-versa. Code using the HTMLFiles and StaticFiles filesystems doesn't need to include the html/ or static/ path prefix when opening files. Note: If you don't want to call panic() from the sub() function, you could restructure this to return an error instead, and initialize the HTMLFiles and StaticFiles variables from within your main() function. But the risk of a runtime panic here is extremely low — the fs.Sub() function will only return an error if the dir value is not a valid path, and the static strings "html" and "static" always pass this check. In practice, I've never had any problems using this approach. HTML template rendering For rendering the HTML templates in an HTTP response, I've found that a nice pattern is to create a htmlRenderer type which a) parses a set of shared templates at startup; b) has a render() method that clones and extends the shared template set, before executing a specific named template and sending it as an HTTP response. Go ahead and create the htmlRenderer type in the cmd/web/html.go file like so: File: cmd/web/html.go package main import ( "bytes" "html/template" "io/fs" "net/http" "time" ) type htmlRenderer struct { templateFS fs.FS sharedTemplates *template.Template } // The newHTMLRenderer function creates a new htmlRenderer containing a shared // set of parsed templates with support for any custom template functions. func newHTMLRenderer(templateFS fs.FS, sharedTemplateFiles ...string) (*htmlRenderer, error) { funcs := template.FuncMap{ "now": time.Now, // Other custom template functions go here... } sharedTemplates, err := template.New("").Funcs(funcs).ParseFS(templateFS, sharedTemplateFiles...) if err != nil { return nil, err } r := &htmlRenderer{ templateFS: templateFS, sharedTemplates: sharedTemplates, } return r, nil } // The render method clones the shared template set, optionally parses additional // templates, executes the named template with the supplied data, and writes the // response. func (h *htmlRenderer) render(w http.ResponseWriter, status int, data any, templateName string, additionalTemplateFiles ...string) error { ts, err := h.sharedTemplates.Clone() if err != nil { return err } if len(additionalTemplateFiles) > 0 { ts, err = ts.ParseFS(h.templateFS, additionalTemplateFiles...) if err != nil { return err } } buf := new(bytes.Buffer) err = ts.ExecuteTemplate(buf, templateName, data) if err != nil { return err } w.WriteHeader(status) buf.WriteTo(w) return nil } And then in the cmd/web/main.go file, let's create a basic web application like so: File: cmd/web/main.go package main import ( "log/slog" "net/http" "os" "example.com/htmx/assets" ) // The application struct holds the dependencies needed for our handlers, // including a htmlRenderer type. type application struct { logger *slog.Logger html *htmlRenderer } func main() { logger := slog.New(slog.NewTextHandler(os.Stdout, nil)) // Initialize a new htmlRenderer, parsing the base template and all partial // templates from assets/html into the shared template set. htmlRenderer, err := newHTMLRenderer(assets.HTMLFiles, "base.tmpl", "partials/*.tmpl") if err != nil { logger.Error(err.Error()) os.Exit(1) } // Include the htmlRenderer in the application struct. app := &application{ logger: logger, html: htmlRenderer, } // Create a file server that serves the files from assets/static. fileserver := http.FileServerFS(assets.StaticFiles) // Register the application routes. mux := http.NewServeMux() mux.Handle("GET /static/", http.StripPrefix("/static", fileserver)) mux.HandleFunc("GET /{$}", app.home) // Start the HTTP server. logger.Info("starting server", "port", 5051) err = http.ListenAndServe(":5051", mux) if err != nil { logger.Error(err.Error()) os.Exit(1) } } The important and relevant thing for this post is the initialization call to newHTMLRenderer(). In this call we pass in the glob paths "base.tmpl" and "partials/*.tmpl", which means that the base template and all templates in the partials directory will be available in the shared template set. And with that in place, we can then write the code for the home handler in cmd/web/handlers.go like so: File: cmd/web/handlers.go package main import ( "net/http" ) func (app *application) home(w http.ResponseWriter, r *http.Request) { err := app.html.render(w, 200, nil, "base", "pages/home.tmpl") if err != nil { app.logger.Error(err.Error()) http.Error(w, http.StatusText(500), 500) } } When we call render() in the code above, we are effectively saying append the templates in pages/home.tmpl to the shared template set, and then render the base template along with a 200 OK status. At this point, you should be able to successfully run the application: $ go run ./... time=2026-06-27T21:05:01.668+02:00 level=INFO msg="starting server" port=5051 And if you visit http://localhost:5051 in your browser, you should see the homepage displayed like so: Rendering partials While you're on this homepage, if you open developer tools and then click the "Wanna see a cute gopher?" button, you'll see that it sends a GET /gopher request that 404s. Let's fix this so that our application includes a GET /gopher route, which returns the contents of the partial:image:gopher template. First add the new route like so: File: cmd/web/main.go package main .. func main() { ... mux := http.NewServeMux() mux.Handle("GET /static/", http.StripPrefix("/static", fileserver)) mux.HandleFunc("GET /{$}", app.home) mux.HandleFunc("GET /gopher", app.gopher) ... } And then in cmd/web/handlers.go create a new gopher() handler, which renders the partial:image:gopher template with a width of 100px. File: cmd/web/handlers.go package main ... func (app *application) gopher(w http.ResponseWriter, r *http.Request) { width := 100 err := app.html.render(w, http.StatusOK, width, "partial:image:gopher") if err != nil { app.logger.Error(err.Error()) http.Error(w, http.StatusText(500), 500) } } Because we've set up our htmlRenderer type so that the shared template set already includes all partials, it's sufficient for us to call render() like this without passing in any additional file paths. If you re-run the application now and click the button, you should see that it gets swapped out for a gopher image like so: So, it's taken a while to get here, but the pattern that we now have in place is neat and has some nice benefits. Our templates (and static assets) are embedded into the Go binary, which makes for easy distribution and deployment. We can use the same htmlRenderer.render() function to send either complete HTML pages or specific partials to the client, which makes it easy to send back partial responses when they are needed by HTMX. We can keep the HTML markup nice and DRY by using the base template and partials. The partials can be inserted in the base template, page-specific content, or even in other partials. A more complex example That was very basic in terms of interactivity, so let's do something a bit more realistic and create a 'user search' page that mimics the active search example from the HTMX website. To make this work, we'll create two new routes in our application: A GET /users route which returns a full HTML page containing a table of all user details. A GET /users/search route which returns an HTML partial containing table rows only for users whose names or emails match a specific search value. Now that we've got all the groundwork in place, it should be pretty quick to do. Let's first add an assets/html/pages/users.tmpl file with the page-specific HTML content: $ touch assets/html/pages/users.tmpl File: assets/html/pages/users.tmpl {{define "page:title"}}Users{{end}} {{define "page:content"}} <input type="search" name="query" placeholder="Begin Typing To Search Users..." hx-get="/users/search" hx-trigger="input changed delay:500ms, keyup[key=='Enter']" hx-target="#search-results" hx-push-url="true"> <table> <thead> <tr> <th>Name</th> <th>Email</th> <th> </th> </tr> </thead> <tbody id="search-results"> {{template "users:rows" .}} </tbody> </table> {{end}} <!-- Fragments for the users page --> {{define "users:rows"}} {{range .}} <tr> <td>{{ .Name }}</td> <td>{{ .Email }}</td> <td> {{if .IsGopher}} {{template "partial:image:gopher" 24}} {{end}} </td> </tr> {{end}} {{end}} There are a couple of interesting things here. The first is the HTMX attributes on the <input> control. We've configured this so that when a user types into the input, after a delay of 500ms (or immediately if they press Enter), HTMX will send a request containing the search term as a query string like GET /users/search?query=foo. When a response is received, HTMX will then swap the response into the inner HTML of the <tbody id="search-results"> element. For demonstration purposes in this project, we're also using the hx-push-url="true" attribute, which will result in the browser URL bar being updated and a new entry added to the browser history each time HTMX makes a request. I've also structured the file so that the table rows are rendered in their own users:rows template, rather than as part of the page:content template. We'll use this in the GET /users/search to render just the matching user table rows for HTMX to swap in. Note: In theory, we could define the users:rows template inside the partials directory instead, and that wouldn't be an unreasonable thing to do. But if I have a HTML fragment that is only used on one specific page, I think it's clearer and neater to define that fragment inside the page file alongside the other content for the page. YMMV though, and that's OK. Then let's set up the two new routes in main.go: File: cmd/web/main.go package main .. func main() { ... mux := http.NewServeMux() mux.Handle("GET /static/", http.StripPrefix("/static", fileserver)) mux.HandleFunc("GET /{$}", app.home) mux.HandleFunc("GET /gopher", app.gopher) mux.HandleFunc("GET /users", app.listUsers) mux.HandleFunc("GET /users/search", app.searchUsers) ... } And lastly let's go to the handlers.go file and create a hardcoded list of user details, along with the two new handlers listUsers and searchUsers, like so: File: cmd/web/handlers.go package main import ( "net/http" "strings" ) ... // Define a user type. The fields need to be exported so that we can reference // them in our HTML templates. type user struct { Name string Email string IsGopher bool } // Create a hardcoded list of users. var users = []user{ {"Alice Madsen", "alice.madsen@example.com", true}, {"Theo Thatcher", "theo.thatcher@example.com", true}, {"Maxwell Albright", "maxwell.albright@example.com", false}, {"Ruby Thompson", "ruby.thompson@example.com", false}, {"Leona Rowan", "leona.rowan@example.com", false}, {"Alicia Lennox", "alicia.lennox@example.com", true}, {"Ruben Mason", "ruben.mason@example.com", false}, {"Leo Reynolds", "leo.reynolds@example.com", false}, {"Max Lester", "max.lester@example.com", true}, {"Theodore Allister", "theodore.allister@example.com", false}, } func (app *application) listUsers(w http.ResponseWriter, r *http.Request) { // Render a full HTML page containing the content from "pages/users.tmpl" // and all user details. err := app.html.render(w, 200, users, "base", "pages/users.tmpl") if err != nil { app.logger.Error(err.Error()) http.Error(w, http.StatusText(500), 500) } } func (app *application) searchUsers(w http.ResponseWriter, r *http.Request) { // Filter down the list of users to find ones that match the query. query := r.FormValue("query") var matches []user if query == "" { matches = users } else { for _, u := range users { if strings.Contains(u.Name, query) || strings.Contains(u.Email, query) { matches = append(matches, u) } } } // Render just the "users:rows" template from the "pages/users.tmpl" file // with the matching user details. err := app.html.render(w, 200, matches, "users:rows", "pages/users.tmpl") if err != nil { app.logger.Error(err.Error()) http.Error(w, http.StatusText(500), 500) } } When it comes to template rendering, in both of these new handlers we are adding the templates from the pages/users.tmpl file to the shared template set, but in listUsers we execute the base template and in searchUsers we execute just the users:rows template. So with just a little bit of thought to how we structured the markup and defined the templates in the pages/users.tmpl file, it's straightforward for us to send back either a complete HTML document or the appropriate partial HTML fragment for HTMX to do its thing. If you want, try this out by visiting http://localhost:5051/users and you should see the list being filtered as you type. Note: I've been deliberately keeping this web application simple so that the focus is on templates and templating. In a real application, you might want to merge listUsers and searchUsers into a single handler, create some centralized helpers for error handling and logging, use middleware to add Content Security Policy headers and recover panics, set appropriate server timeouts, etc. Checking if a request is coming from HTMX This all works well, but what if someone visits a link like http://localhost:5051/users/search?query=leo directly? Or shares a link to it? Anyone visiting this directly would only see the partial HTML response in their browser, similar to this: This obviously isn't ideal. A much better approach would be to change the response that our searchUsers handler sends, depending on whether the request is coming from HTMX or not. Specifically: If the request is coming from HTMX, we should return an HTML partial that it can swap into the table, just like we already are. If the request is not coming from HTMX, we should return a full HTML page that contains the matching user details. As you may already know if you've used HTMX before, requests that come from HTMX always include an HX-Request: true header. So all we need to do is check for the presence of that in the request, and send back the appropriate response. To help with this, I normally create a little isHTMXRequest() function and use it like so: File: cmd/web/handlers.go package main ... func isHTMXRequest(r *http.Request) bool { return r.Header.Get("HX-Request") == "true" } func (app *application) searchUsers(w http.ResponseWriter, r *http.Request) { query := r.FormValue("query") var matches []user if query == "" { matches = users } else { for _, u := range users { if strings.Contains(u.Name, query) || strings.Contains(u.Email, query) { matches = append(matches, u) } } } // Render the base template by default. template := "base" // But if the request is coming from HTMX, render the users:rows template instead. if isHTMXRequest(r) { template = "users:rows" } err := app.html.render(w, 200, matches, template, "pages/users.tmpl") if err != nil { app.logger.Error(err.Error()) http.Error(w, http.StatusText(500), 500) } } If you restart the application and visit http://localhost:5051/users/search?query=leo again now, you should see a full HTML page containing only the matching user records. But there are a couple more things we need to do to finish this up. Because we're sending back different responses from searchUsers based on the value of the HX-Request header, we should also set a Vary: HX-Request on the response to tell any caches between our server and the client that responses may be different based on the value of this header. We could set the Vary: HX-Request header in searchUsers, but I think it's easier to just always set it on all responses in the render() function. It does mean that we'll be setting the Vary header on all responses — including those from our home handler and listUsers — which isn't strictly necessary and a little bit wasteful. But I think it's worth it to avoid having to remember setting the Vary header correctly in individual handlers, and the risk of bugs that forgetting it may cause. File: cmd/web/html.go func (h *htmlRenderer) render(w http.ResponseWriter, status int, data any, templateName string, additionalFiles ...string) error { ... w.Header().Add("Vary", "HX-Request") w.WriteHeader(status) buf.WriteTo(w) return nil } Lastly, we need to consider back-button behavior. Whenever HTMX adds an entry to the browser history (which it will do when you use the hx-push-url or hx-boost attributes), it caches the HTML for the complete page in the browser's local storage. When the user clicks the back button, this complete cached HTML page will be reshown to them. By default the HTMX cache stores up to 10 pages. If there is a cache miss (i.e. the user navigates back far enough that there is no longer a matching page in the cache), HTMX will resend the request to the server to refetch the content for that URL. The problem is that this request will include the HX-Request: true header, and our application will send back a partial HTML response rather than the complete HTML page that it needs to redisplay to the user. To deal with this scenario, there is an historyRestoreAsHxRequest setting which controls whether HTMX will include the HX-Request: true header when it's sending a request because of a cache miss. The documentation advises: This should always be disabled when using HX-Request header to optionally return partial responses. So let's go ahead and configure HTMX so that the historyRestoreAsHxRequest setting is false. There are a couple of ways you can configure HTMX settings, but I generally like to set them in a meta tag in the base.tmpl file like so: File: assets/html/base.tmpl {{define "base"}} <!doctype html> <html lang='en'> <head> <meta charset='utf-8'> <title>{{template "page:title" .}}</title> <meta name="viewport" content="width=device-width, initial-scale=1"> <meta name="htmx-config" content='{ "historyRestoreAsHxRequest": false }' > <link rel="stylesheet" href="/static/css/bamboo.min.css"> <script defer src="/static/js/htmx.min.js"></script> </head> <body> <h1><a href="/">Example website</a></h1> <main> {{template "page:content" .}} </main> </body> </html> {{end}} Now that this is set, if there is a cache miss when using the back button, HTMX will send a request to our application without the HX-Request: true header, and our application will send back the complete HTML page to reshow to the user. Managing redirects Using HTMX in your application normally reduces the need for 3xx redirects. For example, when submitting a form you can often send back an HTML partial with a success message that can be swapped into the page, rather than using the standard Post/Redirect/Get pattern and redirecting to a confirmation page. But still, there may be times that you want to redirect to a completely new page after a form submission coming from HTMX. A common example would be redirecting to a profile page after a successful login. Unfortunately, to achieve this you can't just send a regular 3xx response. The crux of the problem is that that browsers will automatically intercept and follow 3xx responses before HTMX has access to them — so HTMX never gets to see the 3xx response, only the final response after any redirects. It doesn't know that a redirect happened behind the scenes, and will just swap in the returned content like normal. Instead, if you want something that behaves more like a regular redirect, you need to send a 2xx response along with the HX-Redirect header. For example, when you include the response header HX-Redirect: /foo/bar, it will make HTMX tell the browser to navigate to /foo/bar, triggering a full-page reload. Importantly the HX-Request: true header will not be included in the request to /foo/bar. But you also need to handle the situation where the original request might not be coming from HTMX — especially if you are using progressive enhancement so that your application still works if JavaScript is disabled or HTMX doesn't load correctly. In that case, it's important to fallback to sending a regular 3xx response from your Go handler, rather than the 2xx response and HX-Redirect header. Putting this together, I normally create a redirect() helper which leverages the isHTMXRequest() function we made earlier and looks like this: func redirect(w http.ResponseWriter, r *http.Request, url string, code int) { if isHTMXRequest(r) { w.Header().Set("HX-Redirect", url) w.WriteHeader(http.StatusNoContent) return } http.Redirect(w, r, url, code) } And, for example, in the scenario of wanting to redirect to a /profile page after a successful login, I use it in my Go handlers like this: redirect(w, r, "/profile", http.StatusSeeOther) As I mentioned above, using HX-Redirect will trigger a full-page reload. But there is another option — the HX-Location header — which makes HTMX mimic the behavior of a redirect without a full-page reload. It essentially makes HTMX fetch the HTML for the provided URL, swap it into the HTML body, and add a new entry to the browser history. Importantly, when fetching the HTML the HX-Request: true header is used. At first glance, using HX-Location might seem preferable because it doesn't make a full-page reload, which gives your application a smoother more SPA-like experience. But it's a problem if the route that you are redirecting to uses the HX-Request: true header to conditionally send HTML partials. The handler has no way of telling whether the request is coming from HTMX following a HX-Location redirect (in which case it should send a full-page response) or from a 'normal' HTMX request (in which case it should return a partial). Unfortunately, unlike history restore requests, HTMX doesn't provide a setting to disable the HX-Request: true header when redirecting. So, most of the time I think it's easier and safer to use HX-Redirect and accept the downside of a full-page reload. But... if you are careful and structure your application so that the routes you redirect to only ever return full HTML pages, you may want to change the redirect() helper to use HX-Location instead like so: func redirect(w http.ResponseWriter, r *http.Request, url string, code int) { if isHTMXRequest(r) { w.Header().Set("HX-Location", url) w.WriteHeader(http.StatusNoContent) return } http.Redirect(w, r, url, code) } Managing errors If our demo application returns a 4xx or 5xx response, by default HTMX will not swap in the response. Instead it leaves the DOM as-is, and logs an error message in the console. If you'd like to see this in action, go ahead and change the gopher handler to render a "partial:image:missing" template (which doesn't exist). This should cause our application to error and send a 500 status code and a plaintext "Internal Server Error" response to the client. File: cmd/web/handlers.go func (app *application) gopher(w http.ResponseWriter, r *http.Request) { err := app.html.render(w, http.StatusOK, 100, "partial:image:missing") if err != nil { app.logger.Error(err.Error()) http.Error(w, http.StatusText(500), 500) } } If you run the application and click the "Wanna see a cute gopher?" button, now nothing on the screen will change, but in your developer tools network tab you'll see the 500 response and a record of the problem in the console, like so: In most cases, this isn't ideal. If an application is sending back an error message, I normally want the user to actually see this message rather than having the operation fail silently for them (or at least, silently unless they have developer tools open 😉). And also in most cases, I want to display any error message from a 4xx or 5xx response as full-page HTML (in the same way that it would be shown if we weren't using HTMX) by swapping it into the <body> element rather than swapping it into the regular HTMX target. The only exception to this is the 422 Unprocessable Content status, which I typically use when sending back a form with validation errors in it. In this case, I want HTMX to swap the returned content into the target element as normal. Luckily, you can use the HTMX responseHandling setting to configure different behavior for different responses codes. I normally configure this so that: For 204 No Content responses, no action is taken and no changes are made to the DOM. For 422 Unprocessable Content responses, HTMX swaps the response content into the target as normal. For all other 4xx and 5xx responses, HTMX swaps the returned content into the <body> element. For any other response, HTMX swaps the response content into the target as normal. And just like before, I normally configure this via the HTMX configuration meta tag like so: File: assets/html/base.tmpl {{define "base"}} <!doctype html> <html lang='en'> <head> <meta charset='utf-8'> <title>{{template "page:title" .}}</title> <meta name="viewport" content="width=device-width, initial-scale=1"> <meta name="htmx-config" content='{ "historyRestoreAsHxRequest": false, "responseHandling":[ {"code":"204", "swap": false}, {"code":"422", "swap": true}, {"code":"[45]..", "swap": true, "target": "body"}, {"code":"...", "swap": true} ] }' > <link rel="stylesheet" href="/static/css/bamboo.min.css"> <script defer src="/static/js/htmx.min.js"></script> </head> <body> <h1><a href="/">Example website</a></h1> <main> {{template "page:content" .}} </main> </body> </html> {{end}} With that change made, if you restart the application and click the button again, you should now see the "Internal Server Error" message shown as a full-page response, like so: Note: If I ever want to swap an error message into a target that isn't the <body> element, then I use the response target extension to override the above settings for a specific interaction and swap into a specific target. But... I find that the above settings are a good starting default. Current browser URL Because HTMX makes AJAX requests and swaps in responses without changing the browser URL (unless you use the hx-boost, hx-push-url or hx-replace-url attributes), the request URL that we see in our Go handlers when accessing r.URL may be different to the one that the user is seeing in their browser. Occasionally, there are times when I want to know in my Go handler exactly what URL the user is currently seeing in their browser. Fortunately, HTMX sends this information with each request in the HX-Current-URL header. Usually I make another little function to help with this, which parses the HX-Current-URL value and returns it as a url.URL, falling back to returning r.URL if no HX-Current-URL header is present. Like so: func browserURL(r *http.Request) (*url.URL, error) { cu := r.Header.Get("HX-Current-URL") if cu != "" { return url.Parse(cu) } return r.URL, nil } Additional HTMX configuration Lastly, there are a few other HTMX configuration settings that I normally change from the default values. I tend to disable the HTMX cache completely by setting historyCacheSize to 0. Caching pages in local storage is a source of bugs and security issues, so I think it's simpler and better to just disable it completely. If you do this, no pages will be cached in local storage, and when the user clicks the back button HTMX will send a request to the server to refetch the HTML. It's worth noting that caching in local storage will also be disabled by default in future versions of HTMX for the same reasons. I prefer to disable HTMX attribute inheritance by setting disableInheritance to true. I think it's clearer and lowers the risk of bugs or unintended behavior when HTMX attributes are always declared explicitly. Again, it's worth noting that attribute inheritance will also be disabled by default in future versions of HTMX. I also disable HTMX indicator styles by setting includeIndicatorStyles to false. For consistency, I prefer not to have HTMX injecting styles, and would rather define any indicator styles alongside my other CSS rules. By default there is no timeout on HTMX requests, and they will wait as long as necessary for the server to respond. It's project-specific, and depends on how I'm handling timeouts and deadlines in my Go application, but sometimes I may also use the timeout setting to set a default timeout (in milliseconds) on the HTMX end. All in all, the starting point for my HTMX configuration settings normally looks like this: <meta name="htmx-config" content='{ "includeIndicatorStyles": false, "historyCacheSize": 0, "historyRestoreAsHxRequest": false, "responseHandling":[ {"code":"204", "swap": false}, {"code":"422", "swap": true}, {"code":"[45]..", "swap": true, "target": "body"}, {"code":"...", "swap": true} ], "timeout": 5000 }' > Page-specific layouts Let's finish up this post with a final note about HTML templates in larger applications. For some applications, having a base template along with page-specific templates might not be enough. You might also want 'layout' templates that sit between the base template and your page-specific content — for example, you might want to use a layout template for your admin-area pages that is different to the rest of your regular application pages. The patterns that we've talked about in this post can be extended fairly easily to accommodate this. For example, you can change the base template to insert a "layout" template in the body element instead of the page-specific content directly: {{define "base"}} <!doctype html> <html lang='en'> <head> <meta charset='utf-8'> <title>{{template "page:title" .}}</title> ... </head> <body> {{template "layout" .}} </body> </html> {{end}} Then you could create an assets/html/layouts/admin.tmpl file containing the common 'layout' markup for the admin pages: {{define "layout"}} <h1><a href="/">Admin area</a></h1> <nav> <a href="/admin/users">Users</a> <a href="/admin/orders">Orders</a> </nav> <main> {{template "page:content" .}} </main> {{end}} And then you can specify which layout template you want to use in your Go handlers as part of the call to render(). Like so: func (app *application) adminOrders(w http.ResponseWriter, r *http.Request) { err := app.html.render(w, 200, nil, "base", "layouts/admin.tmpl", "pages/admin-orders.tmpl") if err != nil { app.logger.Error(err.Error()) http.Error(w, http.StatusText(500), 500) } }
Alex Edwards Jul 14, 2026 -
Go often ships with experimental features as part of a release. These experimental features can take different forms: sometimes they're completely new packages in the standard library, sometimes they're changes to the compiler or runtime, or – very occasionally – they can be breaking changes to Go's behavior. Most of the time, the purpose of experimental features is to get real-world feedback from users before something graduates to general availability and becomes a permanent part of Go. If the feature causes regressions, or gets negative feedback from the community, it can be changed before it is finalized – or even abandoned entirely. Some examples Let's look at a few recent examples to illustrate the type of things that Go experiments can cover. Go 1.24 shipped with experimental support for a new testing/synctest package (which provides support for testing concurrent code). After feedback, the package API was adjusted slightly and it graduated to general availability in Go 1.25. Go 1.25 shipped with experimental support for a new garbage collector design with better performance. After incorporating feedback, the new garbage collector became the default in Go 1.26. Go 1.21 shipped with an experimental behavioral change to loop variable semantics. This change closed off a previously common bug with Go code, but was technically a breaking change to the language. Shipping the change as an experiment gave people a chance to test their code before the new behavior became the default in Go 1.22. Experiment lifecycle There isn’t a single fixed lifecycle for experiments, but there are some common patterns. Most experiments initially ship as off-by-default. You explicitly opt-in to try out the feature, usually by setting the GOEXPERIMENT environment value (which we'll talk about more in a moment). If things go well, one or two releases later the experimental feature is finalized, graduates to general availability, and becomes on-by-default. If an experiment affects the behavior of something, then after it graduates to general availability there is sometimes – but not always – a transitional grace period where it's possible to temporarily disable it and use the old behavior. For example, in Go 1.26 the new garbage collector design (which we briefly mentioned above) graduated to general availability and is on-by-default, but it's still possible to disable it and use the old garbage collector if you need to. So that's the most common pattern, but sometimes things take longer or work out differently. For example: Go 1.22 shipped with an experimental implementation of the compiler's inlining logic, which is still off-by-default and under evaluation more than two years later. The same release also shipped with a memory arenas experiment. After negative feedback and concerns from users, it remains off-by-default, is on indefinite hold, and may eventually be removed completely. Or finally, when the Go team is confident in a change, they might skip the feedback stage and go straight to general availability... but there may still be a transitional grace period where it's possible to disable it. A good example of this is when Go 1.24 changed its map implementation to use Swiss tables. The Go team was confident enough in the implementation and its performance benefits for this to go straight to general availability and become on-by-default, but – at least for now – it's still possible to opt out and use the old map implementation if you want to. So in practice there are really three broad experiment states: Off-by-default and under evaluation Off-by-default and on hold/dormant On-by-default with a temporary opt-out Permanent experiments Go also has a handful of experimental features that aren't really “experiments” in the normal sense. These are features that are off-by-default, but they're not under evaluation, not seeking feedback, and there's no expectation that they will ever graduate to general availability and become on-by-default. Although they are controlled by the GOEXPERIMENT environment setting in the same way as other experiments, really they are more like optional Go features that you might want to use in specialist situations. I'll refer to these as "permanent experiments" in the rest of this post. For example there is a field tracking diagnostic feature that tracks which struct fields are accessed. It's been available for a decade, and there's no intention for it to ever graduate to general availability. Or there is a static lock ranking feature, which is a diagnostic for finding potential deadlocks in the Go runtime. What experiments are available right now? It's surprisingly difficult to find out what experimental features are currently available and what their status is. Unfortunately, there isn't a page in the official Go documentation or Go Wiki that tracks experiment status, and for this post I've had to piece together the information from various places. If you want to do the same: You can get a list of all available experiments by running $ go doc goexperiment.Flags. You can figure out which experiments are on-by-default by reading the source code of src/internal/buildcfg/exp.go – specifically looking at the baseline variable declaration in the ParseGOEXPERIMENT() function. You can cross-reference the experiment names with the Go release notes and search through GitHub issues to try to figure out the current status. As far as I can tell, as of Go 1.26 here are the available permanent experiments: Experiment name Description Status FieldTrack Diagnostic to track which struct fields are accessed Off-by-default and permanent fixture StaticLockRanking Diagnostic to validate lock acquisition order to catch deadlocks Off-by-default and permanent fixture CgoCheck2 Diagnostic to check cgo pointer passing rules; too expensive to run by default Off-by-default and permanent fixture BoringCrypto Replaces Go's crypto with FIPS-validated BoringSSL; no longer relevant since Go 1.24 Off-by-default and permanent fixture but will be removed soon PreemptibleLoops Allows scheduler to preempt goroutines at loop back-edges; generally not relevant since Go 1.14, but still may be useful on platforms where preemption is otherwise unsupported Off-by-default and permanent fixture Here are the current off-by-default experiments and their status: Experiment name Description Status HeapMinimum512KiB Reduces minimum heap size from 4MB to 512KiB; may be useful for constrained environments Off-by-default and likely dormant Arenas Memory arena implementation Off-by-default and on hold following negative feedback NewInliner Rewritten compiler inliner with better call-site heuristics Off-by-default and under evaluation (available since Go 1.22) JSONv2 New encoding/json/v2 package with improved JSON encoding/decoding functions Off-by-default and under evaluation (available since Go 1.25) RuntimeSecret New runtime/secret package with functions for zeroing out memory; available on Linux amd64/arm64 only Off-by-default and under evaluation (available since Go 1.26) GoroutineLeakProfile Adds a goroutineleak pprof profile type Off-by-default and under evaluation (available since Go 1.26) SIMD New simd/archsimd package providing access to architecture-specific SIMD operations; only available on amd64 Off-by-default and under evaluation (available since Go 1.26) RuntimeFreegc Allows immediate reuse of memory without waiting for a GC cycle when safe to do so Off-by-default and under evaluation (available since Go 1.26, but see #74299 for status information) SizeSpecializedMalloc Enables malloc implementations that are specialized per size class Off-by-default and under evaluation (available since Go 1.26, but see #74299 for status information) And here are the currently on-by-default experiments: Experiment name Description Status LoopVar Per-iteration loop variable scoping On-by-default since Go 1.22, but opt-out kept for edge cases Dwarf5 DWARF 5 debug info generation; reduces binary size On-by-default with a temporary opt-out (opt-out may be removed in a future release) RandomizedHeapBase64 Randomizes the heap base address at startup as a security measure On-by-default with a temporary opt-out (opt-out expected to be removed in a future release) GreenTeaGC New garbage collector with improved performance; unavailable on darwin/ios/aix On-by-default with a temporary opt-out (opt-out expected to be removed in Go 1.27) RegabiWrappers ABI wrappers for calling between ABI0 and ABIInternal functions; only available on 64-bit architectures On-by-default with a temporary opt-out, but opt-out is effective for s390x only, and will be removed in Go 1.27 RegabiArgs Enables register arguments/results in all compiled Go functions; only available on 64-bit architectures On-by-default with a temporary opt-out, but opt-out is effective for s390x only, and will be removed in Go 1.27 How do you enable and disable experiments? Experiments are controlled using the GOEXPERIMENT environment setting. If there are some off-by-default experiments you want to try, you should include the experiment names as comma-separated lowercase values in GOEXPERIMENT. For example, if you wanted to build your application with the JSONv2 and GoroutineLeakProfile experiments enabled, you would do so like this: $ GOEXPERIMENT=jsonv2,goroutineleakprofile go build ./... If there is an on-by-default experiment that you want to turn off, you do so by prefixing the lowercase experiment name with no. For example, if you want to build your application with the GreenTeaGC and RandomizedHeapBase64 experiments turned off, you would do so like this: $ GOEXPERIMENT=nogreenteagc,norandomizedheapbase64 go build ./... It's totally fine to mix enabled and disabled experiments: $ GOEXPERIMENT=jsonv2,nogreenteagc go build ./... Note that if you build the same package with different GOEXPERIMENT values, Go treats them as different builds and stores separate entries in the build cache. I've used go build in the examples above, but you can use exactly the same pattern when using go run or go test too. If you want to try it yourself, try creating the following program which uses the experimental encoding/json/v2 package: package main import ( "encoding/json/v2" "fmt" ) type Person struct { Name string `json:"name"` Age int `json:"age"` City string `json:"city"` } func main() { p := Person{Name: "Ada", Age: 36, City: "Vienna"} data, _ := json.Marshal(p, json.StringifyNumbers(true)) fmt.Println(string(data)) } If you run this normally, the program won't compile and you'll get an error message similar to this: $ go run main.go package command-line-arguments imports encoding/json/v2: build constraints exclude all Go files in /usr/local/go/src/encoding/json/v2 But if you enable the JSONv2 experiment, the program will run as expected: $ GOEXPERIMENT=jsonv2 go run main.go {"name":"Ada","age":"36","city":"Vienna"} Which experiments should you actually care about? If you're a run-of-the-mill Gopher like me, who mainly uses Go to write programs rather than working on Go itself, most of the available experiments probably won't be very relevant to you. The most interesting and relevant ones probably are: GreenTeaGC – If you're using Go 1.26, you're already using this by default. But if you notice any performance or behavior problems, it's worth being aware that you can still disable it (and you should also file an issue). Dwarf5 – Again, if you're using Go 1.25 or later then you're already using this by default. But if you run into any problems, it's useful to know that you can still disable it. JSONv2 – I don't recommend switching to this until it graduates to general availability, but if you write a lot of code that deals with JSON, it's worth experimenting with the new encoding/json/v2 package, familiarizing yourself with what's coming, and giving feedback if you notice any problems. GoroutineLeakProfile – This one is immediately useful and worth enabling if you suspect you have a goroutine leak and need to debug it. RuntimeSecret – Worth experimenting with and giving feedback on if you write cryptographic code or need to handle sensitive data. RuntimeFreegc – If you have an application that leans heavily on the garbage collector, it may be worth benchmarking your code with this enabled to see if it improves performance, and giving feedback if you notice any issues. Finally, it's worth emphasizing that experimental features are not covered by the Go compatibility promise. Their APIs, behavior, and performance characteristics may all change, so it's generally a good idea to avoid adopting too early and depending on experimental features before they are finalized. But experimental features often act as a preview to some of the biggest changes in Go. If you know that an experiment is likely to affect you or your code once it eventually becomes generally available and on-by-default, it's a good idea to try it out, run benchmarks where appropriate, and give feedback if you find issues. If you want to keep track of what experiments are available and their status, the Go release notes have recently started doing a much better job of documenting experimental features and how to use them. Between this blog post and browsing the release notes when there's a new Go release, you should have a decent idea of what's going on.
Alex Edwards Jun 1, 2026 -
Choosing the right names in your codebase is an important (and sometimes difficult!) part of programming in Go. It's a small thing that makes a big difference — good names make your code clearer, more predictable, and easier to navigate; bad names do the opposite. Go has fairly strong conventions — and a few hard rules — for naming things. In this post we're going to explain these rules and conventions, provide some practical tips, and demonstrate some examples of good and bad names in Go. If you're new to the language, all this information might feel like a lot to take in, but it'll quickly become second nature with a bit of practice 😊 Identifiers Let's start with the hard rules for identifiers. By identifiers, I mean the names that you use for the variables, constants, types, functions, parameters, struct fields, methods and receivers in your code. Identifiers can contain unicode letters, digits, and underscores only. Identifiers cannot begin with a digit. You cannot use any of the following Go keywords as identifiers: break default func interface select case defer go map struct chan else goto package switch const fallthrough if range type continue for import return var So long as you stick to those three rules, any identifier name is technically valid and your code will compile all OK. But there are a bunch of other guidelines that it's good practice to follow: You should use camelCase for unexported identifiers, or PascalCase for exported identifiers. Don't use alternative casing variants like snake_case, Pascal_Snake_Case, SCREAMING_SNAKE_CASE or ALLUPPERCASE. Words that are acronyms or initialisms (like API, URL or HTTP) should use a consistent case within the identifier. So, for example, apiKey or APIKey is good, but ApiKey is not. This rule also applies to ID when it is used as shorthand for the words "identity" or "identifier" — so that means write userID rather than userId. Although all unicode letters are allowed, using non-ASCII letters can often make your code harder to read and more awkward to write, and it's rare to see them used. Unless you have a really appropriate use-case, you should stick to using ASCII letters in identifiers. For example, use pi instead of π, use beta instead of β, use naiveBayes instead of naïveBayes. To prevent confusion for readers and potential bugs, avoid choosing identifiers that clash with Go's builtin types. So, for example, don't create variables with names like int, bool or any. Similarly, avoid creating functions with names that clash with Go's builtin functions. So, for example, don't create functions with names like min, max, len or clear. Generally, avoid including the type in identifiers — for example, don't use names like fullNameString, scoreInt or float64Amount. The main exception to this is when you have to convert a variable to a different type, and you want to distinguish between the original variable and the one containing the converted value. In this situation, including the type in the identifier is a common and acceptable way to distinguish between the two. For example, code like this is OK: userID := 42 userIDStr := strconv.Itoa(userID) Where possible, try to avoid choosing identifiers that clash with the standard library package names. This is a 'softer' convention than the others because the standard library steals a lot of good identifier names — such as json, js, mail, user, csv, path, filepath, log, regexp, time and url — and sometimes it can be hard to come up with decent alternatives. However, you definitely should avoid creating identifiers that clash with the package names that your code is actually importing and using. So, for example, if you are writing code that imports the url and net/mail packages, then don't use the words url and mail as identifiers in that code. Here are a few examples of good and bad identifier names: Bad Reason Better order.total := 99.99func load-user() Punctuation not allowed orderTotal := 99.99func loadUser() const 3rdParty = "x"func 2FactorAuth() Cannot start with a digit const thirdParty = "x"func twoFactorAuth() max_value := 10func Fetch_user() Non-standard casing maxValue := 10func FetchUser() type HttpClient struct{}func parseXml() Inconsistent acronym casing type HTTPClient struct{}func parseXML() func GetSessionId()type OrderId string ID should be all caps func GetSessionID()type OrderID string résuméCount := 2const Σ = 100 Non-ASCII letters resumeCount := 2const sum = 100 func clear()int := cache.Internal() Clashes with builtin types or functions func clearQueue()data := cache.Internal() intCount := 42resultSlice := []int{} Type included in name count := 42results := []int{} type json struct{}var log = newLogger() Clashes with stdlib package names type payload struct{}var logger = newLogger() Exported and unexported identifiers Identifiers in Go are case-sensitive. For example, the identifiers apiKey, apikey and APIKey are all different. As you probably already know, when an identifier starts with a capital letter it is exported — that is, it's visible to code outside of the package it's declared in. This means that the casing of the first letter is significant. It impacts the behavior of your codebase. In turn, this means that you shouldn't start identifiers with a capital letter just because they look nice — you should only start them with a capital letter if you want them to be exported and accessible to code outside the package they are declared in. As a tip, try to write packages using unexported identifiers by default. Only export them when you actually have a need to. Typically, the less you export, the easier it is to refactor code within a package without affecting other parts of your codebase. There's a nice quote from The Pragmatic Programmer, which I'll adapt slightly for the Go nomenclature: Write shy code - packages that don't reveal anything unnecessary to other packages and don't rely on other packages' implementations. As a second tip, it's very rare for a main package to be imported by anything, so the identifiers in it should normally all be unexported and start with a lowercase letter. The most frequent exception to this is when you need to export a struct field so that it's visible to packages that use reflection to work, like encoding/json, encoding/gob or github.com/jmoiron/sqlx. Identifier length and descriptiveness In general, the further away that an identifier is used from where it is declared, the more descriptive the name should be. If you have an identifier which is narrow in scope and only used close to where it is declared, it's generally OK to use a short and not-very-descriptive name. For example, if you're naming something that is only used in a small for loop, range block, or very short function, then using short or even single letter names is very common in Go. But it you're naming something that has a larger scope, or is used far away from where it is declared, you should use a name that clearly describes what the thing represents. Here is a nice example that Dave Cheney gave as part of his Practical Go presentation: type Person struct { Name string Age int } func AverageAge(people []Person) int { if len(people) == 0 { return 0 } var count, sum int for _, p := range people { sum += p.Age count += 1 } return sum / count } In this code, within the short range block we use the identifier p to represent a value in the people slice — the range block is so small and tight that using a single letter name is clear enough. In contrast, the count and sum variables are declared, then used inside the range, then again in the return statement. Giving them more descriptive names makes it immediately clearer what the code is doing and what they represent, compared to single letter names like c and s. But these variables are only ever used inside the AverageAge function, so giving them even-more-descriptive names like peopleCount and agesSum would be unnecessarily verbose. It's not an exact science, but when writing Go code you are encouraged to use the right length identifier — sometimes that might be long and descriptive, sometimes it might be short and terse. Naming packages The hard rules for package names are the same as for identifiers: they can contain unicode letters, numbers and underscores, must not begin with a number, and must not be a Go keyword. But in practice, the conventions for naming a package are much tighter. Conventionally: Package names should contain lower case ASCII letters and numbers only. Because package names will need to be typed out a lot when writing code, the name should ideally be short, easy to type, and reflect the contents of the package. Often simple one-word nouns (like orders, customer and slug) work well. If you want to use more than one word in the package name, you should concatenate the words all in lowercase with no separator. So, for example, ordermanager is a good package name — orderManager or order_manager are not. If a package name feels too long, it can be OK to use abbreviations in the name. You can see this in some of the standard library package names, like expvar (instead of exportedvariables) and strconv (instead of stringconversion). To prevent conflicts and confusion, try to avoid using the same name as commonly-used standard library packages. Package names with the prefix . or _ are 'invisible' to Go and completely ignored when you run go build, go run, go test etc. So don't start your package name with these characters, unless you specifically want them to be ignored. Directories with the names vendor, testdata and internal have a special meaning in Go, so to avoid any confusion or bugs, don't use these words as package names. Avoid using 'catch all' package names like common, util, helpers, types or interfaces, which don't really give any clue to what the package contains. For example, does a package called helpers contain validation helpers, formatting helpers, SQL helpers? A mix of all the above? You can't guess from just the name alone. As well as not being clear, these kind of 'catch all' names provide little natural boundary or scope, which can lead to the package becoming a dumping ground for lots of different things. In turn the package may become imported and used throughout your codebase — which increases the risk of import cycles and means that changes to the package potentially affect the whole codebase, rather than just a specific part of it. In other words, catch all package names encourage creating packages which have a large 'blast radius'. If you find yourself wanting to create a utils or helpers package, ask yourself if you can break up the contents into smaller packages with a specific focus and clearer names instead. Bad Reason Better package 3rdpartypackage 2fa Cannot start with a digit package thirdpartypackage twofa package OrderManagerpackage order_manager Non-standard casing / separators package ordermanager package opackage stuff Too vague and not descriptive package orderspackage slug package ordermanagementsystem Too long / hard to type package orderspackage ordermgr package urlpackage mail Clashes with stdlib package names package linkspackage mailer package _cachepackage .hidden Ignored by Go tooling package cachepackage hidden package internalpackage vendorpackage testdata Special directory names in Go package internalauthpackage supplier package utilspackage helpers Catch-all names with unclear scope package validationpackage formatting Naming files In an ideal world, a .go filename should summarize what the file contains, be one word long, and all in lowercase. Some examples of good filenames from the standard library net/http package are cookie.go, server.go and status.go. If you can't think of a good one-word name, and want to use two or more words, there is no clear convention for how those words should be separated. Even in the Go standard library itself there isn't consistency. Sometimes underscores are used to separate the words in filenames (like routing_index.go and routing_tree.go), and other times they are concatenated with nothing between them (like batchcursor.go, textreader.go and reverseproxy.go). Because there isn't a strong convention around this, I recommend just picking one of these two approaches and sticking to it consistently within a codebase. Personally, I think it's better to concatenate words with nothing between them (like routingindex.go), and reserve the underscore character for only when you want to use a special filename suffix. Talking of which, there are some filename prefixes and suffixes that have a special meaning in Go. You should avoid using these in your filenames unless you want to trigger the special behavior. Specifically: Like packages, filenames with the prefix . or _ are 'invisible' to the Go tooling and completely ignored when you run go build, go run, go test etc. Files with the suffix _test.go are only run by the go test tool. They are ignored when using go run or go build. Files with any of the following suffixes will only be included when compiling for that specific operating system: _aix.go, _android.go, _darwin.go, _dragonfly.go, _freebsd.go, _illumos.go, _ios.go, _js.go, _linux.go, _netbsd.go, _openbsd.go, _plan9.go, _solaris.go, _wasip1.go, _windows.go. Similarly, files with any of the following suffixes will only be included when compiling for that specific architecture: _386.go, _amd64.go, _arm.go, _arm64.go, _loong64.go, _mips.go, _mips64.go, _mips64le.go, _mipsle.go, _ppc64.go, _ppc64le.go, _riscv64.go, _s390x.go, _wasm.go. Avoiding chatter When you are naming exported functions, try to avoid repeating the name of the package they are declared in. For example, if you have a package called customer, then function names like NewCustomer() or CustomerOrders() would be 'chattery' and unnecessarily repeat the word 'customer' when you call them from outside the package — like customer.NewCustomer() and customer.CustomerOrders(). Calling the functions New() and Orders() is sufficient and reads better at the call site — like customer.New() and customer.Orders(). The same advice also applies to exported types. For example, if you want to represent an address or phone number in a customer package, it's sufficient and less chattery to name the types Address and PhoneNumber rather than CustomerAddress and CustomerPhoneNumber. Bad Reason Better customer.NewCustomer()customer.CustomerOrders() Chattery function call customer.New()customer.Orders() customer.CustomerAddresscustomer.CustomerPhoneNumber Chattery type reference customer.Addresscustomer.PhoneNumber Note: It's common to want to declare an exported type that shares the same name as the package. For example, a customer package might export a Customer type that represents an individual customer. We would then reference this type in other packages by writing customers.Customer. This is obviously chattery, but it's hard to avoid this repetition without giving either the package or type a name that makes it less clear. So in practice, this is something that you'll see a lot. For example, in the standard library the time package has a Time type, which you reference by typing time.Time, the context package contains a Context type which you reference by typing context.Context, and the regexp package contains a Regexp type which you reference by typing regexp.Regexp. Similar to function and type names, method names should ideally not 'chatter' too much when calling them. For example, if you are writing methods on a Token type, for example, it's probably OK to call a method Validate() rather than ValidateToken(), or IsExpired() rather than IsTokenExpired(). Method receivers When you are creating methods, it is conventional for the method receiver to have a short name, normally between 1 and 3 characters long and often an abbreviation of the type that the method is implemented on. For example, if you are implementing a method on a Customer type, an idiomatic receiver name would be something like c or cus. Or if you were implementing a method on a HighScore type, a good receiver name would be hs. The Go code review comments advise against using generic names like this, self or me for the receiver. Also, you should be consistent with the receiver name. All methods on the same type should use the same receiver name — don't use c for one method and cus for another. type Order struct { Items int } // Good: uses a short receiver func (o *Order) Validate() bool { return o.Items > 0 } // Bad: uses a longer receiver name func (order *Order) Validate() bool { return order.Items > 0 } // Bad: uses a generic receiver name func (self *Order) Validate() bool { return self.Items > 0 } Getter and setter methods on structs Typically, it is not necessary to create 'getter' and 'setter' methods on struct types in Go. Instead, you just access the struct field directly to read or change the data. The major exception to this is when you have a struct with an unexported field, but want to provide a way to get or set the field value from outside the package. To do this, you need to create exported 'getter' and 'setter' methods that read and write to the unexported field. When doing this, it is conventional to prefix the setter method name with Set, but not prefix the getter method name with Get. Like so: type Customer struct { address string } func (c *Customer) Address() string { return c.address } func (c *Customer) SetAddress(addr string) { c.address = addr } Interfaces By convention, interfaces that only contain one method should be named by the method name plus an '-er' suffix or similar. For example: type Speaker interface { Speak() string } type Authorizer interface { Authorize(ctx context.Context, action string) error } type Authenticator interface { Authenticate(ctx context.Context) (User, error) } The Go standard library has quite a few examples of interfaces that follow this convention, such as io.Reader, io.Writer and fmt.Stringer. Also note that the guidance to avoid including the type in the name still applies to interfaces. Don't give your interfaces names like UserInterface or OrderInterface unless you really can't think of a decent alternative. Breaking from conventions There are rare occasions when breaking a convention can actually make your code clearer — and in my view, it can be OK to do that... especially if it's in a private codebase worked on by a small team. For example, a couple of years ago I was working on a Go program that synchronizes data between some other external systems. In this project, I ended up breaking some of the Go naming conventions around casing and separators — instead using exactly the same identifiers that the external systems used. This actually made the intent of the program clearer, and more immediately obvious what was being synchronized with what. But the vast majority of the time, you should endeavour to follow the naming rules and conventions we've discussed in this post. They exist for good reasons: they make your code more predictable and consistent, easier for other Gophers to quickly understand, and reduce the risk of certain bugs.
Alex Edwards Mar 24, 2026 -
Go 1.25 introduced a new http.CrossOriginProtection middleware to the standard library — and it got me wondering: Have we finally reached the point where CSRF attacks can be prevented without relying on a token-based check (like double-submit cookies)? Can we build secure web applications without bringing in third-party packages like justinas/nosurf or gorilla/csrf? And I think the answer now may be a cautious “yes” — so long as a few important conditions are met. If you want to skip the explanations and just want to see what those conditions are, you can click here. The http.CrossOriginProtection middleware The new http.CrossOriginProtection middleware works by checking the values in a request's Sec-Fetch-Site and Origin headers to determine where the request is coming from. It will automatically reject any non-safe requests that are not from the same origin, and will send the client a 403 Forbidden response. The http.CrossOriginProtection middleware has some limitations, which we'll discuss in a moment, but it is robust and simple to use, and a great addition to the standard library. How it works Modern browsers automatically include the Sec-Fetch-Site header in requests. This header indicates the relationship between the origin of the page making the request, and the origin of the page being requested. Two pages are considered to have the same origin if their scheme, hostname and port (if present) exactly match, in which case the browser will include a Sec-Fetch-Site: same-origin header in the request. If the two pages don't have the same origin, the Sec-Fetch-Site header will be set to a different value to indicate this, and http.CrossOriginProtection will reject the request. If no Sec-Fetch-Site header is present, http.CrossOriginProtection will fall back to checking the Origin header. Specifically, it will compare the request's Origin header and Host header to see if they match. If they don't match, then it considers the request to not be from the same origin and it will reject it. If neither the Sec-Fetch-Site nor Origin headers are present, then it assumes the request is not coming from web browser and will always allow the request to proceed. The checks described above only take place on requests with non-safe methods (POST, PUT, etc.). Requests with safe HTTP methods (GET, OPTIONS, etc.) are always allowed to proceed. If you're interested in learning more about the design and decision making behind http.CrossOriginProtection, the original proposal by Filippo Valsorda is an excellent read. At its simplest, you can use it like this: File: main.go package main import ( "fmt" "log/slog" "net/http" "os" ) func main() { mux := http.NewServeMux() mux.HandleFunc("/", home) slog.Info("starting server on :4000") // Wrap the mux with the http.NewCrossOriginProtection middleware. err := http.ListenAndServe(":4000", http.NewCrossOriginProtection().Handler(mux)) if err != nil { slog.Error(err.Error()) os.Exit(1) } } func home(w http.ResponseWriter, r *http.Request) { fmt.Fprint(w, "Hello!") } If you want, it's also possible to configure the behavior of http.CrossOriginProtection. Configuration options include being able to add trusted origins (from which cross-origin requests are allowed), and the ability to use a custom handler for rejected requests instead of the default 403 Forbidden response. When I've wanted to customize the behavior, I've been using a pattern like this: File: main.go package main import ( "fmt" "log/slog" "net/http" "os" ) func main() { mux := http.NewServeMux() mux.HandleFunc("/", home) slog.Info("starting server on :4000") err := http.ListenAndServe(":4000", preventCSRF(mux)) if err != nil { slog.Error(err.Error()) os.Exit(1) } } func preventCSRF(next http.Handler) http.Handler { cop := http.NewCrossOriginProtection() cop.AddTrustedOrigin("https://foo.example.com") cop.SetDenyHandler(http.HandlerFunc(func(w http.ResponseWriter, r *http.Request) { w.WriteHeader(http.StatusBadRequest) w.Write([]byte("CSRF check failed")) })) return cop.Handler(next) } func home(w http.ResponseWriter, r *http.Request) { fmt.Fprint(w, "Hello!") } Limitations The big limitation of http.CrossOriginProtection is that it is only effective at blocking requests from modern browsers. Your application will still be vulnerable to CSRF attacks coming from older (generally pre-2020) browsers which do not include at least one of the Sec-Fetch-Site or Origin headers in requests. Right now, browser support for the Sec-Fetch-Site header is at 92%, and for Origin it is 95%. So — in general — relying on http.CrossOriginProtection is not sufficient as your only protection against CSRF. It's also important to note that the Sec-Fetch-Site header is only sent when your application has a "trustworthy origin" — which basically means that your application needs to be using HTTPS in production (or localhost in development) for http.CrossOriginProtection to work to its full potential. And you should also be aware that when no Sec-Fetch-Site header is present in a request, and it falls back to comparing the Origin and Host headers, the Host header does not include the scheme. This limitation means that http.CrossOriginProtection will wrongly allow cross-origin requests from http://{host} to https://{host} when there is no Sec-Fetch-Site header present but there is an Origin header. To mitigate this risk, you should ideally configure your application to use HTTP Strict Transport Security (HSTS). Enforcing TLS 1.3 Looking into this got me wondering... What if you're already planning to use HTTPS and enforce TLS 1.3 as the minimum supported TLS version? Could you be confident that all web browsers which support TLS 1.3 also support either the Sec-Fetch-Site or Origin headers? As far as I can tell from the MDN compatibility data and tables from Can I Use, the answer is "yes" for (almost) all major browsers. If you enforce TLS 1.3 as the minimum version: Older browsers which don't support TLS 1.3 simply won't be able to connect to your application. For the modern major browsers that do support TLS 1.3 and can connect, you can be confident that at least one of the Sec-Fetch-Site or Origin headers are supported — and therefore http.CrossOriginProtection will work effectively. The only exception to this I can see is Firefox v60-69 (2018-2019), which did not support the Sec-Fetch-Site header and did not send the Origin header for POST requests. This means that http.CrossOriginProtection will not work effectively to block requests originating from that browser. Can I Use puts usage of Firefox v60-69 at 0%, so the risk here appears very low — but there are probably some computers somewhere in the world still running it. Also, we only have this information for the major browsers — Chrome/Chromium, Firefox, Edge, Safari, Opera and Internet Explorer. But of course, other browsers exist. Most of them are forks of Chromium or Firefox and therefore will likely be OK, but there's no guarantee here and it is hard to quantify the risk. So if you use HTTPS and enforce TLS 1.3, it's a huge step forward in making sure that http.CrossOriginProtection can work effectively. However, there remains a non-zero risk that comes from Firefox v60-69 and non-major browsers, so you may want to add some defense-in-depth and utilize SameSite cookies too. We'll talk more about SameSite cookies in a moment, but first we need to take a quick detour and discuss the difference between the terms origin and site. Cross-site vs cross-origin In the world of web specifications and web browsers, cross-site and cross-origin are subtly different things, and in a security context like this it's important to understand the difference and be exact about what we mean. I'll quickly explain. Two websites have the same origin if they share the exact same scheme, hostname, and port (if present). So https://example.com and https://www.example.com are not the same origin because the hostnames (example.com and www.example.com) are different. A request between them would be cross-origin. Two websites are 'same site' if they share the same scheme and registerable domain. Note: The registerable domain is the part of the hostname just before (and including) the effective TLD. Here are a few examples: For https://www.google.com/ the TLD is com and the registerable domain is google.com. For https://login.mail.ucla.edu the TLD is edu and the registerable domain is ucla.edu. For https://www.gov.uk, the TLD is gov.uk and the registerable domain is www.gov.uk. You can find the complete list of effective TLDs here. So https://example.com, https://www.example.com and https://login.admin.example.com are all considered to be the same site because the scheme (https) and registerable domain (example.com) are the same. A request between these would not be considered to be cross-site, but it would be cross-origin. Note: Some browser versions use a different definition of same-site which doesn't require the same scheme, only the same registrable domain. For these browser versions, https://admin.example.com and http://blog.example.com would also be considered same-site. Nowadays, this is typically referred to as schemaless same-site, but in historical versions or documentation it may have just been called same-site. So what are the points that I'm building up to here? Go's http.CrossOriginProtection middleware is accurately and appropriately named. It blocks cross-origin requests. It's more strict than it would be if it only blocked cross-site requests, because it also blocks requests from other origins under the same site (i.e. registrable domain). This is useful because it helps to prevent a situation where your janky-not-been-updated-in-the-last-decade WordPress blog at https://blog.example.com is compromised and used to launch a request forgery attack at your important https://admin.example.com website. When most people — myself included — casually talk about "CSRF attacks", what we are referring to most of the time is actually cross-origin request forgery, not just cross-site request forgery. It's a shame that CSRF is the commonly used and known acronym to describe this family of attacks, because most of the time CORF would be more accurate and appropriate. But hey! That's the messy world we live in. For the rest of this post though, I'll use the term CORF instead of CSRF when that is exactly what I mean. SameSite cookies The SameSite cookie attribute has generally been supported by web browsers since 2017, and by Go since v1.11. If you set the SameSite=Lax or SameSite=Strict attributes on a cookie, that cookie will only be included in requests to the same site that set it. In turn, that prevents cross-site request forgery attacks (but not cross-origin attacks from within the same site). There is some good news here — all major browsers that support TLS 1.3 also fully support SameSite cookies, with no exceptions that I can see. So if you enforce TLS 1.3, you can be confident that all the major browsers using your application will respect the SameSite attribute. This means that by using SameSite=Lax or SameSite=Strict on your cookies, you cover off the risk of cross-site request forgeries from Firefox v60-69 that we talked about earlier. Putting it all together If you combine using HTTPS, enforcing TLS 1.3 as the minimum version, using SameSite=Lax or SameSite=Strict cookies appropriately, and using the http.CrossOriginProtection middleware in your application, as far as I can see there are only two unmitigated CSRF/CORF risks from major browsers: CORF attacks from within the same site (i.e. from another subdomain under your registrable domain) in Firefox v60-69. CORF attacks from a HTTP version of your origin, from browsers that do not support the Sec-Fetch-Site header. For the first of these risks, if you don't have any other websites under your registrable domain, or you're confident that the websites are secure and uncompromised, then this might be a risk that you're willing to accept given the extremely low usage of Firefox v60-69. For the second, if you don't support HTTP on your origin at all (including redirects) then this isn't something you need to worry about. Otherwise, you can mitigate the risk by including a HSTS header on your HTTPS responses. At the start of this article, I said that not using a token-based CSRF check might be OK under certain conditions. So let's run through what those are: Your application uses HTTPS and enforces TLS 1.3 as the minimum version. You accept that users with older browsers will not be able to connect to your application at all. You follow good-practice and never change important application state in response to requests with the safe methods GET, HEAD, OPTIONS or TRACE. You use both the http.CrossOriginProtection middleware and SameSite=Lax or SameSite=Strict cookies. It's important to still use SameSite cookies for general defense in depth, but more specifically to mitigate CSRF attacks from Firefox v60-69. Because of the unprotected risk of a same-site CORF attack from Firefox v60-69, you either don't have any other websites under your registrable domain, or you're confident that they're secure and uncompromised. There is either no HTTP version of your application origin at all, or you include a HSTS header on your HTTPS responses. Finally, you are willing to accept the difficult-to-quantify risk of CSRF/CORF attacks from non-major browsers that support TLS 1.3 but don't support the Origin header, Sec-Fetch-Site header or SameSite cookies. Does any such browser exist? I don't know, and I'm not sure there's a way to answer that question with 100% confidence. So you'll need to do your own risk assessment here, and it's a risk that you probably only want to accept if your application is a low-value target and the impact of a successful CSRF/CORF attack is both isolated and minor.
Alex Edwards Oct 14, 2025 -
A few weeks ago Anton Zhiyanov published the blog post Expressive tests without testify/assert. It's a good and well thought-out post, and I recommend giving it a read if you haven't already. In the post, Anton makes the argument for not using packages like testify/assert for your test assertions, and instead creating your own minimal set of assertion helpers to use in your tests. In fact, so minimal that there are only 3 helpers he uses: AssertEqual, AssertErr and AssertTrue. There are some people who would argue that even this is too much, and that you shouldn't use assertion functions in your tests at all. In fact, the Go Code Review Comments for Tests states that using assert packages should be avoided, which we'll talk about in more detail at the end of this post. But I agree with the general direction of Anton's thinking. I do use assertion functions — and I've always preferred to write my own rather than using a third-party package. Over time I've whittled them down to a standard collection of nine basic functions that I use: Assertion What it checks Equal(got, want) Checks that got and want are equal NotEqual(got, want) Checks that got and want are not equal True(got) Checks that got is true False(got) Checks that got is false Nil(got) Checks that got is nil NotNil(got) Checks that got is not nil ErrorIs(got, want) Checks that got is an error that wraps or equals want ErrorAs(got, target) Checks that got is an error that can be assigned to target via errors.As MatchesRegexp(got, pattern) Checks that got matches the regex pattern Between these nine functions, I'm able to easily do the vast majority of the checks that I want in my tests. Here are some examples from a web application that I'm currently working on: assert.Equal(t, w.StatusCode, http.StatusTeapot) assert.Equal(t, w.Header().Get("X-Custom-Header"), "custom-value") assert.NotEqual(t, updatedSession.token, originalSession.token) assert.True(t, defaultShutdownPeriod > defaultWriteTimeout) assert.True(t, strings.Contains(buf.String(), "level=ERROR")) assert.False(t, strings.Contains(string(decodedCookieValue), "this is a test value")) assert.Nil(t, err) assert.ErrorIs(t, err, sql.ErrNoRows) assert.MatchesRegexp(t, user.HashedPassword, `^\$2a\$12\$[./0-9A-Za-z]{53}$`) From the perspective of someone reading the code, I think it's quite easy to understand what these assertions are checking — even if you've never seen them before. And this might be personal preference, but when writing tests I actually prefer having only a small number of basic assertion functions to remember and pick from, rather than lots of very specific ones. If there is a complex check, which can't be done in a single line as part of the function call, I normally create an additional function and use it in conjunction with the True or False assertions. For example, when testing a web application, I will sometimes want to check if an HTML response body contains a specific HTML node (based on a CSS selector), so I will make a containsHTMLNode() function and then use it in my tests like this: assert.True(t, containsHTMLNode(t, res.Body, `meta[name="page"][content="home"]`)) assert.True(t, containsHTMLNode(t, res.Body, `form[method="POST"][action="/login"]`)) In theory, these assertion helpers could be reduced further. For example, the Nil(got) and NotNil(got) functions could be dropped in favour of using Equal(got, nil) and NotEqual(got, nil). Or MatchesRegexp(got, pattern) could be dropped in favour of using True() to check that a got value matches a specific regexp pattern. But these are checks I use often enough that I like having a specific assertion function for them. Go back to Anton's post for a moment, he effectively combines the assert.Nil(), assert.NotNil(), assert.ErrorIs() and assert.ErrorAs() functions that I have into a single AssertErr() function. The exact kind of check that is carried out by AssertErr() depends on what arguments you pass, or don't pass, to it. However, I prefer assertion functions to be responsible for checking one specific thing. I think it's less prone to mistakes, as well as clearer for a reader exactly what is being checked. Overall, I'm happy to have a few more assertion functions in exchange for some extra convenience, clarity and precision. Here's the complete code that I'm currently using for those functions: package assert import ( "errors" "reflect" "regexp" "testing" ) func Equal[T any](t *testing.T, got, want T) { t.Helper() if !isEqual(got, want) { t.Errorf("got: %v; want: %v", got, want) } } func NotEqual[T any](t *testing.T, got, want T) { t.Helper() if isEqual(got, want) { t.Errorf("got: %v; expected values to be different", got) } } func True(t *testing.T, got bool) { t.Helper() if !got { t.Errorf("got: false; want: true") } } func False(t *testing.T, got bool) { t.Helper() if got { t.Errorf("got: true; want: false") } } func Nil(t *testing.T, got any) { t.Helper() if !isNil(got) { t.Errorf("got: %v; want: nil", got) } } func NotNil(t *testing.T, got any) { t.Helper() if isNil(got) { t.Errorf("got: nil; want: non-nil") } } func ErrorIs(t *testing.T, got, want error) { t.Helper() if !errors.Is(got, want) { t.Errorf("got: %v; want: %v", got, want) } } func ErrorAs(t *testing.T, got error, target any) { t.Helper() if got == nil { t.Errorf("got: nil; want assignable to: %T", target) return } if !errors.As(got, target) { t.Errorf("got: %v; want assignable to: %T", got, target) } } func MatchesRegexp(t *testing.T, got, pattern string) { t.Helper() matched, err := regexp.MatchString(pattern, got) if err != nil { t.Fatalf("unable to parse regexp pattern %s: %s", pattern, err.Error()) return } if !matched { t.Errorf("got: %q; want to match %q", got, pattern) } } func isEqual[T any](got, want T) bool { if isNil(got) && isNil(want) { return true } if equalable, ok := any(got).(interface{ Equal(T) bool }); ok { return equalable.Equal(want) } return reflect.DeepEqual(got, want) } func isNil(v any) bool { if v == nil { return true } rv := reflect.ValueOf(v) switch rv.Kind() { case reflect.Chan, reflect.Func, reflect.Interface, reflect.Map, reflect.Pointer, reflect.Slice: return rv.IsNil() } return false } Are assertion functions an anti-pattern? As I mentioned at the start of this post, the Go Wiki says that using assert packages should be avoided. It starts with this example of some 'bad' test code: assert.IsNotNil(t, "obj", obj) assert.StringEq(t, "obj.Type", obj.Type, "blogPost") assert.IntEq(t, "obj.Comments", obj.Comments, 2) assert.StringNotEq(t, "obj.Body", obj.Body, "") And suggests this as a 'good' alternative: if obj == nil || obj.Type != "blogPost" || obj.Comments != 2 || obj.Body == "" { t.Errorf("AddPost() = %+v", obj) } Let's quickly run through the arguments in the Go Wiki for these approaches being good and bad. [The bad code] either stops the test early (if assert calls t.Fatalf or panic) or omits interesting information about what the test got right There are packages out there (such as testify/require) that will stop a test early on the first assertion failure, and when they do you lose information about what subsequent checks would have passed. But not all of them do this, and if you make your own helpers for test assertions, you control what they do. You can call t.Errorf() to record the failure and continue the test if you want to. [The bad code] also forces the assert package to create a whole new sub-language instead of reusing the existing programming language (Go itself) I think this is a valid point and worth keeping in mind. Sometimes it can be frustrating to have to learn how a third-party package works, and to remember its API and syntax. And if the package is used in a project that lots of people work on, you're forcing all of them to spend the time to learn it. Sometimes it's easier to just read and write Go code that uses the standard library — even if it means you end up with more lines of code. But that said, I'm not sure that having a small number of basic assertion functions adds that much overhead... even for new people working on a codebase. Does having 3 assertion helpers like Anton, or 9 like me, really count as creating a whole new sub-language? Even if you argue that it does, it's a very small sub-language. Assert libraries make it too easy to write imprecise tests I think this is a good point in some — but not all — cases. If you're using a package that does different kinds of assertion checks in the same function (e.g. depending on the type of the argument passed to it, or the presence or not of a variadic argument) then yes, it's possible to see how it potentially increases the risk of bugs or a loss of precision in your tests. But if the assertion function checks one thing and one thing only, I don't see how it would be less precise. The assert.Equal() function that I use is a good example of this. It's imprecise because it checks whether both values are nil or whether both are the same based on an Equals() method or they are equal according to reflect.DeepEqual(). The ors introduce a subtle loss of precision that wouldn't exist if we were only checking one of those things. However, the go-cmp/cmp.Equal function, which the Go Wiki goes on to recommend using for equality checks, is imprecise in a similar way. I'm not sure that the assert.Equal() code above is really any worse in this sense. [Assert libraries] inevitably end up duplicating features already in the language, like expression evaluation, comparisons, sometimes even more. Yes. And I think this is why my preference is to use a small set of very basic assertions, like assert.Equal() and assert.True(). It means that I can write assertions like assert.True(t, len(mySlice) > 3) or assert.False(t, strings.Contains(name, "admin")) using the normal Go functions and operators. I don't get stuck down a rabbit hole implementing helpers like assert.SliceLengthGreaterThan() or assert.StringDoesNotContain() for every kind of check I need to do. On the flip side, the Go Wiki doesn't provide balance and mention the upsides of using assertion helpers, which is a shame. In terms of developer experience, I suspect that even the most hardened Gopher would agree that writing three lines of code like this: assert.Equal(t, w.StatusCode, http.StatusTeapot) assert.ErrorIs(t, err, sql.ErrNoRows) assert.True(t, defaultShutdownPeriod > defaultWriteTimeout) Is a faster and more enjoyable experience than writing the equivalent code like this: if w.StatusCode != http.StatusTeapot { t.Errorf("got %d; want %d", w.StatusCode, http.StatusTeapot) } if !errors.Is(err, sql.ErrNoRows) { t.Errorf("got error %q; want error to be or wrap %q", err.String(), sql.ErrNoRows) } if defaultShutdownPeriod <= defaultWriteTimeout { t.Errorf("default shutdown period %s must be greater than default write timeout %s", defaultShutdownPeriod, defaultWriteTimeout) } Not only is the code shorter, but it takes away the cognitive overhead of having to write a failure message for each check. Which is both good and bad. I find it good because it frees up my brain to focus on arguably the most important thing — which is the logic of the test and what is being tested. When I'm thinking about test logic, I don’t want to get distracted trying to craft a perfect failure message, or having to look up for the 100th time whether it is got before want or want before got. Being able to type out assertions quickly, without losing my train of thought, is something that I really value and appreciate. And it's bad, because having useful and thoughtful failure messages can make debugging a problem easier. Getting a failure message that reads like this: --- FAIL: TestServerConfiguration (0.00s) — FAIL: TestServerConfiguration/Default_timeouts_are_reasonable (0.00s) server_test.go:24: default shutdown period 5s must be greater than default write timeout 10s Is much better than using an assert.True() helper and getting a failure message like this: --- FAIL: TestServerConfiguration (0.00s) — FAIL: TestServerConfiguration/Default_timeouts_are_reasonable (0.00s) server_test.go:22: got: false; want: true In this second example, all you have to go on to start debugging the failure is the file name and line number of the check — it doesn't even include the value that caused the check to fail. I do think this, in particular, is a genuine downside of the assert.True() and assert.False() helpers that I use. Summary I've found that the nine assertion helpers I shared above have worked well for me in a variety of projects — and they might work well for you too. But ultimately whether they are the right fit depends on your preferences, your team members, and the specific project. If you use a small collection of basic assertion functions like this, rather than a large third-party package, then I think that most of the criticisms that the Go Wiki makes of assert packages don't really apply. But you still need to accept that the failure messages printed by assertion functions may not be as helpful as a tailored, specific, failure message would be. On the plus side, they make for a good developer experience when writing tests. I particularly appreciate that they are quick to write and allow my mind to stay focused on the logic of what I'm testing. And on balance, anything that encourages me to write more tests is probably a good thing : )
Alex Edwards Aug 22, 2025 -
When I'm building a web application in Go, I prefer to use command-line flags to pass configuration settings to the application at runtime. But sometimes, the client I'm working with wants to use environment variables to store configuration settings, or the nature of the project means that storing settings in a TOML, YAML or JSON file is a better fit. And of course that's OK — it makes sense to be flexible and vary how configuration is managed based on the specific needs of a project and/or client. So, in this tutorial, I want to share the patterns that I use for parsing configuration settings — whether they come from flags, environment variables or files — and explain how I pass the settings onwards to where they are needed in the rest of the web application code. I'll also end with a short discussion about the relative pros and cons of the different approaches. It's a fairly detailed post, so here are the shortcut links for quick reference: Using command-line flags Using environment variables Using configuration files Passing settings to where they are needed Discussion Example code To illustrate the patterns in the rest of this tutorial, let's pretend that we have a web application where we want to configure the following five settings: Setting Type Description port int The port number the web application listens on verboseLogging bool Enables detailed request and error logging requestTimeout time.Duration Maximum duration to wait for a request to complete basicAuthUsername string Username required for HTTP Basic Authentication basicAuthPassword string Password required for HTTP Basic Authentication Regardless of where the configuration settings are coming from (flags, environment variables or a file), I'm quite strict about keeping all the code related to configuration settings isolated in one place, and reading in the configuration setting values right at the start of the program, before doing almost anything else. Most of the time, I prefer to store all the configuration setting values in a single config struct, like so: type config struct { port int verboseLogging bool requestTimeout time.Duration basicAuth struct { username string password string } } I like this because it feels very clear — all the configuration settings are contained in a single struct, along with their appropriate Go type, and you can easily see at a glance what configuration settings the application expects and supports. Using command-line flags As I mentioned at the start of this tutorial, using command-line flags with the standard library flag package is my preferred approach to managing configuration settings. With this approach, you explicitly pass the configuration values as part of the command when running the program. For example: $ go run main.go -port=9999 -verbose-logging=true -request-timeout=10s -basic-auth-username=admin -basic-auth-password="secr3tPa55word" In your Go code, you define a specific command-line flag using syntax like this: flag.IntVar(&cfg.port, "port", 4000, "The port number the web application listens on")` In this example code, we define a command-line flag named port that accepts an integer value and stores it at the location pointed to by the &cfg.port pointer. It will have a default value of 4000 if no corresponding -port flag is provided when starting the application, and the final parameter is a description that will be displayed when a user runs the program with the -help flag. Importantly, after you've defined all the command-line flags for your application, you need to call the flag.Parse() function to actually read in the values from the command-line arguments. Let's put this together in a very simple application that reads the command-line flag values into a config struct, and then prints them out. File: main.go package main import ( "flag" "fmt" "time" ) // The config struct holds all configuration settings for the application. type config struct { port int verboseLogging bool requestTimeout time.Duration basicAuth struct { username string password string } } func main() { // Create a new config instance. var cfg config // Define the command-line flags. Notice that we define these so that the values // are read directly into the appropriate config struct field, and set sensible default // values for each of them. flag.IntVar(&cfg.port, "port", 4000, "The port number the web application listens on") flag.BoolVar(&cfg.verboseLogging, "verbose-logging", false, "Enables detailed request and error logging") flag.DurationVar(&cfg.requestTimeout, "request-timeout", 5*time.Second, "Maximum duration to wait for a request to complete") flag.StringVar(&cfg.basicAuth.username, "basic-auth-username", "", "Username required for HTTP Basic Authentication") flag.StringVar(&cfg.basicAuth.password, "basic-auth-password", "", "Password required for HTTP Basic Authentication") // Parse the flags with the flag.Parse function. This is important! flag.Parse() // Print all configuration settings. fmt.Printf("Port: %d\n", cfg.port) fmt.Printf("Verbose Logging: %t\n", cfg.verboseLogging) fmt.Printf("Request Timeout: %v\n", cfg.requestTimeout) fmt.Printf("Basic Auth Username: %s\n", cfg.basicAuth.username) fmt.Printf("Basic Auth Password: %s\n", cfg.basicAuth.password) } If you're following along, go ahead and run the application with your own values in the command-line flags. You should see the same values printed out by the application, like so: $ go run main.go -port=9999 -verbose-logging=true -request-timeout=30s -basic-auth-username=admin -basic-auth-password="secr3tPa55word" Port: 9999 Verbose Logging: true Request Timeout: 30s Basic Auth Username: admin Basic Auth Password: secr3tPa55word If you don't provide a value for a specific flag, the application will revert to using the default value you specified. For example, if you don't provide a -port flag it will default to the value of 4000, like so: $ go run main.go -basic-auth-username=admin -basic-auth-password="secr3tPa55word" Port: 4000 Verbose Logging: false Request Timeout: 5s Basic Auth Username: admin Basic Auth Password: secr3tPa55word Help text One of the great things about the standard library flag package is the support for automatic help text. If you run your application with the flag -help, it will list all the available flags for the application, along with their accompanying help text and default values if appropriate. Like so: $ go run main.go -help Usage of /tmp/go-build2103583960/b001/exe/main: -basic-auth-password string Password required for HTTP Basic Authentication -basic-auth-username string Username required for HTTP Basic Authentication -port int The port number the web application listens on (default 4000) -request-timeout duration Maximum duration to wait for a request to complete (default 5s) -verbose-logging Enables detailed request and error logging Boolean flags For boolean flags, if you want to pass a value of true you can simply include the flag name without assigning a value. The following two commands are equivalent: $ go run main.go -verbose-logging=true $ go run main.go -verbose-logging In contrast, you always need to use -flag=false if you want to set a boolean flag value to false. Dashes You can use one or two dashes in front of a flag name, both work identically. The standard library flag package does not support 'short' flags, and the number of dashes has no effect on the behavior or any special meaning. So it's just a matter of personal taste which you use. The following two commands are equivalent: $ go run main.go -verbose-logging -request-timeout=30s $ go run main.go --verbose-logging --request-timeout=30s Invalid flags If you try to pass an invalid value as a command-line flag, the application will automatically exit with an error message and the help text for reference. For example, if you try to pass a non-integer value in the -port flag, the parsing would fail and the output would look like this: $ go run main.go -port=foobar invalid value "foobar" for flag -port: parse error Usage of /tmp/go-build2103583960/b001/exe/main: -basic-auth-password string Password required for HTTP Basic Authentication -basic-auth-username string Username required for HTTP Basic Authentication -port int The port number the web application listens on (default 4000) -request-timeout duration Maximum duration to wait for a request to complete (default 5s) -verbose-logging Enables detailed request and error logging exit status 2 Similarly, if you try to use a flag that as not been defined, the application will automatically exit with an error message and the help text. For example: $ go run main.go -foobar=baz flag provided but not defined: -foobar ...etc Custom flag types The flag package provides functions for reading command-line flag values into the following Go types: bool, int, int64, uint, uint64, float64, string and time.Duration. If you want to parse a command-line flag value into another Go type (such as time.Time or []string), you have a few different options. The simplest approach is to use the flag.Func() function, which I've written about here. Or you can also make your own custom type that implements the flag.Value or encoding.TextUnmarshaler interfaces, and define the flag using either the flag.Var() or flag.TextVar() functions respectively. I've shared a gist demonstrating how to do this here. Alternatively, there are third-party packages (such as spf13/viper) that you can use, which automatically support parsing command-line flags into a wider range of Go types. Personally, I've never felt it necessary to use these, but YMMV. Flagsets Lastly, if you want you can create flagsets, which act like a 'container' for a distinct set of command-line flags. It's rare that I need to use flagsets in a web application, but I do often use them when building CLI applications with multiple subcommands. There's a good tutorial about how to use flagsets here. Using environment variables First, I'll start by saying that you can use environment variables in conjunction with command-line flags if you want. Simply set your environment variables as normal, and use them in the command when starting your application. Like so: $ export VERBOSE_LOGGING="true" $ export REQUEST_TIMEOUT="30s" $ go run main.go -verbose-logging=$VERBOSE_LOGGING -request-timeout=$REQUEST_TIMEOUT But if you don't want to do this, you can read the values from environment variables directly into your Go code using the os.Getenv() function. This will return the value of the environment variable as a string, or the empty string "" if the environment variable doesn't exist. You can also use the os.LookupEnv() function to check whether a specific environment variable exists or not. To help read values from environment variables, I like to create an internal/env package containing some helper functions that convert the environment variable string to the appropriate Go type, and optionally set a default value for if the environment variable doesn't exist (just like command-line flags). For example: File: internal/env/env.go package env import ( "fmt" "os" "strconv" "time" ) func GetInt(key string, defaultValue int) int { value, exists := os.LookupEnv(key) if !exists { return defaultValue } intValue, err := strconv.Atoi(value) if err != nil { panic(fmt.Errorf("environment variable %s=%q cannot be converted to an int", key, value)) } return intValue } func GetBool(key string, defaultValue bool) bool { value, exists := os.LookupEnv(key) if !exists { return defaultValue } boolValue, err := strconv.ParseBool(value) if err != nil { panic(fmt.Errorf("environment variable %s=%q cannot be converted to a bool", key, value)) } return boolValue } func GetDuration(key string, defaultValue time.Duration) time.Duration { value, exists := os.LookupEnv(key) if !exists { return defaultValue } durationValue, err := time.ParseDuration(value) if err != nil { panic(fmt.Errorf("environment variable %s=%q cannot be converted to a time.Duration", key, value)) } return durationValue } func GetString(key string, defaultValue string) string { value, exists := os.LookupEnv(key) if !exists { return defaultValue } return value } In some projects, I use a twist on these helper functions and panic if a specific environment variable isn't set, rather than returning a default value. For example: func MustGetInt(key string) int { value, exists := os.LookupEnv(key) if !exists { panic(fmt.Errorf("environment variable %s must be set", key)) } intValue, err := strconv.Atoi(value) if err != nil { panic(fmt.Errorf("environment variable %s=%q cannot be converted to an int", key, value)) } return intValue } Note: If you're looking at this code and thinking that it is bad practice to call panic() rather than returning an error, you'd be right. But in the context where these helpers are used, it seems a reasonable thing to do. If our application can't load the configuration settings that it needs to operate on startup, it can't reasonably continue, and depending on what has failed to load it may not even be safe or sensible to execute any further code. Terminating the application by panicking doesn't seem inappropriate in this scenario. I've written more about this in the post When is it OK to panic in Go?. Using those helper functions in your application then looks a bit like this: File: main.go package main import ( "fmt" "time" "your-project/internal/env" ) type config struct { port int verboseLogging bool requestTimeout time.Duration basicAuth struct { username string password string } } func main() { var cfg config cfg.port = env.GetInt("PORT", 4000) cfg.verboseLogging = env.GetBool("VERBOSE_LOGGING", false) cfg.requestTimeout = env.GetDuration("REQUEST_TIMEOUT", 5*time.Second) cfg.basicAuth.username = env.GetString("BASIC_AUTH_USERNAME", "") cfg.basicAuth.password = env.GetString("BASIC_AUTH_PASSWORD", "") fmt.Printf("Port: %d\n", cfg.port) fmt.Printf("Verbose Logging: %t\n", cfg.verboseLogging) fmt.Printf("Request Timeout: %v\n", cfg.requestTimeout) fmt.Printf("Basic Auth Username: %s\n", cfg.basicAuth.username) fmt.Printf("Basic Auth Password: %s\n", cfg.basicAuth.password) } If you'd like to try this out, go ahead and add the necessary environment variables to your /etc/environment or ~/.profile files, or export them in your shell, and try running the application again. You should see the configuration settings reflected in the output, or any default values for ones that you didn't set. $ export PORT="9999" $ export VERBOSE_LOGGING="false" $ export BASIC_AUTH_USERNAME="admin" $ export BASIC_AUTH_PASSWORD="secr3tPa55word" $ go run main.go Port: 9999 Verbose Logging: false Request Timeout: 5s Basic Auth Username: admin Basic Auth Password: secr3tPa55word Using .env files If you're working on multiple projects on the same development machine (and not using separate containers for each project), it can become awkward to manage environment variables and avoid clashes across the projects. Rather than setting environment variables in /etc/environment or ~/.profile, a fairly common workaround is to create an .env file in your project containing the environment variables, like so: File: .env export PORT=5000 export VERBOSE_LOGGING=true export REQUEST_TIMEOUT=10s export BASIC_AUTH_USERNAME=admin export BASIC_AUTH_PASSWORD=secr3tPa55word Then you can source the .env file to export the variables in the current terminal session and run your Go application: $ source .env $ go run main.go Port: 5000 Verbose Logging: true Request Timeout: 10s Basic Auth Username: admin Basic Auth Password: secr3tPa55word Alternatively, if you don't want to keep running the source command, you can use the joho/godotenv package to automatically load the values from the .env file into the environment when your application starts up. Using configuration files The third option that I sometimes use is configuration files, which store all the settings in a single file on-disk. I normally only use these in projects where there are a lot of configuration settings, and loading them all via command-line flags would be onerous and error-prone. Or also, if the configuration settings are complex, with a deeply nested 'structure' to them. There are a lot of different formats that you can use for configuration files, such as TOML or YAML — or even JSON. They all have different advantages and disadvantages, and you'll be hard-pressed to find one that everybody agrees is 'perfect'. But whatever format you choose, there is probably a Go package that you can use to automatically parse values from the file into a config struct for you. For example, let's say that you want to use TOML and have a configuration file that looks like this: File: config.toml # Server configuration port = 4000 verbose_logging = true request_timeout = "10s" # Basic authentication settings [basic_auth] username = "admin" password = "secr3tPa55word" You can use the BurntSushi/toml package to read the file and unpack the contents to a config struct like so: File: main.go package main import ( "fmt" "log" "time" "github.com/BurntSushi/toml" ) // Make sure the struct fields are exported, so that the BurntSushi/toml package // can write to them, and use struct tags to map the TOML key/value pairs to the // appropriate struct field. type config struct { Port int `toml:"port"` VerboseLogging bool `toml:"verbose_logging"` RequestTimeout time.Duration `toml:"request_timeout"` BasicAuth struct { Username string `toml:"username"` Password string `toml:"password"` } `toml:"basic_auth"` } func main() { var cfg config // Load configuration settings from the config.toml file. metadata, err := toml.DecodeFile("config.toml", &cfg) if err != nil { log.Fatalf("error loading configuration: %v", err) } // Check for any undecoded keys in the config.toml file. if len(metadata.Undecoded()) > 0 { log.Fatalf("unknown configuration keys: %v", metadata.Undecoded()) } fmt.Printf("Port: %d\n", cfg.Port) fmt.Printf("Verbose Logging: %t\n", cfg.VerboseLogging) fmt.Printf("Request Timeout: %v\n", cfg.RequestTimeout) fmt.Printf("Basic Auth Username: %s\n", cfg.BasicAuth.Username) fmt.Printf("Basic Auth Password: %s\n", cfg.BasicAuth.Password) } Notice that in this code we're making use of the metadata returned by the toml.DecodeFile() function to check if any settings were not decoded successfully — which should help to catch typos or invalid keys in the TOML file. Passing settings to where they are needed Getting the configuration settings into the config struct, wherever they come from, is the first half of the puzzle. The second part is getting those settings to where you need them in your Go code. There are many different ways to approach this, and no single 'right' way. For small or medium sized web applications, I often use a pattern of creating an application struct which contains all the dependencies that my HTTP handlers need, and I implement the handlers as methods on the application struct. To make the configuration settings available to the HTTP handlers, I simply include the config struct as a field in application. For example: File: main.go package main import ( "flag" "fmt" "log/slog" "net/http" "os" "time" ) type config struct { port int verboseLogging bool requestTimeout time.Duration basicAuth struct { username string password string } } // The application struct contains the dependencies for the handlers, including // the config struct type application struct { config config logger *slog.Logger } func main() { logger := slog.New(slog.NewTextHandler(os.Stdout, nil)) var cfg config flag.IntVar(&cfg.port, "port", 4000, "The port number the web application listens on") flag.BoolVar(&cfg.verboseLogging, "verbose-logging", false, "Enables detailed request and error logging") flag.DurationVar(&cfg.requestTimeout, "request-timeout", 5*time.Second, "Maximum duration to wait for a request to complete") flag.StringVar(&cfg.basicAuth.username, "basic-auth-username", "", "Username required for HTTP Basic Authentication") flag.StringVar(&cfg.basicAuth.password, "basic-auth-password", "", "Password required for HTTP Basic Authentication") flag.Parse() app := &application{ config: cfg, logger: logger, } mux := http.NewServeMux() mux.HandleFunc("/", app.home) // Use the port configuration setting logger.Info("starting server", "port", cfg.port) err := http.ListenAndServe(fmt.Sprintf(":%d", cfg.port), mux) if err != nil { logger.Error(err.Error()) os.Exit(1) } } func (app *application) home(w http.ResponseWriter, r *http.Request) { // Use the verboseLogging configuration setting if app.config.verboseLogging { app.logger.Info("handling request", "method", r.Method, "path", r.URL.Path) } fmt.Fprintf(w, "Hello!") } If you run this application with the -verbose-logging flag, and make a HTTP request to localhost:4000, you should see the details of the request in the log output, similar to below — demonstrating that the config setting is correctly available to the handler. $ go run main.go -verbose-logging time=2025-06-27T14:15:40.230+02:00 level=INFO msg="starting server" port=4000 time=2025-06-27T14:15:48.705+02:00 level=INFO msg="handling request" method=GET path=/ In larger applications where I want to define my handlers outside of package main, or pass the config struct to functions in other packages, I normally define an exported Config struct in an internal/config package, and pass this around as necessary. For example, let's say that you have a project structure like so: ├── go.mod ├── go.sum ├── main.go └── internal ├── config │ └── config.go └── handlers └── home.go Then the contents of those .go files would look something like this: File: internal/config/config.go package config import "time" type Config struct { Port int VerboseLogging bool RequestTimeout time.Duration BasicAuth struct { Username string Password string } } File: internal/handlers/home.go package handlers import ( "fmt" "log/slog" "net/http" "your-project/internal/config" ) func Home(cfg config.Config, logger *slog.Logger) http.HandlerFunc { return func(w http.ResponseWriter, r *http.Request) { if cfg.VerboseLogging { logger.Info("handling request", "method", r.Method, "path", r.URL.Path) } fmt.Fprintf(w, "Hello!") } } File: main.go package main import ( "flag" "fmt" "log/slog" "net/http" "os" "time" "your-project/internal/config" "your-project/internal/handlers" ) func main() { logger := slog.New(slog.NewTextHandler(os.Stdout, nil)) var cfg config.Config flag.IntVar(&cfg.Port, "port", 4000, "The port number the web application listens on") flag.BoolVar(&cfg.VerboseLogging, "verbose-logging", false, "Enables detailed request and error logging") flag.DurationVar(&cfg.RequestTimeout, "request-timeout", 5*time.Second, "Maximum duration to wait for a request to complete") flag.StringVar(&cfg.BasicAuth.Username, "basic-auth-username", "", "Username required for HTTP Basic Authentication") flag.StringVar(&cfg.BasicAuth.Password, "basic-auth-password", "", "Password required for HTTP Basic Authentication") flag.Parse() mux := http.NewServeMux() mux.HandleFunc("/", handlers.Home(cfg, logger)) // Use the port configuration setting logger.Info("starting server", "port", cfg.Port) err := http.ListenAndServe(fmt.Sprintf(":%d", cfg.Port), mux) if err != nil { logger.Error(err.Error()) os.Exit(1) } } Obviously I'm using command-line flags in these examples, but the same patterns work for environment variables or config files too — once the config struct is loaded with the data, it doesn't matter where it originally came from and the code patterns are the same. Discussion If you've been in the web development world for a long time and buy into the 12-factor app principles (which I generally do), you might think that the correct approach is "just use environment variables". But over the years I've come to the conclusion that they have some drawbacks: I've been bitten more times than I want by bugs that were ultimately a result of an unset or unexpected value in an environment variable — and I think that part of the problem here is that environment variables aren't readily and easily observable in the same way that the values in command-line flags or a configuration file are. If you're working on multiple projects on the same development machine (rather than working in separate containers for each project), you have to manage the lack of natural isolation between environment variables... you need to make sure that there aren't any naming clashes, and that (for example) application A isn't accidentally using the DB_PASSWORD setting intended for application B. I've also seen a lot of Go codebases where configuration settings are read in using os.Getenv() at the point in the code where they are needed. This makes discoverability difficult — it's hard to look at an application's code and easily see what the expected configuration settings are. You can mitigate these issues with some of the techniques that we've discussed in this tutorial. If you're strict about reading all the settings into a single config struct at application startup, that addresses the discoverability problem. If you create helpers like env.MustGetInt() which panic if an environment variable isn't set, that helps to eliminate bugs that exist due to missing environment variables. And you can work around some of the environment variable isolation problems in development by using a .env file — but at that point, it might be worth considering whether a configuration file might be more appropriate. One of the big reasons that I like to use command-line flags is that you get a lot of stuff for free. You get automatic -help text, automatic type conversions, the ability to set defaults, and it handles invalid inputs and undefined flags nicely. Also, it's always very clear what configuration values are being used — you either explicitly pass the values when starting the application, or the default values hardcoded into your Go codebase are used. On top of that, most other gophers will be familiar with the flag package and you don't need any third-party dependencies. When I'm using command-line flags, I typically set the default values to things that are appropriate for a development environment. This is mainly so I don't have to keep typing long commands to run the application when actively developing it. In terms of application secrets, like I mentioned earlier, there's nothing stopping you from storing a specific secret in an environment variable and using it in conjunction with a command-line flag if you want. For example, if you store a password for your database user in a DB_PASSWORD environment variable, you can include it as a command-line flag value when starting the application like so: $ go run main.go -db-user=web -db-password=$DB_PASSWORD Or, although it is a bit more 'magical', you could even use the environment variable as the default value: flag.StringVar(&cfg.db.password, "db-password", os.Getenv("DB_PASSWORD"), "Database user password") So, for all these reasons, I tend to prefer using command-line flags for configuration. The big exception to this is when there are a lot of configuration settings, and it would be awkward to pass them all via command-line flags, or the settings have a deeply nested 'structure' to them. In these cases, I think it can be more practical and maintainable to store the settings in a TOML or JSON configuration file, and load them on application startup like we demonstrated earlier.
Alex Edwards Jun 30, 2025 -
For many years, I've used third-party packages to help organize and manage middleware in my Go web applications. In small projects, I often used alice to create middleware 'chains' that I could reuse across multiple routes. And for larger applications, with lots of middleware and routes, I typically used a router like chi or flow to create nested route 'groups' with per-group middleware. But since Go 1.22 introduced the new pattern matching functionality for http.ServeMux, where possible I've tried to drop third-party dependencies from my routing logic and shift to using just the standard library. But going all-in on the standard library leaves a good question: how should we organize and manage middleware without using any third-party packages? Note: If you're not familiar with middleware in Go, I recommend reading this introduction to making and using middleware before continuing. Why is managing middleware a problem? If you have an application with only a few routes and middleware functions, the simplest thing to do is to wrap your handler functions with the necessary middleware on a route-by-route basis. A bit like this: // No middleware on this route. mux.Handle("GET /static/", http.FileServerFS(ui.Files)) // Both these routes use the requestID and logRequest middleware. mux.Handle("GET /", requestID(logRequest(http.HandlerFunc(home)))) mux.Handle("GET /article/{id}", requestID(logRequest(http.HandlerFunc(showArticle)))) // This route has the additional authenticateUser and requireAdminUser middleware. mux.Handle("GET /admin", requestID(logRequest(authenticateUser(requireAdminUser(http.HandlerFunc(showAdminDashboard)))))) This works, and requires no external dependencies, but you can probably imagine the downsides as the number of routes grows: There's repetition in the route declarations. It's a bit difficult to read and see which routes are using the same middleware at a glance. It feels error-prone — in a large application if you need to add, remove or reorder middleware across many routes it could be easy to miss out one of the routes and not spot the mistake. An alternative to alice As I briefly mentioned above, the alice package allows you to declare and reuse 'chains' of middleware. We could rewrite the example code above to use alice like so: mux := http.NewServeMux() // Create a base middleware chain. baseChain := alice.New(requestID, logRequest) // Extend the base chain with auth middleware for admin-only routes. adminChain := baseChain.Append(authenticateUser, requireAdminUser) // No middleware on this route. mux.Handle("GET /static/", http.FileServerFS(ui.Files)) // Public routes using the base middleware. mux.Handle("GET /", baseChain.ThenFunc(home)) mux.Handle("GET /article/{id}", baseChain.ThenFunc(showArticle)) // Admin routes with the additional auth middleware. mux.Handle("GET /admin", adminChain.ThenFunc(showAdminDashboard)) To me, this code feels quite a lot cleaner, and it largely mitigates the three problems that we talked about above. But if you don't want to introduce alice as a dependency, it's possible to leverage the slices.Backward function introduced in Go 1.23 and create your own chain type in a few simple lines of code: type chain []func(http.Handler) http.Handler func (c chain) thenFunc(h http.HandlerFunc) http.Handler { return c.then(h) } func (c chain) then(h http.Handler) http.Handler { for _, mw := range slices.Backward(c) { h = mw(h) } return h } You can then use this chain type in your route declarations like so: mux := http.NewServeMux() // Create a base middleware chain. baseChain := chain{requestID, logRequest} // Extend the base chain with auth middleware for admin-only routes. adminChain := append(baseChain, authenticateUser, requireAdminUser) mux.Handle("GET /static/", http.FileServerFS(ui.Files)) mux.Handle("GET /", baseChain.thenFunc(home)) mux.Handle("GET /article/{id}", baseChain.thenFunc(showArticle)) mux.Handle("GET /admin", adminChain.thenFunc(showAdminDashboard)) The syntax in this code isn't exactly the same as using alice, but it's pretty close, and in terms of behavior it's functionally the same. If you're interested in using this approach in your own codebase, I've made tests for the chain type available in this gist. An alternative to chi and similar routers In large applications, when I have lots-of-different-middleware being used on lots-of-different-routes, I've always found the route grouping functionality provided by routers like chi and flow to be a huge help. They basically allow you to create route groups with specific middleware, and these groups can be nested, with child groups 'inheriting' and extending the middleware of their parent groups. Let's take a look at an example using chi, which I think was the first router to support this style of route grouping functionality. r := chi.NewRouter() // No middleware on this route. r.Method("GET", "/static/", http.FileServerFS(ui.Files)) // Create a route group. r.Group(func(r chi.Router) { // Add the middleware for the group. r.Use(requestID) r.Use(logRequest) // The routes declared in the group will use this middleware. r.Get("/", home) r.Get("/article/{id}", showArticle) // Create a nested route group. Any routes in this group will use the // middleware declared in the group *and* the parent groups. r.Group(func(r chi.Router) { r.Use(authenticateUser) r.Use(requireAdminUser) r.Get("/admin", showAdminDashboard) }) }) But if you want to stick with the standard library, it doesn't take much to create your own router implementation that wraps http.ServeMux and supports middleware groups in a similar style: type Router struct { chain []func(http.Handler) http.Handler *http.ServeMux } func NewRouter() *Router { return &Router{ServeMux: http.NewServeMux()} } func (r *Router) Use(mw ...func(http.Handler) http.Handler) { r.chain = append(r.chain, mw...) } func (r *Router) Group(fn func(r *Router)) { subRouter := &Router{chain: slices.Clone(r.chain), ServeMux: r.ServeMux} fn(subRouter) } func (r *Router) HandleFunc(pattern string, h http.HandlerFunc) { r.Handle(pattern, h) } func (r *Router) Handle(pattern string, h http.Handler) { for _, mw := range slices.Backward(r.chain) { h = mw(h) } r.ServeMux.Handle(pattern, h) } And then you can use the Router type in your code like so: r := NewRouter() r.Handle("GET /static/", http.FileServerFS(ui.Files)) r.Group(func(r *Router) { r.Use(requestID) r.Use(logRequest) r.HandleFunc("GET /", home) r.HandleFunc("GET /article/{id}", showArticle) r.Group(func(r *Router) { r.Use(authenticateUser) r.Use(requireAdminUser) r.HandleFunc("GET /admin", showAdminDashboard) }) }) Again, complete tests for the Router type are available in this gist.
Alex Edwards Apr 26, 2025 -
If you've been working with Go for a while, you might be familiar with the Go proverb "don't panic". It's a pithy way of saying: "handle errors gracefully, or return them to the caller to handle gracefully, instead of passing errors to the built-in panic() function". And while "don't panic" is a great guideline that you should follow, sometimes it's taken to mean that you should no-way, never, ever call panic(). And I don't think that's true. The panic() function is a tool, and there are some rare times when it might be the appropriate tool for the job. In this post we'll talk through what panic() does and why it's generally better to avoid using it, discuss some scenarios where panicking can be appropriate, and finish with a few real-world examples. Panicking vs. returning errors Let's begin by creating a timeIn() function, which takes a IANA time zone name and returns the current time in that zone. In Go, if the timeIn() function encounters an error, the normal and idiomatic way to deal with it would be to return the error to the caller. Like so: package main import ( "fmt" "os" "time" ) func timeIn(zone string) (time.Time, error) { loc, err := time.LoadLocation(zone) if err != nil { return time.Time{}, err // Return any error from time.LoadLocation() } return time.Now().In(loc), nil } func main() { tz := "Europe/Wonderland" t, err := timeIn(tz) if err != nil { fmt.Println("Error:", err) os.Exit(1) } fmt.Println("Current time in", tz, "is", t) } $ go run main.go Error: unknown time zone Europe/Wonderland exit status 1 In theory, you could handle the potential error inside timeIn() by passing it to panic() — instead of returning it. Like this: package main import ( "fmt" "time" ) func timeIn(zone string) time.Time { loc, err := time.LoadLocation(zone) if err != nil { panic(err) // Call panic() with the error as the argument } return time.Now().In(loc) } func main() { tz := "Europe/Wonderland" t := timeIn(tz) fmt.Println("Current time in", tz, "is", t) } $ go run main.go panic: unknown time zone Europe/Wonderland goroutine 1 [running]: main.timeIn({0x4c2c7e?, 0x7d40fe626108?}) /tmp/main.go:11 +0xc5 main.main() /tmp/main.go:20 +0x2b exit status 2 When you call panic() in your Go code, it will do the following four things: Immediately stop normal execution of the code in the current function. Nothing after the call to panic() will be executed. Run any deferred functions for the current goroutine in reverse (LIFO) order. Print out panic: and the value you passed to the panic() function to os.Stderr, along with a stack trace for the current goroutine at the point panic() was called, . Terminate the program with exit code 2. Note: It's possible to recover panics by using the recover() function inside a deferred function, in which case step 2 will only be executed until the point of recovery, and steps 3 and 4 in the list above won't automatically happen. Explaining how recover() works is outside the scope of this blog post, but here's a good introduction and I also recommend watching this video for a discussion of some intricacies. Also note: The official documentation for panic() only goes as far as saying "the program is terminated with a non-zero exit code". As far as I can see, at the time of writing, the exit code following an unrecovered panic is always 2, but the documentation deliberately says "non-zero" to give wiggle-room for a potential change to a different exit code in the future. There's a discussion about this here. Why is panicking considered bad? The panic() function itself isn't intrinsically bad. In fact, what it does for you is really quite nice — the running of deferred functions, the printing of the stack trace... this is good stuff. It's more that returning errors is normally better. When you call panic() in a function, it always sets off the same fixed chain of events that we described above. Whereas if the function returns the error, the caller has full control over how that error is managed. It could be logged, presented to a user, the function could be retried, or the error could even be ignored. Alternatively, the error could be propagated again back up the call stack to the grandparent caller to manage. It all depends on the use case. When you return an error, the caller has control and flexibility to handle it in the most appropriate way. There are also some other benefits of returning errors: When propagating errors back up the call stack, you can optionally wrap them to provide additional context at each step. This extra context can make errors more informative and useful, and potentially make debugging easier than relying solely on the stack trace from a panic(). It's easier to write unit tests for a function when it returns errors. It's certainly not impossible to verify that a function panics when you expect it to during a test, but it is more awkward and less clear than just checking an error return value. If you're creating a package for other people to import and use, it's polite to return errors instead of panicking. Remember: a panic will terminate the running application, which people using your package may not expect or appreciate! It's better to return an error, and leave it up to the caller to decide what to do next. They can always call panic() with the error if they want. Finally, it's just the Go way. Errors are normally returned — it's what the Go standard library mostly does, and it's what other Gophers have come to expect as standard. By sticking with this convention, your code is more predictable and easier for other people to follow. So, returning errors (or handling them gracefully then-and-there) is almost always better. Which leaves us with the question, when is panicking the better option? When is panicking appropriate? To answer this, it's helpful to distinguish between what I'll call "operational errors" and "programmer errors" for the purpose of this post. By operational errors, we're talking about errors that you might reasonably expect to happen during the operation of your program. Some examples are errors caused by a database or network resource being temporarily unavailable, the permissions on a file being wrong, a timeout on a long-running operation, or invalid user input. These errors don't necessarily mean there is a problem with your program itself — in fact they're often caused by things outside the control of your program. Operational errors are to be expected. And because you know there's a chance they'll occur during normal operation, you should endeavour to return them to the caller and gracefully handle them in a way that makes the most sense for your program. Don't use panic() to manage them. By programmer errors, we're talking about errors which should "never" happen during the operation of your program — the kind of error that stems from a developer mistake, a logical flaw in your codebase, or trying to use another piece of code in an unsupported way. Ideally, you'd spot programmer errors during development or testing, rather than having them surface in production. And (hopefully!) they should be relatively rare. When you encounter a programmer error, it means that your program finds itself in an unexpected state. And in this scenario, calling panic() is much more commonly accepted as an appropriate thing to do. For all the good reasons that we talked about above, if it is possible to safely and gracefully manage the error by returning it up the call stack, then you should default to doing that still. But using panic() can be a good and appropriate choice when either: The error is truly unrecoverable (that is, there is no reasonable way to safely continue operating and handle the error more gracefully); or Returning the error would add an unacceptable amount of complexity or additional error handling code to the rest of your codebase — all for something that you never expect to see in production. You can see this logic play out in some of the Go standard library operations that trigger a panic. For instance: Dividing an integer or float by 0 Accessing an out-of-bounds index in slice or array Dereferencing a nil pointer Trying to use a nil map Unlocking a mutex that isn't locked Sending on a closed channel Defining two flags with the same name in the same flag.FlagSet Passing an integer < 100 or > 999 to http.ResponseWriter.WriteHeader() When a sync.WaitGroup counter drops below zero What do all these have in common? First, they're programmer errors. If any of these things happen, it's due to a logical mistake in your codebase or you trying to use a language feature or function in an unsupported way. These things shouldn't happen during normal operation in production. And if they returned an error, it would add an arguably unacceptable amount of extra error handling to everyone's Go code. Just imagine if you had to check for an error return value every time you use the / operator, access a value in a slice, or unlock a mutex. It would add a lot of overhead. So, in summary, it can be appropriate to use panic() to deal with programmer errors that are either unrecoverable or where returning an error would add an unacceptable amount of extra error handling to the rest of your codebase. Exactly what constitutes "an unacceptable amount" is your judgement call, based on your experience and particular codebase. And that's OK. There's no exact right or wrong answer here. On top of this, there are a couple of other scenarios where I think calling panic() can be appropriate: In a last-ditch 'guard clause' to prevent a particular operation happening when it shouldn't. If the panic ever gets executed, it indicates a bug in your program or violation of some internal business logic. When you don't want the program to continue and there are no better options for dealing with the error beyond calling panic(). Real-world examples and discussion By now I hope it's clear that panic() should be used sparingly and only when it really makes sense. Personally, probably about half of the codebases I work on don't call panic() at all, and even when they do, it's only in a few places. So with that said, here are a few real-life examples from recent codebases I've worked on. Example one Here's an example from a web application, where we have some code to retrieve a user value from the HTTP request context. type contextKey string const userContextKey = contextKey("user") func contextGetUser(r *http.Request) user.User { user, ok := r.Context().Value(userContextKey).(user.User) if !ok { panic("missing user value in request context") } return user } In this particular application, the code is structured in such a way that the contextGetUser() function is only ever called when we logically expect there to be a user value in the request context. In this application, a missing value is firmly an programmer error and indicates that there is something wrong with the codebase. Yes, contextGetUser() could return an error instead of panicking. The error is certainly recoverable — the caller could cease further operations, log the error and send the user a 500 Internal Server Error response. But this function gets called a lot, and it felt like returning an error would introduce excessive error handling for something that we should never see during normal operation. On balance, using panic() here felt appropriate. Example two Here's another example from the same application: func getEnvInt(key string, defaultValue int) int { value, exists := os.LookupEnv(key) if !exists { return defaultValue } intValue, err := strconv.Atoi(value) if err != nil { panic(err) } return intValue } In this application, getEnvInt() is a helper function used to read a value from an environment variable and convert it to an int. If the conversion fails, then it panics. At first glance, this might not seem like a suitable place to use panic(). An error when trying to convert a specific environment variable to an int seems like something outside of our program's control — an operational error. And it is. But in this case, the getEnvInt function is used (and only used) right at the start of the program to load configuration settings from the environment, like so: httpPort := getEnvInt("HTTP_PORT", 3939) At this early stage of the program, the logger (which also happens to rely on environment settings) hasn't been initialized. Since the program can't run without valid configuration values, and there's no proper logger available yet to handle errors gracefully, there aren't any other good options on the table for managing this error. Resorting to panic() feels like a reasonable choice. It fits the scenario of you don't want the program to continue and there are no better options for dealing with the error. Note: I could have made the getEnvInt() function return an error, and had the caller itself call panic(). But it would have generated additional error handling for basically the same end result, so on balance it made sense to panic from within getEnvInt(). Example three This is an example of where I've previously used panic() in a guard clause. var safeChars = regexp.MustCompile("^[a-z0-9_]+$") type SortValues struct { Column string Ascending bool } func (sv *SortValues) OrderBySQL() string { if !safeChars.MatchString(sv.Column) { panic("unsafe sort column: " + sv.Column) } if sv.Ascending { return fmt.Sprintf("ORDER BY %s ASC", sv.Column) } return fmt.Sprintf("ORDER BY %s DESC", sv.Column) } In this particular application, there was a need to generate SQL queries with dynamic ORDER BY parameters based on user input. Unfortunately, SQL doesn't support placeholder parameters in ORDER BY clauses, so we have to use string interpolation to insert the column name and sort direction into the query instead. The SortValues type holds the user-provided column name and sort direction, and its OrderBySQL() method returns a string like ORDER BY title ASC. By the time that the OrderBySQL() method is called, one of the upstream functions should have already validated the SortValues.Column value against a whitelist of allowed column names. But if a bug, or oversight, ever caused that validation step to be missed, the application would be vulnerable to a SQL injection attack via the user-provided column name. So, as a last-ditch mitigation, we use a panicking guard clause in OrderBySQL() to ensure that the SortValues.Column value only contains 'safe' characters (a to z, 0 to 9, and underscores). We never expect this check to fail, so returning an error from OrderBySQL() seems like overkill. But if it ever did happen, it feels better to trigger a panic than risk compromising the database. Summary So, let's answer the title of this post: When is it OK to panic in Go? Your default should always be to return errors to the caller — or handle them gracefully then-and-there. "Don't panic" is a good guideline to almost always follow. But panic() isn't inherently bad, and using it is appropriate when: Your program encounters a programmer error and there is no way to manage it safely in a more graceful way. Your program encounters a programmer error and returning it to the caller would add an unacceptable amount of complexity or error handling to the rest of your codebase. You have a last-ditch 'guard clause' to prevent a particular operation happening when it shouldn't. Your program can't continue and there are simply no better options for dealing with the error in a more graceful way.
Alex Edwards Mar 31, 2025 -
One of my favourite features of Go 1.24 is the new functionality for managing developer tooling dependencies. By this, I mean tooling that you use to assist with development, testing, build, or deployment – such as staticcheck for static code analysis, govulncheck for vulnerability scanning, or air for live-reloading applications. Historically, managing these dependencies — especially in a team setting — has been tricky. The previous solutions have been to use a tools.go file or the go run pattern, but while these approaches work, they’ve always felt like workarounds with some downsides. With Go 1.24, there’s finally a better way. Adding tools to your module Using tools Listing tools Verifying tools Vendoring tools Upgrading and downgrading tools Removing tools Using a separate modfile for tools A quick example To demonstrate the new functionality, let's scaffold a simple module and add some application code. $ go mod init example.com go: creating new go.mod: module example.com $ touch main.go File: main.go package main import ( "fmt" "github.com/kr/text" ) func main() { wrapped := text.Wrap("This is an informational message that should be wrapped.", 30) fmt.Println(wrapped) } Now fetch the github.com/kr/text package and run the code. The output should look like this: $ go get github.com/kr/text go: downloading github.com/kr/text v0.2.0 go: added github.com/kr/text v0.2.0 $ go run . This is an informational message that should be wrapped. Adding tools to your module Go 1.24 introduces the -tool flag for go get, which you can use like this: go get -tool import_path@version This command will download the package specified by the import path (along with any child dependencies), store them in your module cache, and record them in your go.mod file. The @version part is optional – if you omit it, the latest version will be downloaded. Let's use this to add the latest versions of stringer and govulncheck to our module as developer tools, along with staticcheck version 0.5.1. $ go get -tool golang.org/x/tools/cmd/stringer go: downloading golang.org/x/tools v0.30.0 go: downloading golang.org/x/sync v0.11.0 go: downloading golang.org/x/mod v0.23.0 go: added golang.org/x/mod v0.23.0 go: added golang.org/x/sync v0.11.0 go: added golang.org/x/tools v0.30.0 $ go get -tool golang.org/x/vuln/cmd/govulncheck go: downloading golang.org/x/vuln v1.1.4 go: downloading golang.org/x/telemetry v0.0.0-20240522233618-39ace7a40ae7 go: downloading golang.org/x/sys v0.30.0 go: upgraded golang.org/x/telemetry v0.0.0-20240521205824-bda55230c457 => v0.0.0-20240522233618-39ace7a40ae7 go: added golang.org/x/vuln v1.1.4 $ go get -tool honnef.co/go/tools/cmd/staticcheck@v0.5.1 go: downloading honnef.co/go/tools v0.5.1 go: downloading golang.org/x/exp/typeparams v0.0.0-20231108232855-2478ac86f678 go: downloading github.com/BurntSushi/toml v1.4.1-0.20240526193622-a339e1f7089c go: downloading golang.org/x/exp v0.0.0-20231110203233-9a3e6036ecaa go: added github.com/BurntSushi/toml v1.4.1-0.20240526193622-a339e1f7089c go: added golang.org/x/exp/typeparams v0.0.0-20231108232855-2478ac86f678 go: added honnef.co/go/tools v0.5.1 After running these, your go.mod file will now include a tool (...) section listing the tools you've added. The corresponding module paths and versions for all the dependencies will appear in the require (...) section and be marked as indirect: File: go.mod module example.com go 1.24.0 require ( github.com/BurntSushi/toml v1.4.1-0.20240526193622-a339e1f7089c // indirect github.com/kr/text v0.2.0 // indirect golang.org/x/exp/typeparams v0.0.0-20231108232855-2478ac86f678 // indirect golang.org/x/mod v0.23.0 // indirect golang.org/x/sync v0.11.0 // indirect golang.org/x/sys v0.30.0 // indirect golang.org/x/telemetry v0.0.0-20240522233618-39ace7a40ae7 // indirect golang.org/x/tools v0.30.0 // indirect golang.org/x/vuln v1.1.4 // indirect honnef.co/go/tools v0.5.1 // indirect ) tool ( golang.org/x/tools/cmd/stringer golang.org/x/vuln/cmd/govulncheck honnef.co/go/tools/cmd/staticcheck ) Using tools Once added, you can run tools using the go tool command. From the command line To run a specific tool from the command line within your module, you can use go tool followed by the last non-major-version segment of the import path for the tool (which is, normally, just the name for the tool). For example: $ go tool staticcheck -version staticcheck 2024.1.1 (0.5.1) $ go tool govulncheck No vulnerabilities found. In a makefile The go tool command also works nicely if you want to execute tools from your scripts or Makefiles. To illustrate, let's create a Makefile with an audit task that runs staticcheck and govulncheck on the codebase. $ touch Makefile .PHONY: audit audit: go vet ./... go tool staticcheck ./... go tool govulncheck If you run make audit, you should see that all the checks complete successfully. $ make audit go vet ./... go tool staticcheck ./... go tool govulncheck No vulnerabilities found. With go:generate Let's also take a look at an example where we use the stringer tool in conjunction with go:generate to generate String() methods for some iota constants. File: main.go package main import ( "fmt" "github.com/kr/text" ) //go:generate go tool stringer -type=Level type Level int const ( Info Level = iota Error Fatal ) func main() { wrapped := text.Wrap("This is an informational message that should be wrapped.", 30) fmt.Printf("%s: %s\n", Info, wrapped) } The important thing here is the //go:generate line. When you run go generate on this file, it will in turn use go tool to execute the version of the stringer tool listed in your go.mod file. Let's try it out: $ go generate . $ ls go.mod go.sum level_string.go main.go Makefile You should see that a new level_string.go file is created, and running the application should result in some output that looks like this: $ go run . Info: This is an informational message that should be wrapped. Listing tools You can check which tools have been added to a module by running go list tool, like so: $ go list tool honnef.co/go/tools/cmd/staticcheck golang.org/x/tools/cmd/stringer golang.org/x/vuln/cmd/govulncheck Verifying tools Because the tools are included in your go.mod file as dependencies, if you want to check that the code for the tools stored in your module cache has not changed you can simply run go mod verify: $ go mod verify all modules verified This will check that the code in your module cache exactly matches the corresponding checksums in your go.sum file. Vendoring tools If you run go mod vendor, the code for tooling dependencies will be included in the vendor folder and the vendor/modules.txt manifest alongside your non-tool dependencies. $ go mod vendor $ tree -L 3 . ├── go.mod ├── go.sum ├── main.go ├── Makefile └── vendor ├── github.com │ ├── BurntSushi │ └── kr ├── golang.org │ └── x ├── honnef.co │ └── go └── modules.txt When tools are vendored in this way, running go tool will execute the corresponding code in the vendor directory. Note that go mod verify does not work on vendored code. Upgrading and downgrading tools To upgrade or downgrade a specific tool to a specific version, you can use the same go get -tool import_path@version command that you did for adding the tool originally. For example: $ go get -tool honnef.co/go/tools/cmd/staticcheck@v0.5.0 To upgrade to the latest version of a specific tool, omit the @version suffix. $ go get -tool honnef.co/go/tools/cmd/staticcheck You can also upgrade all tools to their latest version by running go get tool. Note: tool is a sub-command here, not a flag. $ go get tool If your tool dependencies are vendored, you will need to re-run go mod vendor after any upgrades or downgrades. At the time of writing, I'm not aware of any easy way to specifically list the tools that have upgrades available – if you know of one please let me know! Removing tools To remove the tool completely from your module, use go get -tool with the special version tag @none. $ go get -tool honnef.co/go/tools/cmd/staticcheck@none Again, if you're vendoring, make sure to run go mod vendor after removing a tool. Using a separate modfile for tools A Reddit commenter mentioned the potential for problems if your tools share dependencies with your application code. For example, let's say that your application code depends on golang.org/x/sync version v0.11.0, and is tested and known to work with that version. Then if you add a tool that relies on a newer version of golang.org/x/sync, the version number in your go.mod file will be bumped to the newer version and your application code will use that newer version too. In theory, this shouldn't be a problem so long as all your dependencies and their child dependencies are stable, follow strict semantic versioning, and don't make backwards-incompatible changes without a major version increment. But, of course, the real world is messy and backwards-incompatible changes might happen, which could unexpectedly break your application code. It's worth noting that this issue isn't limited to tool dependencies – the same thing can happen if your application code and a non-tool dependency both rely on the same package. However, including tools in go.mod increases the risk. To reduce this risk, you can use a separate modfile for tool dependencies instead of including them in your main go.mod. You can do this with the -modfile flag, specifying an alternative file such as go.tool.mod, like so: # Initialize a go.tool.mod modfile $ go mod init -modfile=go.tool.mod example.com # Add a tool to the module $ go get -tool -modfile=go.tool.mod golang.org/x/vuln/cmd/govulncheck # Run the tool from the command line $ go tool -modfile=go.tool.mod govulncheck # List all tools added to the module $ go list -modfile=go.tool.mod tool # Verify the integrity of the tool dependencies $ go mod verify -modfile=go.tool.mod # Upgrade or downgrade a tool to a specific version $ go get -tool -modfile=go.tool.mod golang.org/x/vuln/cmd/govulncheck@v1.1.2 # Upgrade all tools to their latest version $ go get -modfile=go.tool.mod tool # Remove a tool from the module $ go get -tool -modfile=go.tool.mod golang.org/x/vuln/cmd/govulncheck@none
Alex Edwards Feb 20, 2025 -
When working with Go, you have three main building blocks to help organize your code: files, packages and modules. But as Go developers, one of the common challenges we have is knowing how to best combine these building blocks to structure a codebase. In this post, I'll share a mix of mindset tips and practical advice that I hope will help, especially if you're new to the language. Different projects, different structures Aim for effective, not perfect Forget conventions from other languages or frameworks Don't use directories just to organize files Use one of the standard layouts as a skeleton … And then let it evolve If you're unsure, begin with two files Keep related things close Big files aren't necessarily bad Create packages judiciously Look out for warning signs 1. Different projects, different structures I'd like to start by emphasizing that there's no single "right" way to structure a Go codebase. If you're using a specific framework or tool to scaffold your project, then you might be given a fixed directory structure to work with. But outside of that, there are relatively few conventions widely-adopted by the Go community, and the answer to "how should I structure my codebase?" is almost always "it depends". It depends on what you're building, your business needs, your testing approach, your team, your dependencies or tooling, and any internal conventions you choose to follow. Take a look at GitHub, and you'll find thousands of examples of successful Go projects — with quite different structures. For example, mkcert and Kubernetes are both excellent Go projects, but they differ significantly in scale and purpose. And these differences mean that their repository structures also look quite different. A structure that works well for your current project might not be the same as the structures that you've used before or seen elsewhere — and that's perfectly fine. 2. Aim for effective, not perfect If you're a perfectionist, this might be easier said than done, but try not to stress too much about making your codebase structure perfect. If you find yourself obsessing over the "perfect" way to organize your code, try to let go of that. Instead, aim for a structure that works effectively enough for your specific project. By "effective enough," I mean that your code is easy to find and navigate, the logic is straightforward to follow, changes can be made with confidence, and you're not running into the kind of warning signs I'll cover later in this post. 3. Forget conventions from other languages or frameworks Don't feel guilty if your codebase structure doesn't follow the conventions or best practices you're used to from other languages or frameworks. If it works effectively for your Go project, that's what matters. For example, if you're an experienced Ruby on Rails or Django developer building your first Go web application, you might be tempted to recreate the familiar directory structure from those frameworks. But while you probably could make it work if you tried, it's unlikely to be the most effective or simple solution for your Go project. 4. Don't use directories just to organize files This is a subtle but important point, especially if you're new to Go. You shouldn't create new directories just to organize your .go files. In Go, creating a directory creates a new package, and placing a file in that directory makes it part of that package. Create a directory only when you have a specific reason to create a new package – not because you want a neater/cleaner/clearer directory structure for your files. 5. Use one of the standard layouts as a skeleton The official Go documentation has a great article describing some standard project layouts. I use one of these layouts as the high level "skeleton structure" in pretty much every Go project I work on nowadays, and recommend that you do too. Small projects For small projects, consider using the basic layout where you just put everything in the project's root directory, like this: ├── main.go ├── foo.go ├── bar.go ├── go.mod └── README.md A couple of real-life examples of projects that use this layout are mkcert and flow. Small projects with supporting packages For projects where you need to break out some code out into supporting packages, use the supporting packages layout. In this pattern, the supporting packages live within an internal directory in the project root, and your main package files and other project assets continue to live in the root directory. ├── internal │ └── foo │ └── foo.go ├── main.go ├── bar.go ├── go.mod └── README.md Note: The directory name internal carries a special meaning and behavior in Go: any package which lives under this directory can only be imported by code inside the parent of the internal directory. So if you put your supporting packages in an internal directory, like above, they cannot be imported by code outside of your project – even if the project code is publicly available somewhere like GitHub. That's often useful, because it means you can confidently refactor the code within the internal folder without inadvertently breaking something for other people. Larger projects For larger projects I generally recommend using the server project layout, especially if: Your project will have a lot non .go assets (like template files, SQL migrations, tool configurations and Makefiles); or Your project will contain more than one main package (e.g. main packages for a web application and a CLI tool) In this layout: Your executable main package files live in sub-directories under a cmd directory The rest of your Go packages live in an internal directory All other project assets remain in the root of the project directory Like so: ├── cmd │ └── foo │ ├── main.go │ └── bar.go ├── internal │ └── baz │ └── baz.go ├── go.mod ├── Makefile └── README.md For a more complete example, here's the directory structure from a recent project I worked on – including main packages for a web server and CLI application, along with various non-Go assets. 6. … And then let it evolve Use one of the standard project layouts as your high-level 'skeleton', but beyond that, I recommend letting the rest of the structure within that skeleton evolve naturally as development progresses. In other words, don't decide your directory structure or what .go files you will have upfront, and then shoehorn in your Go code into that. Instead, let the code you're writing guide the files and packages that you create. 7. If you're unsure, begin with two files If you're in any doubt, start with the basic layout and just a go.mod and main.go file in the root of your project directory. Then, as your project evolves, add additional files and packages as needed. Starting this way is perfectly OK. Personally, about half of the new projects I work on begin with just these two files — and nothing more. 8. Keep related things close This one feels pretty obvious – especially if you're an experienced developer – but it's still worth saying. As a general rule, keep related things close to each other – in the same .go file or in the same package. Here are a few examples: Constants, variables, custom types and utility functions (which are not reused by multiple packages) should be declared close to the code they support, in the same .go file or package. It may make sense to group utility functions that are related to each other and used in multiple places into a single reusable package. If you have a custom struct type, define any methods for it directly below the struct declaration in the same .go file. In a web application or API, define all routing rules together in a single function or .go file. There will probably be times when it makes sense for you to break the 'keep related things close' rule in your code, and that's OK, but it's a good principle to default to. 9. Big files aren't necessarily bad So long as it doesn't cause you practical problems during development or maintenance, file size in Go doesn't matter. It's OK to have .go files that contain a couple of lines, or thousands. Neither of these things is automatically considered an anti-pattern in Go. To give you an idea of some big files, the runtime/proc.go file from the Go standard library contains 6,548 lines of code. And /pkg/apis/core/validation/validation.go from the Kubernetes repository contains 8,606 lines of code (it's corresponding _test.go file also has over 26,000 lines). I'm not saying that your .go files should be big. More that if – on balance – it makes sense to have a big file… then it makes sense. Don't feel guilty about it, and don't feel like you need to break it into smaller files unless there's a good reason to. 10. Create packages judiciously In a similar vein, big packages aren't necessarily bad. In fact, I'd say that one of the more common mistakes in Go is splitting up your code into too many small packages. The problem with having lots of small packages is that it can add complexity to your application, especially when you need to share state, configuration, or dependencies across package boundaries. It also increases the likelihood of encountering import cycle problems. As a rule of thumb, only create additional packages when you have a demonstrable need or good reason to. For example: You have some code that you want to reuse. Putting the code in a standalone package facilitates this because you can then import the package and use it in different files throughout your project, or even copy-and-paste the package directory straight into another codebase. You want to isolate or enforce a boundary between the package code and the rest of your project. For example, you might use packages as an architectural tool to create lightweight decoupled 'layers' in your project code, or to isolate part of the codebase so it's easier for another person or team to work on separately. You have some code that acts as a 'black box' and moving it to a standalone package will reduce cognitive overhead and make your codebase clearer overall. 11. Look out for warning signs It can be hard to know exactly when your project structure is working effectively… instead it's probably easier to spot the signs that it isn't working effectively in practice. Some things to look out for are: You keep running into import cycle problems. It's hard to find things in the codebase, especially after time away or for new contributors. Relatively small changes often impact multiple packages or .go files. The flow of control is overly "jumpy" and hard to follow when debugging. There's a lot of duplication that's difficult to refactor out (note: some duplication is not always bad.) You're finding it difficult to manage errors appropriately. You feel like your are 'fighting the language', or you resort to using language features in a way that is not intended or idiomatic. It feels like a single file or package is doing too much and that there isn't a clear separation of responsibilities within it, and this is having a negative effect on the clarity of your code. If you spot these warning signs, it might be worth taking a step back and considering if tweaking the structure your codebase and packages will help to fix the problem.
Alex Edwards Jan 22, 2025 -
In almost all web applications that I build, I end up needing to persist some data – either for a short period of time (such as caching the result of an expensive database query), or for the lifetime of the running application until it is restarted. When your application is a single binary running on a single machine, a simple, effective, and no-dependency way to do this is by persisting the data in memory using a mutex-protected map. And since generics was introduced in Go 1.18, it's possible to write a generic implementation that you can use to persist various different data types in a type-safe way. Note: The code for this post can be found in this gist. Long-lived cache If you want to persist data for the lifetime of the running application (or until you deliberately delete the data), you can create a generic Cache type like this: package cache import ( "sync" "time" ) // Cache is a basic in-memory key-value cache implementation. type Cache[K comparable, V any] struct { items map[K]V // The map storing key-value pairs. mu sync.Mutex // Mutex for controlling concurrent access to the cache. } // New creates a new Cache instance. func New[K comparable, V any]() *Cache[K, V] { return &Cache[K, V]{ items: make(map[K]V), } } // Set adds or updates a key-value pair in the cache. func (c *Cache[K, V]) Set(key K, value V) { c.mu.Lock() defer c.mu.Unlock() c.items[key] = value } // Get retrieves the value associated with the given key from the cache. The bool // return value will be false if no matching key is found, and true otherwise. func (c *Cache[K, V]) Get(key K) (V, bool) { c.mu.Lock() defer c.mu.Unlock() value, found := c.items[key] return value, found } // Remove deletes the key-value pair with the specified key from the cache. func (c *Cache[K, V]) Remove(key K) { c.mu.Lock() defer c.mu.Unlock() delete(c.items, key) } // Pop removes and returns the value associated with the specified key from the cache. func (c *Cache[K, V]) Pop(key K) (V, bool) { c.mu.Lock() defer c.mu.Unlock() value, found := c.items[key] // If the key is found, delete the key-value pair from the cache. if found { delete(c.items, key) } return value, found } And you can use it like this: package main import ( "fmt" "time" "path/to/cache" ) func main() { // Create a new Cache instance myCache := cache.New[string, int]() // Set key-value pairs in the cache myCache.Set("one", 1) myCache.Set("two", 2) myCache.Set("three", 3) // Retrieve values from the cache value, found := myCache.Get("two") if found { fmt.Printf("Value for key 'two': %v\n", value) } else { fmt.Println("Key 'two' not found in the cache") } // Pop a key from the cache poppedValue, found := myCache.Pop("three") if found { fmt.Printf("Popped value for key 'three': %v\n", poppedValue) } else { fmt.Println("Key 'three' not found in the cache") } // Remove a key from the cache myCache.Remove("one") // Try to retrieve a removed key removedValue, found := myCache.Get("one") if found { fmt.Printf("Value for key 'one': %v\n", removedValue) } else { fmt.Println("Key 'one' not found in the cache (after removal)") } } Expiring cache You can extend this idea to associate an expiry time with every value in the cache, and launch a background goroutine to periodically remove expired entries. Like so: package cache import ( "sync" "time" ) // item represents a cache item with a value and an expiration time. type item[V any] struct { value V expiry time.Time } // isExpired checks if the cache item has expired. func (i item[V]) isExpired() bool { return time.Now().After(i.expiry) } // TTLCache is a generic cache implementation with support for time-to-live // (TTL) expiration. type TTLCache[K comparable, V any] struct { items map[K]item[V] // The map storing cache items. mu sync.Mutex // Mutex for controlling concurrent access to the cache. } // NewTTL creates a new TTLCache instance and starts a goroutine to periodically // remove expired items every 5 seconds. func NewTTL[K comparable, V any]() *TTLCache[K, V] { c := &TTLCache[K, V]{ items: make(map[K]item[V]), } go func() { for range time.Tick(5 * time.Second) { c.mu.Lock() // Iterate over the cache items and delete expired ones. for key, item := range c.items { if item.isExpired() { delete(c.items, key) } } c.mu.Unlock() } }() return c } // Set adds a new item to the cache with the specified key, value, and // time-to-live (TTL). func (c *TTLCache[K, V]) Set(key K, value V, ttl time.Duration) { c.mu.Lock() defer c.mu.Unlock() c.items[key] = item[V]{ value: value, expiry: time.Now().Add(ttl), } } // Get retrieves the value associated with the given key from the cache. func (c *TTLCache[K, V]) Get(key K) (V, bool) { c.mu.Lock() defer c.mu.Unlock() item, found := c.items[key] if !found { // If the key is not found, return the zero value for V and false. return item.value, false } if item.isExpired() { // If the item has expired, remove it from the cache and return the // value and false. delete(c.items, key) return item.value, false } // Otherwise return the value and true. return item.value, true } // Remove removes the item with the specified key from the cache. func (c *TTLCache[K, V]) Remove(key K) { c.mu.Lock() defer c.mu.Unlock() // Delete the item with the given key from the cache. delete(c.items, key) } // Pop removes and returns the item with the specified key from the cache. func (c *TTLCache[K, V]) Pop(key K) (V, bool) { c.mu.Lock() defer c.mu.Unlock() item, found := c.items[key] if !found { // If the key is not found, return the zero value for V and false. return item.value, false } // If the key is found, delete the item from the cache. delete(c.items, key) if item.isExpired() { // If the item has expired, return the value and false. return item.value, false } // Otherwise return the value and true. return item.value, true } And you can use this in much the same way: package main import ( "fmt" "time" "path/to/cache" ) func main() { // Create a new TTLCache instance myTTLCache := cache.NewTTL[string, int]() // Set key-value pairs with TTL in the cache myTTLCache.Set("one", 1, 5*time.Second) myTTLCache.Set("two", 2, 10*time.Second) myTTLCache.Set("three", 3, 15*time.Second) // Retrieve values from the cache value, found := myTTLCache.Get("two") if found { fmt.Printf("Value for key 'two': %v\n", value) } else { fmt.Println("Key 'two' not found in the cache or has expired") } // Wait for a while to allow some items to expire time.Sleep(7 * time.Second) // Try to retrieve an expired key expiredValue, found := myTTLCache.Get("one") if found { fmt.Printf("Value for key 'one': %v\n", expiredValue) } else { fmt.Println("Key 'one' not found in the cache or has expired") } // Pop a key from the cache poppedValue, found := myTTLCache.Pop("two") if found { fmt.Printf("Popped value for key 'two': %v\n", poppedValue) } else { fmt.Println("Key 'two' not found in the cache or has expired") } // Remove a key from the cache myTTLCache.Remove("three") }
Alex Edwards Dec 22, 2023 -
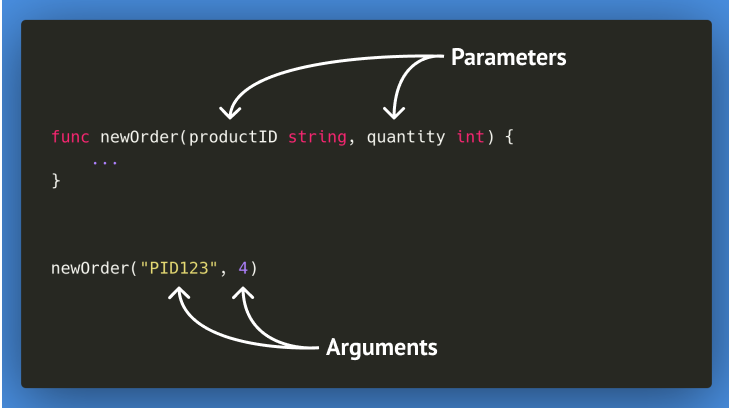
In this post we're going to talk about how (and why!) different types of function parameters behave differently in Go. If you're new (or even not-so-new) to Go, this can be a common source of confusion and questions. Why do functions generally mutate maps and slices, but not other data types? Why isn't my slice being mutated when I append to it in a function? Why doesn't assigning a new value to a pointer parameter have any effect outside the function? Once you understand how functions and the different Go types work, the answers to these kind of questions becomes clearer. You'll discover that Go's behavior consistently follows a few fairly straightforward rules, which I'll aim to highlight in this post. (If you just want the actionable takeaways, you can skip to the summary.) Note: In this post we'll be talking a lot about pointers, so if you're not 100% sure what pointers are, or the terms reference operator and dereference operator don't mean anything to you, then I recommend reading my gentle introduction to pointers tutorial before continuing with this one. Parameters and arguments Before we dive into this post, I'd like to quickly explain the difference between parameters and arguments. People sometimes use these terms interchangeably – but for this tutorial it's important that we're precise on the terminology. Parameters are the variables that you define in a function declaration. Arguments are the values that get passed to the function for execution. (A neat way to remember this is arguments = actual values.) Functions operate on copies of the arguments It's important to understand that when you call a function in Go, the function always operates on a copy of the arguments. That is, the parameters contain a copy of the argument values. We can illustrate this with the following short example: package main import "fmt" func incrementScore(s int) { s += 10 } func main() { score := 20 incrementScore(score) fmt.Println("The score is", score) // Prints: "The score is 20" } When you run this program it will print "The score is 20", not "The score is 30". That's because the parameter s in incrementScore() contains a copy of the score argument, and when we increment the value with s += 10 we are updating this copy, not the original score variable in the main() function. We can confirm this behavior by using the reference operator & to get the memory addresses of the score argument and s parameter, like so: package main import "fmt" func incrementScore(s int) { fmt.Println("has address", &s) // Prints: "has address 0xc000012040" s += 10 } func main() { score := 20 fmt.Println("has address", &score) // Prints: "has address 0xc000012028" incrementScore(score) } If you run this, you'll see that the printed memory addresses are different – in my case 0xc000012028 for the score argument and 0xc000012040 for the parameter s. That confirms that they are truly different variables, with their values stored at different locations in memory. With that in mind, it's not surprising that changing one doesn't change the other. Just to hammer home the point one more time: in Go, functions always operate on a copy of the arguments. There are no exceptions to this. Pointer parameters So, what can we do if we want incrementScore() to actually change the score variable? The answer is to change the signature of incrementScore() so that the parameter s is a pointer, like func incrementScore(s *int). Let's take a look at a working example and then talk it through. package main import "fmt" func incrementScore(s *int) { newScore := *s + 10 *s = newScore } func main() { score := 20 incrementScore(&score) fmt.Println("The score is", score) // Prints: "The score is 30" } In this code: We declare the score variable normally in main() with the line score := 20. Then in the line incrementScore(&score) we use the reference operator & to get a pointer to the score variable, and pass this pointer as the argument to incrementScore(). Remember, a pointer just contains a memory address – in this case it's the memory address of the score variable. When incrementScore() is executed, the parameter s contains a copy of this pointer. But this copy still holds the same memory address – the memory address of the score variable. In the line newScore := *s + 10 we use the dereference operator *s to 'read through' and get the underlying value at that memory address, and add ten to it. Then in the next line *s = newScore we use the dereference operator again to 'write through' and set newScore as the value at that memory address. The end result is that we've mutated the value at the memory address of the score variable. So when the program executes the final line of code, we get the output "The score is 30". I should point out that I made the code here a bit more verbose than it needs to be. You can simplify incrementScore() to use the += operator like so: func incrementScore(s *int) { *s += 10 } Write-though vs reassignment In the example above, we used the deference operator *s to read-through and then write-through to the underlying memory address. But what would happen if we didn't write-through, and assigned a completely new pointer value to s instead? Let's take a look. package main import "fmt" func incrementScore(s *int) { newScore := *s + 10 s = &newScore } func main() { score := 20 incrementScore(&score) fmt.Println("The score is", score) // Prints: "The score is 20" } If you run this, you'll see we're back to the situation where the score value isn't being mutated, and the program is printing "The score is 20" again. The only thing that's changed here is the body of the incrementScore() function. In this code: The line newScore := *s + 10 is exactly the same as before. It reads through to get the underlying score value from the s parameter, adds ten to it, and assigns the result to the newScore variable. But the line s = &newScore is different. Here we use the reference operator &newScore to get a pointer to the newScore variable, and assign this to s. This means that the variable s no longer contains the memory address of the score variable from main() – it now contains the memory address of the newScore variable. So, in this example, incrementScore() doesn't ever 'write-through' and change anything at the memory address of the score variable. All it does is replace s with a completely different pointer, which is then discarded when the function returns. This is just one example of a more general rule. Assigning a new value to a parameter with the = operator won't affect the argument in any way (unless the parameter is a pointer and you are dereferencing it and 'writing-through' a new value). Remember, the parameter is just a copy of the argument. Automatic dereferencing Let's continue with the same example, but update the incrementScore() function so that it accepts a pointer to a custom player struct, containing the player's name and score. package main import "fmt" type player struct { name string score int } // Make the parameter a pointer to a player struct. func incrementScore(p *player) { p.score += 10 } func main() { // Initialize a player struct and assign it to the variable p1. p1 := player{name: "Alice", score: 20} // Pass a pointer to p1 to incrementScore(). incrementScore(&p1) fmt.Printf("The score for %s is %d", p1.name, p1.score) // Prints: "The score for Alice is 30" } So as you might expect, because the parameter p in incrementScore() is a pointer, the changes that we make to p affect the data at the underlying memory address of p1 and the program prints "The score for Alice is 30". But the most interesting part here is the line of code p.score += 10 in the incrementScore() function. p is a pointer, but we appears that we don't have to dereference it using the * operator in order to write-through the new value. You could – if you wanted to – change this line to be (*p).score += 10. That's perfectly valid and will compile fine. But it's not necessary. If you have a pointer to a struct (which is what the p parameter is here), then Go will automatically dereference the pointer for you when you use the dot operator . on it to access a field or call a method. You can also use index expressions on a pointer to an array without dereferencing it. (Note that this will only work on arrays, not slices). For example: a := &[3]string{"a", "b", "c"} fmt.Println(a[1]) // Instead of having to write (*a)[1] "Reference types" Everything we've illustrated in this tutorial so far is true when the parameter type is a basic type, a struct, an array, a function, or a pointer to any of those things. However, the behavior that you get when a parameter is a map, slice or channel type needs some further discussion. Once you realize how these types are implemented at runtime behind the scenes, you'll see that their behavior actually follows the same rules as the other Go types – but nonetheless it can be a bit confusing at first. If you've been programming for a while, you might be familiar with the terms pass-by-value and pass-by-reference from other languages. You might have also heard or read people in the Go world saying things like "maps, slices and channels are reference types", or "maps, slices and channels are passed by reference". Well... the sentiment there is sort of right, but the wording isn't correct and needs tightening up. Firstly, Go does not support pass-by-reference behavior. I've probably banged this drum enough already now, but parameters are always a copy of the arguments. That is, they are always passed by value. Even pointers are passed by value; a pointer parameter will contain a copy of the pointer. Strictly speaking, there's also no such group of things in Go known as "reference types". To be fair, the Go spec did use "reference types" as an umbrella term for maps, slices and channels in one sentence, but this was removed over a decade ago (with the commit message Go has no 'reference types'). Basically, I recommend forgetting hearing the term "reference types" in relation to Go, and replacing it with an understanding of how maps, channels and slices are actually implemented. Maps and Channels The important thing to understand is that behind-the-scenes when your code is running, the Go runtime implements a map as a pointer to a runtime.hmap struct, and a channel as a pointer to a runtime.hchan struct. This means that map and channel parameters behave in a similar way to regular pointer parameters. The parameter will contain a copy of the map or channel, but this copy will still point to the same underlying memory location that holds the runtime.hmap or runtime.hchan struct. In turn, that means that any changes you make to a map or channel parameter will also mutate the argument. Let's look at an example, where we create a scores map containing the names and scores for multiple players like map[string]int{"Alice": 20, "Bob": 160}, and then pass it to a function that increments the score by ten for all players. package main import "fmt" func incrementAllScores(sm map[string]int) { for name := range sm { sm[name] += 10 } } func main() { scores := map[string]int{"Alice": 20, "Bob": 160} incrementAllScores(scores) fmt.Println(scores) // Prints: map[Alice:30 Bob:170] } When you run this, you'll see that incrementAllScores() mutates the scores argument and the program prints map[Alice:30 Bob:170] as the output. Because of this behavior, you normally won't need to use a pointer to a map or channel as a function parameter. On the other hand, if you don't want a function to mutate a map, you can use the maps.Clone() function to create a clone that points to a different memory location, and work on the clone instead. func example(m map[string]int) { cm := maps.Clone(sm) // ... do something with the cloned map. } Note: Although the Go runtime implements maps and channels as pointers to internal structures, this is a runtime implementation detail. Maps and channels are their own concrete types as far as the compiler is concerned, they are not pointers, and you can't do things like dereferencing a map or channel type like you would a pointer. Slices How slices work behind the scenes in Go can be pretty difficult to grok, and if you'd like a detailed explanation I recommend reading the Go Slices: usage and internals post on the official blog. But as a high-level summary, the Go runtime implements slices as a runtime.slice struct. This struct wraps a pointer to a (fixed-size) array that actually stores the slice data. You can think of a slice as being a bit like a 'window through' to a segment of this underlying array. So when you have a function with a slice parameter, the parameter will contain a copy of the slice argument you pass it. Effectively, it will have a copy of the runtime.slice struct. But the pointer in this copy of runtime.slice will still point to the same underlying array, meaning that any changes you make to a slice parameter will also mutate the argument. To demonstrate this, let's say that we have a slice containing some player scores, and pass it to a addBonus() function that adds fifty to each score in the slice. package main import "fmt" func addBonus(s []int) { for i := range s { s[i] += 50 } } func main() { scores := []int{10, 20, 30} addBonus(scores) fmt.Println(scores) // Prints: [60 70 80] } When you run this code it will print [60 70 80], demonstrating that the changes made in addBonus() mutated the elements in the scores slice. If you don't want a function to mutate a slice, you can make a clone of it using slices.Clone() and work on that instead. func example(s []int) { cs := slices.Clone(s) // ... do something with the cloned slice. } So far, so good. Slices generally behave pretty much like maps and channels, in the sense that changing a slice parameter will mutate the argument. If you don't want that, you can make a clone at the start of the function and use the clone instead. But using append() on a slice parameter can sometimes be a source of confusion. Consider the following code, where we create a variadic addScores() function that appends some new values to a scores slice. package main import "fmt" func addScores(s []int, values ...int) { s = append(s, values...) } func main() { scores := []int{10, 20, 30} addScores(scores, 40, 50, 60) fmt.Println(scores) // Prints: [10 20 30] } (Yes, this is a bit of a silly example, but it illustrates the point in a simple way.) When you run this program, it will print out [10 20 30] – demonstrating that the append() operation in addScores() has not affected the scores argument. This actually makes sense and is consistent with the other behavior we've seen in this post. Earlier on I said: Assigning a new value to a parameter with the = operator won't affect the argument in any way (unless the parameter is a pointer and you are dereferencing it and 'writing-through' a new value). Remember, the parameter is just a copy of the argument. The code s = append(s, values...) is no different. We're replacing the s parameter with a new value, and this operation doesn't touch the argument in any way. Note: As a slight aside, the slice returned by append() may or may not point to the same underlying array as the original slice that you're appending too. It all depends on whether the underlying array has enough capacity to store the new values or not. If a new underlying array needs to be reallocated, the pointer in the slice returned by append() will be different. If it doesn't, then the pointer will remain the same and point to the same underlying array. When it comes to slices as a function parameter, this means that if you change the elements in a slice parameter after a call to append(), the change may or may not mutate the argument. It all depends on whether the append() operation resulted in a new underlying array being allocated or not. You can see an example of this behavior here. So what about when you want an append() operation in a function to mutate the argument? The answer here is to make the parameter a pointer to a slice, like so: package main import "fmt" func addScores(s *[]int, values ...int) { *s = append(*s, values...) } func main() { scores := []int{10, 20, 30} addScores(&scores, 40, 50, 60) fmt.Println(scores) // Prints: [10 20 30 40 50 60] } Now with the line *s = append(*s, values...), whatever is returned by the append() function will be 'written-through' to the memory address of the scores argument. Exactly the same logic applies for operations to 'reslice' a slice and assign the result back to the parameter, like s = s[0:1]. If you want this operation to mutate the argument, you should make the parameter a pointer and dereference it like *s = (*s)[0:1]. Summary We've covered a lot of ground in this post, so I'll try to summarize everything into a handful of take-away points. Parameters always contain a copy of the argument. Go doesn't have "reference types" or support pass-by-reference semantics. For the basic Go types, as well as structs, arrays and functions, changing the value of a parameter in the function body won’t change the value of the argument. But if you do want to mutate the argument, you can use a pointer parameter instead and dereference it inside the function to ‘write-through’ a new value to the argument's memory address. For common operations on structs and arrays, Go will automatically dereference the pointer for you. Because of the way that they're implemented by the Go runtime, changes you make to map, slice, channel parameters in a function will mutate the argument. If you don't want this, make a clone at the start of the function and use that instead. Using the = operator to assign a new value to a parameter does not affect the argument (unless you are manually-or-automatically dereferencing a pointer and 'writing-through' a new value). So for slices, if you want a function to perform an append or reslice operation that mutates the argument, you should use a pointer to a slice as the function parameter and dereference it as necessary.
Alex Edwards Nov 8, 2023 -
Whenever I start a new Go project, one of the first things I do is create a Makefile in the root of my project directory. This Makefile serves two purposes. The first is to automate common admin tasks (like running tests, checking for vulnerabilities, pushing changes to a remote repository, and deploying to production), and the second is to provide short aliases for Go commands that are long or difficult to remember. I find that it's a simple way to save time and mental overhead, as well as helping me to catch potential problems early and keep my codebases in good shape. While the exact contents of the Makefile changes from project to project, in this post, I want to share the boilerplate that I'm currently using as a starting point. It's generic enough that you should be able to use it as-is for almost all projects. Note: You can also find the Makefile code in this Gist. File: Makefile # Change these variables as necessary. main_package_path = ./cmd/example binary_name = example # ==================================================================================== # # HELPERS # ==================================================================================== # ## help: print this help message .PHONY: help help: @echo 'Usage:' @sed -n 's/^##//p' ${MAKEFILE_LIST} | column -t -s ':' | sed -e 's/^/ /' .PHONY: confirm confirm: @echo -n 'Are you sure? [y/N] ' && read ans && [ $${ans:-N} = y ] .PHONY: no-dirty no-dirty: @test -z "$(shell git status --porcelain)" # ==================================================================================== # # QUALITY CONTROL # ==================================================================================== # ## audit: run quality control checks .PHONY: audit audit: test go mod tidy -diff go mod verify test -z "$(shell gofmt -l .)" go vet ./... go run honnef.co/go/tools/cmd/staticcheck@latest -checks=all,-ST1000,-U1000 ./... go run golang.org/x/vuln/cmd/govulncheck@latest ./... ## test: run all tests .PHONY: test test: go test -v -race -buildvcs ./... ## test/cover: run all tests and display coverage .PHONY: test/cover test/cover: go test -v -race -buildvcs -coverprofile=/tmp/coverage.out ./... go tool cover -html=/tmp/coverage.out ## upgradeable: list direct dependencies that have upgrades available .PHONY: upgradeable upgradeable: @go run github.com/oligot/go-mod-upgrade@latest # ==================================================================================== # # DEVELOPMENT # ==================================================================================== # ## tidy: tidy modfiles and format .go files .PHONY: tidy tidy: go mod tidy -v go fmt ./... ## build: build the application .PHONY: build build: # Include additional build steps, like TypeScript, SCSS or Tailwind compilation here... go build -o=/tmp/bin/${binary_name} ${main_package_path} ## run: run the application .PHONY: run run: build /tmp/bin/${binary_name} ## run/live: run the application with reloading on file changes .PHONY: run/live run/live: go run github.com/cosmtrek/air@v1.43.0 \ --build.cmd "make build" --build.bin "/tmp/bin/${binary_name}" --build.delay "100" \ --build.exclude_dir "" \ --build.include_ext "go, tpl, tmpl, html, css, scss, js, ts, sql, jpeg, jpg, gif, png, bmp, svg, webp, ico" \ --misc.clean_on_exit "true" # ==================================================================================== # # OPERATIONS # ==================================================================================== # ## push: push changes to the remote Git repository .PHONY: push push: confirm audit no-dirty git push ## production/deploy: deploy the application to production .PHONY: production/deploy production/deploy: confirm audit no-dirty GOOS=linux GOARCH=amd64 go build -ldflags='-s' -o=/tmp/bin/linux_amd64/${binary_name} ${main_package_path} upx -5 /tmp/bin/linux_amd64/${binary_name} # Include additional deployment steps here... The Makefile is organized into several sections, each with its own set of targets: 1. HELPERS help: Prints a help message for the Makefile, including a list of available targets and their descriptions. confirm: Prompts the user to confirm an action with a "y/N" prompt. no-dirty: Checks that there there are no untracked files or uncommitted changes to the tracked files in the current git repository. 2. QUALITY CONTROL audit: Runs quality control checks on the codebase, including using go mod tidy -diff to check that the go.mod and go.sum files are up-to-date and correctly formatted, verifying the dependencies with go mod verify, running test -z "$(shell gofmt -l .)" to check that all .go files are correctly formatted, running static analysis with go vet and staticcheck, checking for vulnerabilities using govulncheck, and running all tests. Note that it uses go run to execute the latest versions of the remote staticcheck and govulncheck packages, meaning that you don't need to install these tools first. I've written more about this pattern in a previous post. test: Runs all tests. Note that we enable the race detector and embed build info in the test binary. test/cover: Runs all tests and outputs a coverage report in HTML format. upgradeable: List all direct module dependencies that have a newer version available, using the oligot/go-mod-upgrade tool. 3. DEVELOPMENT tidy: Updates the dependencies and formats the go.mod and go.sum using go mod tidy, and formats all .go files using go fmt. build: Builds the package at main_package_path and outputs a binary at /tmp/bin/{binary_name}. run: Calls the build target and then runs the binary. Note that my main reason for not using go run here is that go run doesn't embed build info in the binary. run/live: Use the air tool to run the application with live reloading enabled. When changes are made to any files with the specified extensions, the application is rebuilt and the binary is re-run. Depending on the project I often add more to this section, such as targets for connecting to a development database instance and managing SQL migrations. Here's an example. 4. OPERATIONS push: Push changes to the remote Git repository. This asks for y/N confirmation first, and automatically runs the audit and no-dirty targets to make sure that all audit checks are passing and there are no uncommitted changes in the repository before the push is executed. production/deploy: Builds the a binary for linux/amd64 architecture, compress it using upx, and then run any deployment steps. Note that this target asks for y/N confirmation before anything is executed, and also runs the audit and no-dirty checks too. Depending on the project I often add more to this section too. For example, a staging/deploy rule for deploying to a staging server, production/connect for SSHing into a production server, production/log for viewing production logs, production/db for connecting to the production database, and production/upgrade for updating and upgrading software on a production server. Usage Each of these targets can be executed by running make followed by the target name in your terminal. For example: $ make tidy go mod tidy -v go fmt ./... If you run make help (or the naked make command without specifiying a target) then you'll get a description of the available targets. $ make help Usage: help print this help message tidy tidy modfiles and format .go files audit run quality control checks test run all tests test/cover run all tests and display coverage build build the application run run the application run/live run the application with reloading on file changes push push changes to the remote Git repository production/deploy deploy the application to production
Alex Edwards May 2, 2023 -
One of my favorite things about the recent Go 1.20 release is the new http.ResponseController type, which brings with it three nice benefits: You can now override your server-wide read and write deadlines on a per request basis. The pattern for using the http.Flusher and http.Hijacker interfaces is clearer and feels less hacky. No more type assertions necessary! It makes it easier and safer to create and use custom http.ResponseWriter implementations. The first two benefits are mentioned in the release notes, but the third one seems to have gone under the radar a bit... which is a shame, because it's very helpful! Let's dive in a take a look. Per-request deadlines Go's http.Server has ReadTimeout and WriteTimeout settings, which you can use to automatically close a HTTP connection if reading a request or writing response takes longer than a fixed amount of time. These settings are server-wide and apply to all requests, irrespective of the handler or URL. With http.ResponseController you can now use the SetReadDeadline() and SetWriteDeadline() methods to relax or tighten these settings on a per-request basis if you need too. For example: func exampleHandler(w http.ResponseWriter, r *http.Request) { rc := http.NewResponseController(w) // Set a write deadline in 5 seconds time. err := rc.SetWriteDeadline(time.Now().Add(5 * time.Second)) if err != nil { // Handle error } // Do something... // Write the response as normal. w.Write([]byte("Done!")) } This is particularly helpful in an application where you have a small number of handlers that need longer deadlines than all the others, for things like processing a file upload or carrying out a long-running operation. A few other details to mention: If you set a short server-wide deadline, and that deadline is hit before you call SetWriteDeadline() or SetReadDeadline() then they will have no effect. The server-wide deadline wins. If your underlying http.ResponseWriter doesn't support setting per-request deadlines, then calling SetWriteDeadline() or SetReadDeadline() will return a http.ErrNotSupported error. You can effectively remove the server-wide deadline on a per-request basis by passing a zero-valued time.Time struct to SetWriteDeadline() or SetReadDeadline(). For example: rc := http.NewResponseController(w) err := rc.SetWriteDeadline(time.Time{}) if err != nil { // Handle error } Flusher and Hijacker interfaces The http.ResponseController type also makes it slightly nicer to use the 'optional' http.Flusher and http.Hijacker interfaces. For example, before Go 1.20 you would use a code pattern like this this to flush response data to the client: func exampleHandler(w http.ResponseWriter, r *http.Request) { f, ok := w.(http.Flusher) if !ok { // Handle error } for i := 0; i < 5; i++ { fmt.Fprintf(w, "Write %d\n", i) f.Flush() time.Sleep(time.Second) } } Now you can do this: func exampleHandler(w http.ResponseWriter, r *http.Request) { rc := http.NewResponseController(w) for i := 0; i < 5; i++ { fmt.Fprintf(w, "Write %d\n", i) err := rc.Flush() if err != nil { // Handle error } time.Sleep(time.Second) } } The pattern for hijacking a connection is similar: func (app *application) home(w http.ResponseWriter, r *http.Request) { rc := http.NewResponseController(w) conn, bufrw, err := rc.Hijack() if err != nil { // Handle error } defer conn.Close() // Do something... } Again, if your underlying http.ResponseWriter doesn't support support flushing or hijacking, then calling Flush() or Hijack() on a http.ResponseController will also return an http.ErrNotSupported error. Custom http.ResponseWriters It's now also easier and safer to create and use custom http.ResponseWriter implementations that still support flushing and hijacking. It's probably easiest to explain how this works with an example, so let's look at the code for a custom http.ResponseWriter implementation that records the HTTP status code of a response. type statusResponseWriter struct { http.ResponseWriter // Embed a http.ResponseWriter statusCode int headerWritten bool } func newstatusResponseWriter(w http.ResponseWriter) *statusResponseWriter { return &statusResponseWriter{ ResponseWriter: w, statusCode: http.StatusOK, } } func (mw *statusResponseWriter) WriteHeader(statusCode int) { mw.ResponseWriter.WriteHeader(statusCode) if !mw.headerWritten { mw.statusCode = statusCode mw.headerWritten = true } } func (mw *statusResponseWriter) Write(b []byte) (int, error) { mw.headerWritten = true return mw.ResponseWriter.Write(b) } func (mw *statusResponseWriter) Unwrap() http.ResponseWriter { return mw.ResponseWriter } So here we've defined a custom statusResponseWriter type, which embeds an existing http.ResponseWriter and implements custom WriteHeader() and Write() methods to support the recording of the HTTP response status code. But the important thing to notice here is the Unwrap() method at the end, which returns the original embedded http.ResponseWriter. When you use the new http.ResponseController type to to flush, hijack or set a deadline, it will call this Unwrap() method to access the original http.ResponseWriter. This is done recursively if necessary, so you can potentially layer multiple custom http.ResponseWriter implementations on top of each other. Let's look at a complete example, where we use this statusResponseWriter in conjunction with some middleware to log response status codes, along with a handler that sends a 'normal' response and another that uses the new http.ResponseController type to send a flushed response. package main import ( "log" "net/http" "time" ) type statusResponseWriter struct { http.ResponseWriter // Embed a http.ResponseWriter statusCode int headerWritten bool } func newstatusResponseWriter(w http.ResponseWriter) *statusResponseWriter { return &statusResponseWriter{ ResponseWriter: w, statusCode: http.StatusOK, } } func (mw *statusResponseWriter) WriteHeader(statusCode int) { mw.ResponseWriter.WriteHeader(statusCode) if !mw.headerWritten { mw.statusCode = statusCode mw.headerWritten = true } } func (mw *statusResponseWriter) Write(b []byte) (int, error) { mw.headerWritten = true return mw.ResponseWriter.Write(b) } func (mw *statusResponseWriter) Unwrap() http.ResponseWriter { return mw.ResponseWriter } func main() { mux := http.NewServeMux() mux.HandleFunc("/normal", normalHandler) mux.HandleFunc("/flushed", flushedHandler) log.Print("Listening...") err := http.ListenAndServe(":3000", logResponse(mux)) if err != nil { log.Fatal(err) } } func logResponse(next http.Handler) http.Handler { return http.HandlerFunc(func(w http.ResponseWriter, r *http.Request) { sw := newstatusResponseWriter(w) next.ServeHTTP(sw, r) log.Printf("%s %s: status %d\n", r.Method, r.URL.Path, sw.statusCode) }) } func normalHandler(w http.ResponseWriter, r *http.Request) { w.WriteHeader(http.StatusTeapot) w.Write([]byte("OK")) } func flushedHandler(w http.ResponseWriter, r *http.Request) { rc := http.NewResponseController(w) w.Write([]byte("Write A....")) err := rc.Flush() if err != nil { log.Println(err) return } time.Sleep(time.Second) w.Write([]byte("Write B....")) err = rc.Flush() if err != nil { log.Println(err) } } If you want, you can run this and try making requests to the /normal and /flushed endpoints: $ curl http://localhost:3000/normal OK $ curl --no-buffer http://localhost:3000/flushed Write A....Write B.... You should see the response from the flushedHandler in two parts, first the Write A... part, then followed a second later by the Write B... part. And you should see that the statusResponseWriter and logResponse middleware have successfully written log messages, including the correct HTTP status code for each response. $ go run main.go 2023/03/06 21:41:21 Listening... 2023/03/06 21:41:32 GET /normal: status 418 2023/03/06 21:41:44 GET /flushed: status 200
Alex Edwards Mar 7, 2023 -
This tutorial is written for anyone who is new to Go. In it we'll explain what packages, import statements and modules are in Go, how they work and relate to each other and — hopefully — clear up any questions that you have. We'll start at a high level, then work down to the details later. There's quite a lot of content in this tutorial, so I've broken it down into the following eight sections: Packages The main package Importing and using standard library packages Unused and missing imports Exported vs unexported Modules Using multiple packages in your code Importing and using third-party packages Organizing import statements To help illustrate things throughout this post we'll build a small CLI (command-line interface) application which generates and prints out a random 'lucky number'. If you'd like to follow along, run the following commands: $ mkdir lucky-number $ cd lucky-number $ touch main.go Then add the following code to the main.go file: File: main.go package main import ( "fmt" "math/rand" ) func main() { // Get a random number between 0 and 99 inclusive. n := rand.Intn(100) // Print it out. fmt.Printf("Your lucky number is %d!\n", n) } At this point you should be able to run the application and see some output like this: $ go run main.go Your lucky number is 81! Packages A package in Go is essentially a named collection of one or more related .go files. In Go, the primary purpose of packages is to help you isolate and reuse code. Every .go file that you write should begin with a package {name} statement which indicates the name of the package that the file is a part of. For example, in the 'lucky number' code above, the package main line declares that the main.go file is part of a package named main. At the moment: Our 'lucky number' application consists of one package, with the package name main. The main package is made up of one file, with the filename main.go. It's important to explain that code in a package can access and use all types, constants, variables and functions within that package — even if they are declared in a different .go file. Let's illustrate this by splitting our 'lucky number' code across two files. Go ahead and add an additional random.go file: $ touch random.go Then update the two files so that the main() function calls a new randomNumber() function, like so: File: random.go package main import ( "math/rand" ) func randomNumber() int { return rand.Intn(100) } File: main.go package main import ( "fmt" ) func main() { fmt.Printf("Your lucky number is %d!\n", randomNumber()) } So now: Our 'lucky number' application consists of two .go files. Both files are part of the main package (because they both start with a package main statement). If you re-run the application using the two files, you should see the same output. $ go run *.go Your lucky number is 81! Note: If your terminal doesn't support wildcard expansion, you'll need to list the files explicitly and run the command $ go run main.go random.go instead. This example is a bit contrived but it illustrates the point nicely — our main() function is able to call our randomNumber() function because they are part of the same package — despite being in separate .go files. It's totally OK to have quite a lot of .go files in the same package. Having 5, 10 or even 20 files — and thousands of lines of code — in the same package is not uncommon or an anti-pattern in Go. The main package In Go, main is actually a special package name which indicates that the package contains the code for an executable application. That is, it indicates that the package contains code that can be built into a binary and run. Any package with the name main must also contain a main() function somewhere in the package which acts as the entry point for the program. If it doesn't, and you try to run it, you will get this error: $ go run *.go function main is undeclared in the main package It's conventional for your main() function to live in a file with the filename main.go. Technically it doesn't have to, but following this convention makes the application entry point easier to find for anyone reading your code in the future. As an aside, if you try to build or run a non-main package it will also result in an error. For example, if you changed the 'lucky number' code so that the package name is foo instead of main and try to run it, you will get the following (somewhat confusing) error: $ go run *.go package command-line-arguments is not a main package Importing and using standard library packages I'm sure you know this already, but individual .go files can import and use exported types, constants, variables and functions from other packages — including the packages in the Go standard library. The complete tree of Go standard library packages is available here. In our 'lucky number' code we've imported and used the math/rand and fmt packages from the standard library to help us generate a random number and print a message. For example, in the random.go file: File: random.go package main import ( "math/rand" // Import the math/rand package. ) func randomNumber() int { return rand.Intn(100) // Call the Intn() function from the math/rand package. } When importing a package from the standard library you need to use the full path to the package in the standard library tree, not just the name of the package. For example: import ( "fmt" "math/rand" // Not "rand" "net/http" // Not "http" "net/http/httptest" // Not "httptest" ) Once imported, the package name becomes an accessor for the contents of that package. Conveniently, all the packages in the Go standard library have a package name which is the same as the final element of their import path. That means we can use the Intn() function from math/rand by calling rand.Intn(), or the Printf() function from fmt by calling fmt.Printf(). As well as importing packages from the standard library it's possible to import your own packages or third-party packages too. We'll get to that shortly. Unused and missing imports If you import a package but don't actually use it in your code, it will result in a compile-time error. For example, if you import the os package but don't use it you will get an error like: "os" imported and not used Similarly, you'll also get a compile-time error if a package is referenced in your code but not imported. For example, if you try to use the strconv package without importing it you'll get an error like this: undefined: strconv When you're developing rapidly it can sometimes be annoying to keep editing your import statements, but ultimately this behavior helps to keep your code correct and your import list clean and accurate. Tip: You can use the goimports tool to automatically add and remove import statements in your .go files. It's also possible to integrate this with many popular text editors (including VSCode, Emacs and Sublime), so that import statements are updated for you whenever you save a file. But you should be careful if you are using one of the rand or template packages in your code — these standard library package names are ambiguous and you should always check that goimports has added the one that you want (for example, that it has imported html/template instead of text/template, or crypto/rand instead of math/rand). Exported vs unexported Earlier in this tutorial I said: Individual .go files can import and use exported types, constants, variables, functions and methods from other packages — including the packages in the Go standard library. So what does exported mean? Essentially, something in Go code is exported if its name starts with a capital letter. Otherwise it is unexported. For example: var fooBaz string // This is an unexported variable. var FooBar string // This is an exported variable. func fooBaz() {...} // This is an unexported function. func FooBar() {...} // This is an exported function. type fooBaz struct {...} // This is an unexported type. type FooBar struct {...} // This is an exported type. The difference between them is: Unexported things are 'private' to the package that they are declared in. They are only visible to code in the same package. In contrast, exported things in a package are 'public' and are visible to any code that that imports the package. In other words: when you import a package you get to use its exported things, but not its unexported things. Depending on your programming background, capitalization might seem like a funny way to control visibility. But once you get used to it, it has some positives. It's simple, doesn't require you to remember any additional syntax, and it's trivial to see at a glance whether something is exported or not — even when that thing is being used far away from where it is declared. Tips: Generally don't export things unless you actually have a reason to (i.e. don't capitalize a name just because it looks nicer!). Additionally, a main package should never normally be imported by anything, so it probably shouldn't have any exported things in it. Modules If you have a small application which only imports packages from the standard library, then what we've done so far works just fine. But if you want to import and use a third-party package — or structure your code so it's split into multiple packages — then you first need to turn your code into a Go module. The Go Wiki defines modules like this: A module is... a tree of Go source files with a go.mod file in the tree's root directory. In our example the lucky-number directory already contains our two .go files, so all we need to do is add a valid go.mod file to the directory to make it a module. The easiest way to do this is by running the go mod init command and passing in a module path as the final argument, like so: $ go mod init lucky-number.alexedwards.net go: creating new go.mod: module lucky-number.alexedwards.net go: to add module requirements and sums: go mod tidy Before we go further, let's talk about module paths. The module path act as a canonical identifier for a module. Ideally it should be unique and something that is unlikely to be used by anyone else, in any other project. In the command above I've used lucky-number.alexedwards.net as the module path, but it could be (almost) any string value. In the Go community it's conventional to base your module path on a URL that you own or control. So, for this example, a good module path would be something like lucky-number.alexedwards.net or github.com/alexedwards/lucky-number. Important: In most cases, your module path doesn't need to be a 'real' functioning URL with something hosted at it. It's really just an arbitrary string which acts as a unique identifier for your module. But… if you plan to make your code available for reuse (e.g. as an open source package) then your module path must be the location that the code will be fetchable from. So, for example, if you're planning to host the code at github.com/example/package the module path should also be github.com/example/package. OK, let's take a look at the go.mod file that was generated for us: File: go.mod module lucky-number.alexedwards.net go 1.19 We can see that (for now) all this does is declare the module path, along with the version of Go that you are using. We'll revisit this file again later when we talk about using third-party Go packages. Tip: If you're ever looking at some code and want to know what it's module path is, just take a look in its go.mod file. So at this point in the tutorial: The code in the lucky-number directory is now a Go module. The Go module has the module path lucky-number.alexedwards.net. The module contains one main package, which is made up of our main.go and random.go files. Using multiple packages in your code Let's make our 'lucky number' application structure a bit more complex and split up the code into two packages. Before we get started on this change there are a couple of rules and conventions to be aware of: In Go, one package == one directory. That is, all .go files for a package should be contained in the same directory, and a directory should contain the .go files for one package only. You shouldn't ever have .go files with different package names in the same directory. For all non-main packages, the directory name that the code lives in should be the same as the package name. When choosing a name you should pick something that is short, descriptive, lower case and ideally one word. The Go blog has a helpful post with additional guidance and some examples of good and bad names. With those things in mind, let's restructure our 'lucky number' application so that the code for generating the random number is isolated in a new, separate, package called random. $ rm random.go $ mkdir random $ touch random/number.go The file tree for the lucky-number directory should now look like this: $ tree --dirsfirst . ├── random │ └── number.go ├── go.mod └── main.go The important thing to point out is that all the .go files are still part of the same module — they are all part of a file tree with a single go.mod file in the root directory of the tree. OK, let's go ahead and add the following code to the new random/number.go file: File: random/number.go package random import ( "math/rand" ) func Number() int { return rand.Intn(100) } There are four things I'd like to quickly highlight and re-iterate here: The number.go file is part of the random package (notice the statement in the first line). The Number() function is exported (i.e. its name begins with a capital letter). This means it will be visible to any code which imports the random package. The directory name that the code lives in is exactly the same as the package name (random) . The random package is part of the lucky-number.alexedwards.net module. Next let's update our main.go file to import and use the new package. Like so: File: main.go package main import ( "fmt" // Import the random package. "lucky-number.alexedwards.net/random" ) func main() { // Call the random.Number() function to get the random number. Notice that // we use the package name as the accessor, just like we do for the standard // library packages. fmt.Printf("Your lucky number is %d!\n", random.Number()) } The most interesting thing about this is the import path for our new package. When you are importing packages that are part of the same module as your current .go file, the import statement should take the form: import {module path}/{path to the package relative to your go.mod file} So in this case, the module path is lucky-number.alexedwards.net and the path within the module for the package is random, giving us an import path of lucky-number.alexedwards.net/random. Before we go further, I'd like to point out that I'm making this code structure more complicated than it needs to be (just to illustrate things for teaching purposes). There's no real reason here to have split the code into two packages. In fact, overusing packages is a common mistake that newcomers to Go make. Generally you should only split code into additional packages if you have a demonstrable reason to, such as: You want a convenient way to reuse it the code, or to make it available for reuse. You want to isolate or enforce some boundary between the package code and the rest of your codebase. You have some complex code that acts as a 'black box' and moving it to a standalone package will reduce cognitive overhead when working with the rest of your code. A more complex structure Let's tweak the directory structure of our 'lucky number' code a bit more. We'll: Move the main package files into a new cmd/cli directory. Move the random package files into a new internal/random directory. (Again, this is just for teaching purposes. This structure isn't actually necessary for such a small and simple application.) $ mkdir -p cmd/cli internal $ mv main.go cmd/cli/ $ mv random internal/ $ tree --dirsfirst . ├── cmd │ └── cli │ └── main.go ├── internal │ └── random │ └── number.go └── go.mod Once that's done, let's update the cmd/cli/main.go file so that the random package is imported from its new location. Like so: File: cmd/cli/main.go package main import ( "fmt" // Import the random package using the new location under the // `internal` directory. "lucky-number.alexedwards.net/internal/random" ) func main() { fmt.Printf("Your lucky number is %d!\n", random.Number()) } You should now be able to run the application by calling go run with the path to the main package. Like this: $ go run ./cmd/cli Your lucky number is 81! This change helps to illustrate a couple of things: It's not necessary for a main package to live in the module root. It can be anywhere. In fact, it's totally OK for a module to contain multiple main packages. For example, in a larger project you could have a cmd/cli directory with the main package for a CLI tool, and a cmd/web directory with the main package for a web application in the same module. Your non-main packages don't need to be a direct child of the module root either. They can be anywhere in an arbitrarily deep directory structure within the module. Note: The directory name internal has a special behavior in Go. Any packages which live under a directory called internal can only be imported by code inside the parent of the internal directory. In this example, it means that any packages nested under internal can only be imported by code inside our lucky-number directory. Or, looking at it the other way, any packages under internal cannot be imported by code outside of the lucky-number directory. This is useful because it prevents other codebases from importing and relying on the (potentially unversioned and unsupported) packages in an internal directory — even if the code is publicly available somewhere like GitHub. Importing and using third-party packages Let's quickly explore how to import and use a third-party packages. As an example, we'll import the github.com/fatih/color package and use it change the color of the message that our application prints out — but the general process is exactly the same for most other third-party packages too. First you need to download the third-party code from its public repository to your local machine, which you can do with go get: $ go get github.com/fatih/color@latest go: added github.com/fatih/color v1.14.1 go: added github.com/mattn/go-colorable v0.1.13 go: added github.com/mattn/go-isatty v0.0.17 go: added golang.org/x/sys v0.3.0 Notice that go get will recursively download any dependencies that the code has too. Then using the third-party package in your code is fairly straightforward. You'll need to import the third-party package using its module path (which should normally be the same as the repository location that you used when running go get), and then access its exported things via its package name (which in most cases should be the same as the final element of the import path… if it is not, the documentation for the package should make that clear). Let's head to our main.go file and update the code to print a colored message using github.com/fatih/color. File: cmd/cli/main.go package main import ( "lucky-number.alexedwards.net/internal/random" // Import the color package. "github.com/fatih/color" ) func main() { // Use it to print the message in green. green := color.New(color.FgGreen) green.Printf("Your lucky number is %d!\n", random.Number()) } If you run the application again now, you should see a colorized message similar to this: $ go run ./cmd/cli Your lucky number is 81! The go.mod file should have been updated to include the dependencies that the lucky-number.alexedwards.net module has too, along with their exact version numbers. It should look similar to this: File: go.mod module lucky-number.alexedwards.net go 1.19 require github.com/fatih/color v1.14.1 require ( github.com/mattn/go-colorable v0.1.13 // indirect github.com/mattn/go-isatty v0.0.17 // indirect golang.org/x/sys v0.3.0 // indirect ) We can see that github.com/fatih/color is listed as a direct dependency of the lucky-number.alexedwards.net module, and the other dependencies are indirect (that is, our code doesn't import them directly, but they are imported by a package that our code imports). Note: If your go.mod file looks different to this, try running the $ go mod tidy command to format it. go mod tidy also ensures that the listed dependencies match the source code in your module, so it's a good idea to run this command fairly often… especially before committing a change that adds or removes a third-party package import statement in your code. Also note: If you are using a Go version older than 1.17, indirect dependencies are handled differently and not all of them will necessarily be listed in your go.mod file. As an aside, if you are ever looking at a go.mod file and wondering why something is listed as a dependency you can use the $ go mod why command. For example, if you wanted to find out why golang.org/x/sys is an indirect dependency for the lucky-number.alexedwards.net module you could run: $ go mod why -m golang.org/x/sys # golang.org/x/sys lucky-number.alexedwards.net/cmd/cli github.com/fatih/color github.com/mattn/go-isatty golang.org/x/sys/unix We can see from the output that our cmd/cli package imports github.com/fatih/color, which in turn imports github.com/mattn/go-isatty, which in turn imports golang.org/x/sys/unix. Version 2+ packages Sometimes the third-party packages that you want to use will be in modules with a major version number greater than 1 (like v2.0.0, v3.4.5 etc). In Go, it is conventional for modules with a major version number greater than 1 to append the major version number to their module path. A few popular real-life examples are: github.com/go-chi/chi/v5 github.com/jackc/pgx/v5 github.com/go-playground/validator/v10 Typically you will need to go get these version 2+ packages using the full module path including the version number. Like this: $ go get github.com/go-chi/chi/v5 go: added github.com/go-chi/chi/v5 v5.0.8 And then you need to also import them in your .go files using the full module path (including the version number), but reference their exported things using the package name (which will normally now be the second-to-last element in the import path). For example: import ( "github.com/go-chi/chi/v5" ) func main() { router := chi.NewRouter() ... } Organizing import statements Lastly, there's no right or wrong way to organize your import statements in Go. No single convention has really emerged in the Go community, so I recommend just picking something that works for you and being consistent with it. Personally, I like to separate imports into four groups separated by an empty line. Like this: import ( {standard library packages} {packages from the current module} {third-party packages} {aliased packages} ) Within each group, go fmt will automatically sort the imports alphabetically for you. I like having aliased imports as a final standalone group because it helps to draws attention to them and highlight to the reader that 'there is something a little bit unusual going on here' with them. As an illustration, here's an example from the main.go file of a web application I was recently working on: import ( "fmt" "net/http" "os" "runtime/debug" "sync" "example.com/internal/logger" "example.com/internal/smtp" "github.com/go-playground/form/v4" "github.com/spf13/pflag" _ "github.com/mattn/go-sqlite3" )
Alex Edwards Feb 1, 2023 -

In this post we're going to run through how to use cookies in your Go web application to persist data between HTTP requests for a specific client. We'll start simple, and slowly build up a working application which covers the following topics: Basic reading and writing of cookies Encoding special characters and maximum length Using tamper-proof (signed) cookies Using confidential (encrypted) and tamper-proof cookies Storing custom data types in cookies Hint: If you're new to web development and need a general introduction to what cookies are and how they work, I recommend reading this MDN article before continuing. If you just want the final code, rather than the explanations, you can find it in this gist. Basic use The first thing to know is that cookies in Go are represented by the http.Cookie type. This is a struct which looks like this: type Cookie struct { Name string Value string Path string Domain string Expires time.Time RawExpires string // MaxAge=0 means no 'Max-Age' attribute specified. // MaxAge<0 means delete cookie now, equivalently 'Max-Age: 0' // MaxAge>0 means Max-Age attribute present and given in seconds MaxAge int Secure bool HttpOnly bool SameSite SameSite Raw string Unparsed []string } Name is the cookie name. It can contain any US-ASCII characters except ( ) < > @ , ; : \ " / [ ? ] = { } and space, tab and control characters. It is a mandatory field. Value contains the data that you want to persist. It can contain any US-ASCII characters except , ; \ " and space, tab and control characters. It is a mandatory field. Path, Domain, Expires, MaxAge, Secure, HttpOnly and SameSite map directly to the respective cookie attributes. All of these are optional fields. If set, the value of the SameSite field should be one of the SameSite constants from the net/http package. The RawExpires, Raw and Unparsed fields are only used when your Go program is acting as a client (rather than a server) and parsing the cookies from a HTTP response. Most of the time you won't need to use these fields. Cookies can be written in a HTTP response using the http.SetCookie() function, and read from a HTTP request using the *Request.Cookie() method. Let's jump in and use these things in a working example. If you'd like to follow along, please run the following commands to set up a basic project scaffold: $ mkdir example-project $ cd example-project/ $ go mod init example.com/example-project go: creating new go.mod: module example.com/example-project $ touch main.go In the main.go file we're going to create a simple web application with two endpoints: GET /set which writes a new cookie along with the HTTP response. GET /get which reads the cookie sent with the HTTP request and then echoes out the cookie value in the response. Go ahead and add the following code to main.go: File: main.gopackage main import ( "errors" "log" "net/http" ) func main() { // Start a web server with the two endpoints. mux := http.NewServeMux() mux.HandleFunc("/set", setCookieHandler) mux.HandleFunc("/get", getCookieHandler) log.Print("Listening...") err := http.ListenAndServe(":3000", mux) if err != nil { log.Fatal(err) } } func setCookieHandler(w http.ResponseWriter, r *http.Request) { // Initialize a new cookie containing the string "Hello world!" and some // non-default attributes. cookie := http.Cookie{ Name: "exampleCookie", Value: "Hello world!", Path: "/", MaxAge: 3600, HttpOnly: true, Secure: true, SameSite: http.SameSiteLaxMode, } // Use the http.SetCookie() function to send the cookie to the client. // Behind the scenes this adds a `Set-Cookie` header to the response // containing the necessary cookie data. http.SetCookie(w, &cookie) // Write a HTTP response as normal. w.Write([]byte("cookie set!")) } func getCookieHandler(w http.ResponseWriter, r *http.Request) { // Retrieve the cookie from the request using its name (which in our case is // "exampleCookie"). If no matching cookie is found, this will return a // http.ErrNoCookie error. We check for this, and return a 400 Bad Request // response to the client. cookie, err := r.Cookie("exampleCookie") if err != nil { switch { case errors.Is(err, http.ErrNoCookie): http.Error(w, "cookie not found", http.StatusBadRequest) default: log.Println(err) http.Error(w, "server error", http.StatusInternalServerError) } return } // Echo out the cookie value in the response body. w.Write([]byte(cookie.Value)) } Note: As an aside, we have set the Secure attribute on the cookie to true. This indicates to the client (usually a web browser) that the cookie should only be used for 'secure' connections. Generally speaking this means that the cookie should only be used for encrypted connections (i.e. HTTPS), but many modern browsers (including Firefox and Chrome) also consider unencrypted connections to localhost to be 'secure'. This means that the cookie should work on localhost even if our web application is only using HTTP. OK, let's try this out. Go ahead and run the application: $ go run . 2022/09/25 10:44:11 Listening... And then open http://localhost:3000/set in your web browser. You should see the "cookie set!" response and, if you have developer tools open, you should also see the Set-Cookie header containing the data in the HTTP response headers. Then if you visit http://localhost:3000/get, our exampleCookie cookie should be passed back along with the HTTP request, and our getCookieHandler will retrieve the cookie value and print it in the response. Like so: If you want, you can also make a request to http://localhost:3000/set using curl to see the contents of the Set-Cookie header. Like so: $ curl -i http://localhost:3000/set HTTP/1.1 200 OK Set-Cookie: exampleCookie="Hello world!"; Path=/; Max-Age=3600; HttpOnly; Secure; SameSite=Lax Date: Sun, 25 Sep 2022 08:45:02 GMT Content-Length: 11 Content-Type: text/plain; charset=utf-8 cookie set! Encoding special characters and maximum length So far, so good! But there are a couple of important things to be aware of when writing cookies. As mentioned briefly above, cookie values must only contain a subset of the US-ASCII characters. If you try to use an unsupported character, Go will strip it out before setting the Set-Cookie header. Let's try this out by adapting our setCookieHandler to write a cookie value containing a non US-ASCII character like "Hello Zoë!" (notice the umlauted ë character): File: main.go package main ... func setCookieHandler(w http.ResponseWriter, r *http.Request) { cookie := http.Cookie{ Name: "exampleCookie", Value: "Hello Zoë!", Path: "/", MaxAge: 3600, HttpOnly: true, Secure: true, SameSite: http.SameSiteLaxMode, } http.SetCookie(w, &cookie) w.Write([]byte("cookie set!")) } ... Then when you make a request to http://localhost:3000/set, you'll see that the cookie value has been stripped down to "Hello Zo!". $ curl -i http://localhost:3000/set HTTP/1.1 200 OK Set-Cookie: exampleCookie="Hello Zo!"; Path=/; Max-Age=3600; HttpOnly; Secure; SameSite=Lax Date: Sun, 25 Sep 2022 09:00:03 GMT Content-Length: 11 Content-Type: text/plain; charset=utf-8 cookie set! A good way to avoid this kind of problem is to base64-encode your cookie values before writing them. Because the base64 character set is a subset of the US-ASCII characters supported in cookies, we can be confident that nothing will be stripped from the cookie value. Another thing to be aware of is that web browsers impose a maximum size limit on cookies. But this limit — and how the cookie size is calculated — depends on the browser version being used. To prevent problems, a good rule-of-thumb is to keep the total size of the cookie (including all attributes) to no more than 4096 bytes. If you try to send a cookie larger than 4096 bytes, Go will write the Set-Cookie header without any problems (it won't be truncated), but there is a risk that the client may truncate or reject the cookie. To help with these two potential problems, let's create an internal/cookies package containing a couple of helper functions: A Write() function which encodes a cookie value to base64 and checks that the total length of the cookie is no more than 4096 bytes before writing it. A Read() function which reads a cookie from the current request and decodes the cookie value from base64. $ mkdir -p internal/cookies $ touch internal/cookies/cookies.go File: internal/cookies/cookies.gopackage cookies import ( "encoding/base64" "errors" "net/http" ) var ( ErrValueTooLong = errors.New("cookie value too long") ErrInvalidValue = errors.New("invalid cookie value") ) func Write(w http.ResponseWriter, cookie http.Cookie) error { // Encode the cookie value using base64. cookie.Value = base64.URLEncoding.EncodeToString([]byte(cookie.Value)) // Check the total length of the cookie contents. Return the ErrValueTooLong // error if it's more than 4096 bytes. if len(cookie.String()) > 4096 { return ErrValueTooLong } // Write the cookie as normal. http.SetCookie(w, &cookie) return nil } func Read(r *http.Request, name string) (string, error) { // Read the cookie as normal. cookie, err := r.Cookie(name) if err != nil { return "", err } // Decode the base64-encoded cookie value. If the cookie didn't contain a // valid base64-encoded value, this operation will fail and we return an // ErrInvalidValue error. value, err := base64.URLEncoding.DecodeString(cookie.Value) if err != nil { return "", ErrInvalidValue } // Return the decoded cookie value. return string(value), nil } Then we can update our main.go file to use these new helpers, like so: File: main.gopackage main import ( "errors" "log" "net/http" "example.com/example-project/internal/cookies" // Import the internal/cookies package. ) ... func setCookieHandler(w http.ResponseWriter, r *http.Request) { // Initialize the cookie as normal. cookie := http.Cookie{ Name: "exampleCookie", Value: "Hello Zoë!", Path: "/", MaxAge: 3600, HttpOnly: true, Secure: true, SameSite: http.SameSiteLaxMode, } // Write the cookie. If there is an error (due to an encoding failure or it // being too long) then log the error and send a 500 Internal Server Error // response. err := cookies.Write(w, cookie) if err != nil { log.Println(err) http.Error(w, "server error", http.StatusInternalServerError) return } w.Write([]byte("cookie set!")) } func getCookieHandler(w http.ResponseWriter, r *http.Request) { // Use the Read() function to retrieve the cookie value, additionally // checking for the ErrInvalidValue error and handling it as necessary. value, err := cookies.Read(r, "exampleCookie") if err != nil { switch { case errors.Is(err, http.ErrNoCookie): http.Error(w, "cookie not found", http.StatusBadRequest) case errors.Is(err, cookies.ErrInvalidValue): http.Error(w, "invalid cookie", http.StatusBadRequest) default: log.Println(err) http.Error(w, "server error", http.StatusInternalServerError) } return } w.Write([]byte(value)) } If you restart your web application and make a request to http://localhost:3000/set followed by http://localhost:3000/get in your browser, you should now successfully see the message "Hello Zoë!" in full. Likewise, if you make a request to http://localhost:3000/set using curl, you should see that the cookie value is SGVsbG8gWm_DqyE= — which is the base64 encoding of Hello Zoë!. $ curl -i localhost:3000/set HTTP/1.1 200 OK Set-Cookie: exampleCookie=SGVsbG8gWm_DqyE=; Path=/; Max-Age=3600; HttpOnly; Secure; SameSite=Lax Date: Sun, 25 Sep 2022 09:14:18 GMT Content-Length: 11 Content-Type: text/plain; charset=utf-8 cookie set $ echo "SGVsbG8gWm_DqyE=" | base64url --decode Hello Zoë! Tamper-proof (signed) cookies By default, you shouldn't trust cookie data. Because cookies are stored on the client, it's fairly straightforward for a user to edit them (in fact, many web browser extensions exist for exactly this purpose). So if you're performing actions in your web application based on the value of a cookie, it's important to first verify that the cookie hasn't been edited and contains the original name and value that you set. A good way to do this is to generate a HMAC signature of the cookie name and value, and then prepend this signature to the cookie value before sending it to the client. So that the final value is in this format: cookie.Value = "{HMAC signature}{original value}" When we receive the cookie back from the client, we can recalculate the HMAC signature from the cookie name and original value, and check that the recalculated HMAC signature matches the signature at the start of the received cookie. If they match, it confirms the integrity of the name and value — and we know that it hasn't been edited by the client. Let's update the internal/cookies/cookies.go file to include some WriteSigned() and ReadSigned() functions which do exactly that. File: internal/cookies/cookies.gopackage cookies import ( "crypto/hmac" "crypto/sha256" "encoding/base64" "errors" "net/http" ) ... func WriteSigned(w http.ResponseWriter, cookie http.Cookie, secretKey []byte) error { // Calculate a HMAC signature of the cookie name and value, using SHA256 and // a secret key (which we will create in a moment). mac := hmac.New(sha256.New, secretKey) mac.Write([]byte(cookie.Name)) mac.Write([]byte(cookie.Value)) signature := mac.Sum(nil) // Prepend the cookie value with the HMAC signature. cookie.Value = string(signature) + cookie.Value // Call our Write() helper to base64-encode the new cookie value and write // the cookie. return Write(w, cookie) } func ReadSigned(r *http.Request, name string, secretKey []byte) (string, error) { // Read in the signed value from the cookie. This should be in the format // "{signature}{original value}". signedValue, err := Read(r, name) if err != nil { return "", err } // A SHA256 HMAC signature has a fixed length of 32 bytes. To avoid a potential // 'index out of range' panic in the next step, we need to check sure that the // length of the signed cookie value is at least this long. We'll use the // sha256.Size constant here, rather than 32, just because it makes our code // a bit more understandable at a glance. if len(signedValue) < sha256.Size { return "", ErrInvalidValue } // Split apart the signature and original cookie value. signature := signedValue[:sha256.Size] value := signedValue[sha256.Size:] // Recalculate the HMAC signature of the cookie name and original value. mac := hmac.New(sha256.New, secretKey) mac.Write([]byte(name)) mac.Write([]byte(value)) expectedSignature := mac.Sum(nil) // Check that the recalculated signature matches the signature we received // in the cookie. If they match, we can be confident that the cookie name // and value haven't been edited by the client. if !hmac.Equal([]byte(signature), expectedSignature) { return "", ErrInvalidValue } // Return the original cookie value. return value, nil } Alright, let's update our main.go file to include a secret key and use the new WriteSigned() and ReadSigned() functions. The secret key should be generated using a cryptographically secure random number generator (CSRNG), should be unique to your application, and should ideally have at least 32 bytes of entropy. For the purpose of this example, we'll use a random 64 character hex string and decode it to give us a byte slice containing 32 random bytes. File: main.gopackage main import ( "encoding/hex" "errors" "log" "net/http" "example.com/example-project/internal/cookies" ) // Declare a global variable to hold the secret key. var secretKey []byte func main() { var err error // Decode the random 64-character hex string to give us a slice containing // 32 random bytes. For simplicity, I've hardcoded this hex string but in a // real application you should read it in at runtime from a command-line // flag or environment variable. secretKey, err = hex.DecodeString("13d6b4dff8f84a10851021ec8608f814570d562c92fe6b5ec4c9f595bcb3234b") if err != nil { log.Fatal(err) } mux := http.NewServeMux() mux.HandleFunc("/set", setCookieHandler) mux.HandleFunc("/get", getCookieHandler) log.Print("Listening...") err = http.ListenAndServe(":3000", mux) if err != nil { log.Fatal(err) } } func setCookieHandler(w http.ResponseWriter, r *http.Request) { cookie := http.Cookie{ Name: "exampleCookie", Value: "Hello Zoë!", Path: "/", MaxAge: 3600, HttpOnly: true, Secure: true, SameSite: http.SameSiteLaxMode, } // Use the WriteSigned() function, passing in the secret key as the final // argument. err := cookies.WriteSigned(w, cookie, secretKey) if err != nil { log.Println(err) http.Error(w, "server error", http.StatusInternalServerError) return } w.Write([]byte("cookie set!")) } func getCookieHandler(w http.ResponseWriter, r *http.Request) { // Use the ReadSigned() function, passing in the secret key as the final // argument. value, err := cookies.ReadSigned(r, "exampleCookie", secretKey) if err != nil { switch { case errors.Is(err, http.ErrNoCookie): http.Error(w, "cookie not found", http.StatusBadRequest) case errors.Is(err, cookies.ErrInvalidValue): http.Error(w, "invalid cookie", http.StatusBadRequest) default: log.Println(err) http.Error(w, "server error", http.StatusInternalServerError) } return } w.Write([]byte(value)) } If you visit http://localhost:3000/set in your web browser followed by http://localhost:3000/get, you should still successfully see the message "Hello Zoë!". If you like, you can also use a browser extension to change the cookie value (search for "cookie editor" in your browser extension store). If you do this and visit http://localhost:3000/get again, you should now receive a 400 Bad Request response and the "invalid cookie" message. Before we move on, let's also make a request to http://localhost:3000/set using curl: $ curl -i http://localhost:3000/set HTTP/1.1 200 OK Set-Cookie: exampleCookie=1lYrR9MfMsu6Dm39EgfbOuFTUbZm3_5tmWsF943HN4hIZWxsbyBab8OrIQ==; Path=/; Max-Age=3600; HttpOnly; Secure; SameSite=Lax Date: Wed, 28 Sep 2022 09:28:55 GMT Content-Length: 11 Content-Type: text/plain; charset=utf-8 cookie set! In my case we can see that the signed cookie value is: 1lYrR9MfMsu6Dm39EgfbOuFTUbZm3_5tmWsF943HN4hIZWxsbyBab8OrIQ== Let's base64-decode this: $ echo "1lYrR9MfMsu6Dm39EgfbOuFTUbZm3_5tmWsF943HN4hIZWxsbyBab8OrIQ==" | base64url --decode �V+G�2˺m��:�SQ�f��m�k���7�Hello Zoë! The first part of the decoded value is the HMAC signature (which looks like gibberish), followed by our original cookie value in plaintext. Confidential (encrypted) and tamper-proof cookies The HMAC signing pattern above is great for times when you want to confirm that a cookie has not been edited by a client, and you're not worried about the client being able to read the cookie data (i.e. the cookie doesn't contain any secret or confidential information). But if you do want to prevent the client from being able to read the cookie data, we need to encrypt the data before writing it. A good way to encrypt the data in cookies is to use AES-GCM (AES with Galois/Counter Mode) encryption. AES-GCM is a type of authenticated encryption, which is good because it both encrypts and authenticates the data. The encryption ensures confidentiality of the data, and the authentication ensures the integrity of the data (i.e. that the data hasn't been changed). Effectively, encrypting our cookie data using AES-GCM is a relatively easy way to give us confidential, tamper-proof, cookies in a single step. Let's create two new helper functions, WriteEncrypted() and ReadEncrypted(), which use this. Like so: File: internal/cookies/cookies.gopackage cookies import ( "crypto/aes" "crypto/cipher" "crypto/hmac" "crypto/rand" "crypto/sha256" "encoding/base64" "errors" "fmt" "io" "net/http" "strings" ) ... func WriteEncrypted(w http.ResponseWriter, cookie http.Cookie, secretKey []byte) error { // Create a new AES cipher block from the secret key. block, err := aes.NewCipher(secretKey) if err != nil { return err } // Wrap the cipher block in Galois Counter Mode. aesGCM, err := cipher.NewGCM(block) if err != nil { return err } // Create a unique nonce containing 12 random bytes. nonce := make([]byte, aesGCM.NonceSize()) _, err = io.ReadFull(rand.Reader, nonce) if err != nil { return err } // Prepare the plaintext input for encryption. Because we want to // authenticate the cookie name as well as the value, we make this plaintext // in the format "{cookie name}:{cookie value}". We use the : character as a // separator because it is an invalid character for cookie names and // therefore shouldn't appear in them. plaintext := fmt.Sprintf("%s:%s", cookie.Name, cookie.Value) // Encrypt the data using aesGCM.Seal(). By passing the nonce as the first // parameter, the encrypted data will be appended to the nonce — meaning // that the returned encryptedValue variable will be in the format // "{nonce}{encrypted plaintext data}". encryptedValue := aesGCM.Seal(nonce, nonce, []byte(plaintext), nil) // Set the cookie value to the encryptedValue. cookie.Value = string(encryptedValue) // Write the cookie as normal. return Write(w, cookie) } func ReadEncrypted(r *http.Request, name string, secretKey []byte) (string, error) { // Read the encrypted value from the cookie as normal. encryptedValue, err := Read(r, name) if err != nil { return "", err } // Create a new AES cipher block from the secret key. block, err := aes.NewCipher(secretKey) if err != nil { return "", err } // Wrap the cipher block in Galois Counter Mode. aesGCM, err := cipher.NewGCM(block) if err != nil { return "", err } // Get the nonce size. nonceSize := aesGCM.NonceSize() // To avoid a potential 'index out of range' panic in the next step, we // check that the length of the encrypted value is at least the nonce // size. if len(encryptedValue) < nonceSize { return "", ErrInvalidValue } // Split apart the nonce from the actual encrypted data. nonce := encryptedValue[:nonceSize] ciphertext := encryptedValue[nonceSize:] // Use aesGCM.Open() to decrypt and authenticate the data. If this fails, // return a ErrInvalidValue error. plaintext, err := aesGCM.Open(nil, []byte(nonce), []byte(ciphertext), nil) if err != nil { return "", ErrInvalidValue } // The plaintext value is in the format "{cookie name}:{cookie value}". We // use strings.Cut() to split it on the first ":" character. expectedName, value, ok := strings.Cut(string(plaintext), ":") if !ok { return "", ErrInvalidValue } // Check that the cookie name is the expected one and hasn't been changed. if expectedName != name { return "", ErrInvalidValue } // Return the plaintext cookie value. return value, nil } Then we can switch our main.go file to use these new helpers like so: File: main.gopackage main ... func setCookieHandler(w http.ResponseWriter, r *http.Request) { cookie := http.Cookie{ Name: "exampleCookie", Value: "Hello Zoë!", Path: "/", MaxAge: 3600, HttpOnly: true, Secure: true, SameSite: http.SameSiteLaxMode, } err := cookies.WriteEncrypted(w, cookie, secretKey) if err != nil { log.Println(err) http.Error(w, "server error", http.StatusInternalServerError) return } w.Write([]byte("cookie set!")) } func getCookieHandler(w http.ResponseWriter, r *http.Request) { value, err := cookies.ReadEncrypted(r, "exampleCookie", secretKey) if err != nil { switch { case errors.Is(err, http.ErrNoCookie): http.Error(w, "cookie not found", http.StatusBadRequest) case errors.Is(err, cookies.ErrInvalidValue): http.Error(w, "invalid cookie", http.StatusBadRequest) default: log.Println(err) http.Error(w, "server error", http.StatusInternalServerError) } return } w.Write([]byte(value)) } Note: When using AES-GCM encryption, it's important that your secret key is exactly 32 bytes long. Otherwise you will get a runtime error like crypto/aes: invalid key size <N>. Again, you can visit http://localhost:3000/set and http://localhost:3000/get in your browser, and you should still successfully see the message "Hello Zoë!". And if you edit the exampleCookie cookie using a browser extension, you should find that any subsequent requests result in an "invalid cookie" response. Let's take a look at the Set-Cookie header now using curl. $ curl -i http://localhost:3000/set HTTP/1.1 200 OK Set-Cookie: exampleCookie=hBGecbVJ2cI0yAwrbMYd5sv7qslxBJoGnk7LBLHVR9rKrqh1cTVs2IuWHZUOkl2fdYeIYmY=; Path=/; Max-Age=3600; HttpOnly; Secure; SameSite=Lax Date: Wed, 28 Sep 2022 10:37:23 GMT Content-Length: 11 Content-Type: text/plain; charset=utf-8 cookie set! In my case the encrypted cookie value is: hBGecbVJ2cI0yAwrbMYd5sv7qslxBJoGnk7LBLHVR9rKrqh1cTVs2IuWHZUOkl2fdYeIYmY= If we base64-decode this value, we should now just see gibberish and our original "Hello Zoë!" value should no longer be visible. $ echo "hBGecbVJ2cI0yAwrbMYd5sv7qslxBJoGnk7LBLHVR9rKrqh1cTVs2IuWHZUOkl2fdYeIYmY=" | base64url --decode ��q�I��4�+l������q��N���G�ʮ�uq5l؋���]�u��bf Great! The encryption has worked! Storing custom data types So far we've just been storing simple string data in our cookies. But what if we want to store something more complicated, like the data for a user represented as a struct in Go? type User struct { Name string Age int } The good news is that the Go standard library includes the encoding/gob package, which we can use to encode/decode a Go value to and from a byte slice. It's kind of like "pickling" in Python, "marshaling" in Ruby, or "serializing" in PHP. To help demonstrate how to use this, let's update our main.go file to gob-encode a User struct and store it in a cookie: package main import ( "bytes" "encoding/gob" "encoding/hex" "errors" "fmt" "log" "net/http" "strings" "example.com/example-project/internal/cookies" ) var secret []byte // Declare the User type. type User struct { Name string Age int } func main() { // Importantly, we need to tell the encoding/gob package about the Go type // that we want to encode. We do this my passing *an instance* of the type // to gob.Register(). In this case we pass a pointer to an initialized (but // empty) instance of the User struct. gob.Register(&User{}) var err error secret, err = hex.DecodeString("13d6b4dff8f84a10851021ec8608f814570d562c92fe6b5ec4c9f595bcb3234b") if err != nil { log.Fatal(err) } mux := http.NewServeMux() mux.HandleFunc("/set", setCookieHandler) mux.HandleFunc("/get", getCookieHandler) log.Print("Listening...") err = http.ListenAndServe(":3000", mux) if err != nil { log.Fatal(err) } } func setCookieHandler(w http.ResponseWriter, r *http.Request) { // Initialize a User struct containing the data that we want to store in the // cookie. user := User{Name: "Alice", Age: 21} // Initialize a buffer to hold the gob-encoded data. var buf bytes.Buffer // Gob-encode the user data, storing the encoded output in the buffer. err := gob.NewEncoder(&buf).Encode(&user) if err != nil { log.Println(err) http.Error(w, "server error", http.StatusInternalServerError) return } // Call buf.String() to get the gob-encoded value as a string and set it as // the cookie value. cookie := http.Cookie{ Name: "exampleCookie", Value: buf.String(), Path: "/", MaxAge: 3600, HttpOnly: true, Secure: true, SameSite: http.SameSiteLaxMode, } // Write an encrypted cookie containing the gob-encoded data as normal. err = cookies.WriteEncrypted(w, cookie, secret) if err != nil { log.Println(err) http.Error(w, "server error", http.StatusInternalServerError) return } w.Write([]byte("cookie set!")) } func getCookieHandler(w http.ResponseWriter, r *http.Request) { // Read the gob-encoded value from the encrypted cookie, handling any errors // as necessary. gobEncodedValue, err := cookies.ReadEncrypted(r, "exampleCookie", secret) if err != nil { switch { case errors.Is(err, http.ErrNoCookie): http.Error(w, "cookie not found", http.StatusBadRequest) case errors.Is(err, cookies.ErrInvalidValue): http.Error(w, "invalid cookie", http.StatusBadRequest) default: log.Println(err) http.Error(w, "server error", http.StatusInternalServerError) } return } // Create a new instance of a User type. var user User // Create an strings.Reader containing the gob-encoded value. reader := strings.NewReader(gobEncodedValue) // Decode it into the User type. Notice that we need to pass a *pointer* to // the Decode() target here? if err := gob.NewDecoder(reader).Decode(&user); err != nil { log.Println(err) http.Error(w, "server error", http.StatusInternalServerError) return } // Print the user information in the response. fmt.Fprintf(w, "Name: %q\n", user.Name) fmt.Fprintf(w, "Age: %d\n", user.Age) } If you want, restart your application and visit localhost:3000/set followed by localhost:3000/get in your web browser. You should see a response similar to this: Note: In the example above, we've gob-encoded the cookie data and then written the cookie using WriteEncrypted(), but you could equally write the cookie using the Write() or WriteSigned() helper functions that we made earlier too.
Alex Edwards Sep 28, 2022 -
In this post I'd like to talk about one of my favorite architectural patterns for building web applications and APIs in Go. It's kind of a mix between the service object and fat model patterns — so I mentally refer to it as the 'fat service' pattern, but it might have a more formal name that I'm not aware of 🙃 It's certainly not a perfect pattern (we'll discuss some of the pros and cons later) — but it is (deliberately) simple, pragmatic, and I find it often works well for small-to-medium sized projects. Note: Before we start I'd like to emphasize that there's no single 'correct' way to structure your project in Go. Different architectures suit different projects and teams, and this is just one option to consider. At a high-level, the fat service pattern splits your project code into two distinct 'layers': The application layer. This contains your code related to reading and writing HTTP requests and responses, authenticating/authorizing requests, session management, etc. The service layer. This contains your business logic, defines your core data types, and is also responsible for interacting with any persistent data stores. A fat service example Let's illustrate how this pattern works with an example of a JSON API. Specifically, let's say that we want to build an API with a POST /register endpoint which is used to register a new user. When a client makes a request to this endpoint, let's pretend we want to take the following actions: Parse the JSON input into a Go struct so we can work with it easily. Carry out some validation checks on the data (and return an error response to the client if any of them fail). Create a hash of the new user's password. Insert a record for the user into a database. Send a notification to a Slack channel to say that a new user has registered. Return a 204 No Content response to the client if everything worked successfully. Using the fat service pattern, we could structure our project so that the directory and file layout looks like this: . ├── cmd │ └── api | ├── handlers.go │ └── main.go └── internal └── service ├── service.go └── users.go The cmd/api package will contain the application layer code, and the internal/service package will contain the service layer code. Then, very roughly, the code in our service layer might look something like this: File: internal/service/service.go package service import ( "database/sql" "errors" ) var ErrFailedValidation = errors.New("failed validation") type Service struct { DB *sql.DB SlackWebhookURL string } File: internal/service/users.go package service import ( "github.com/slack-go/slack" "golang.org/x/crypto/bcrypt" ) type RegisterUserInput struct { Username string `json:"username"` Password string `json:"password"` ValidationErrors map[string]string `json:"-"` } func (s *Service) RegisterUser(input *RegisterUserInput) error { input.ValidationErrors = make(map[string]string) if input.Username == "" { input.ValidationErrors["username"] = "must be provided" } // And any other validation checks... if len(input.ValidationErrors) > 0 { return ErrFailedValidation } hashedPassword, err := bcrypt.GenerateFromPassword([]byte(input.Password), 12) if err != nil { return err } _, err = s.DB.Exec("INSERT INTO (username, hashed_password) VALUES ($1, $2)", input.Username, string(hashedPassword)) if err != nil { return err } msg := slack.WebhookMessage{ Username: "robot", Channel: "#general", Text: "A new user has signed up!", } return slack.PostWebhook(s.SlackWebhookURL, &msg) } And the code in our application layer might look like this (I've omitted the helper functions for brevity): File: cmd/api/main.go package main import ( "database/sql" "flag" "log" "net/http" "os" "example.com/internal/service" "github.com/alexedwards/flow" _ "github.com/mattn/go-sqlite3" ) type application struct { logger *log.Logger service *service.Service } func main() { dsn := flag.String("dsn", "./db.sqlite", "sqlite3 DSN") slackWebhookURL := flag.String("slack-webhook-url", "https://hooks.slack.com/services/example", "slack webhook URL for notifications") flag.Parse() logger := log.New(os.Stdout, "", log.LstdFlags|log.Llongfile) db, err := sql.Open("sqlite3", *dsn) if err != nil { logger.Fatal(err) } defer db.Close() app := &application{ logger: logger, service: &service.Service{DB: db, SlackWebhookURL: *slackWebhookURL}, } mux := flow.New() mux.HandleFunc("/register", app.registerUserHandler, "POST") logger.Print("starting server on :3000") err = http.ListenAndServe(":3000", mux) logger.Fatal(err) } File: cmd/api/handlers.go package main import ( "errors" "net/http" "example.com/internal/service" ) func (app *application) registerUserHandler(w http.ResponseWriter, r *http.Request) { var input service.RegisterUserInput err := app.decodeJSON(r.Body, &input) if err != nil { app.badRequest(w, r, err) return } err = app.service.RegisterUser(&input) if err != nil { if errors.Is(err, service.ErrFailedValidation) { app.failedValidation(w, r, input.ValidationErrors) } else { app.serverError(w, r, err) } return } w.WriteHeader(http.StatusNoContent) } Hopefully you get the rough idea. Essentially, our service layer contains a Service.RegisterUser() method which executes all the validation checks, business logic and SQL queries related to registering a user. The expected input to this method is the simple, standard, service.RegisterUserInput Go struct. And in our application layer's registerUserHandler() handler we can decode the JSON request body directly into that struct and pass it on the the service layer, handling any returned errors as necessary. The pros and cons In terms of benefits, there are quite a lot of nice things about this pattern: It's fairly simple. The number of mental hoops to jump through when reading the code is relatively low. You don't have to dig through lots of packages and functions to follow what the code is doing — meaning it's relatively easy for newcomers to your project to understand (or even yourself after a long break). The separation of concerns keeps our registerUserHandler() code primarily focused on reading and writing HTTP requests and responses. For applications with more than a few endpoints, I find that not trying to do everything in your handlers helps to make your codebase easier to navigate and reason about. The code in the service layer can be reused by other applications. For example, we could create a CLI application under cmd/cli with a task that also calls the Service.RegisterUser() method. This one is more personal, but I find it easier to reason about my business logic and write the code for it when the input is a well-defined Go struct with the correct types (rather than a more 'messy' input like a JSON string or HTML-encoded form data). It's really practical for APIs and web applications. You can parse JSON or HTML form data from a request body directly into the service.RegisterUserInput struct in your handlers, and then pass that struct to the service layer for processing. You don't need to create interim types in your handlers to hold the decoded request data, or copy data from one struct to another. Methods in the service layer can potentially return validation errors from multiple points in the code, and you can deal with them all just once in your handler. For example, if our user INSERT failed because we tried to insert a record with a duplicate username, then we could return a "username is already taken" validation error from our service layer in addition to the pre-INSERT validation checks. Working with database transactions is easy. If we wanted to execute multiple SQL statements as part of registering a user in a single transaction, we could initialize the sql.TX, execute all the necessary statements, and commit the transaction all within our Service.RegisterUser() method. We don't need to pass the sql.TX around to a bunch of different places in our codebase. If you want to test only your application layer logic only, this pattern lends itself nicely to creating an interface type that describes the methods on the service.Service struct, which you can then satisfy with a mock implementation. But it's not perfect, and there are also a few downsides: When you are looking at the code for your handlers, you can't immediately see what the expected inputs are. You have to navigate to the service package and look at the fields of the service.RegisterUserInput struct. With most modern text editors this is just one click away, but it still introduces a bit of 'obscurity' and feels less than ideal to me. Not having a separate abstraction for the database logic makes it harder to swap out one database for another in the future (say moving from SQLite to PostgreSQL). You can't easily mock the database calls during tests. Personally I tend to prefer using a test instance of an actual database for testing, so I don't find this too much of a drawback most of the time. But if you need to mock the database (i.e. to speed up test runtime, or because it's a hard requirement from a client) then this pattern doesn't really suit that. Lastly, SQL queries which use database/sql and the Query() method to return multiple rows of data are quite verbose. These queries can take up a lot of visual space and add clutter to the service layer methods — which ultimately starts to reduce the scannability of the code. Using jmoiron/sqlx or blockloop/scan can be a big help here. But overall — so long as you don't need to mock your database calls — I like this pattern. I've used it a lot over the past 3-4 years and have found that the relative simplicity and practical benefits comfortably outweigh any downsides.
Alex Edwards Aug 8, 2022 -
Last year I wrote a new HTTP router for Go called Flow. I've been using it in production on this site and in a couple of other projects since, and I'm pretty happy with how it's working out so decided to share it a bit more widely. My aim with Flow was to bring together my favourite features from other popular routers that I frequently used. It has: A very small and readable codebase (approx. 160 LOC) with pattern-matching logic similar to matryer/way. Middleware management like chi — including the ability to create route 'groups' which use different middleware. Optional regexp support for tighter pattern matching, similar to chi and gorilla/mux. Automatic handling of OPTIONS requests, like julienschmidt/httprouter. Automatic handling of HEAD requests, like bmizerany/pat. An Allow header is automatically set on all OPTIONS and 405 Method Not Allowed responses, like julienschmidt/httprouter. Ability to map multiple HTTP methods to the same handler in one declaration, like gorilla/mux. Additionally: It has a very small API (see the Go docs) so there's not much to learn. It's designed to work nicely with http.Handler, http.HandlerFunc, and the standard Go middleware pattern. The handlers for 404 Not Found and 405 Method Not Allowed responses are customizable. Conflicting routes are permitted (e.g. /posts/:id and posts/new), with routes matched in the order that they are declared. It has zero dependencies. Below is a quick example of the syntax, and if you like the look of it you can check out the full README on GitHub. mux := flow.New() // The Use() method can be used to register middleware. Middleware declared at // the top level will used on all routes (including error handlers and OPTIONS // responses). mux.Use(exampleMiddleware1) // Routes can use multiple HTTP methods. mux.HandleFunc("/profile/:name", exampleHandlerFunc1, "GET", "POST") // Optionally, regular expressions can be used to enforce a specific pattern // for a named parameter. mux.HandleFunc("/profile/:name/:age|^[0-9]{1,3}$", exampleHandlerFunc2, "GET") // The wildcard ... can be used to match the remainder of a request path. // Notice that HTTP methods are also optional (if not provided, all HTTP // methods will match the route). mux.Handle("/static/...", exampleHandler) // You can create route 'groups'. mux.Group(func(mux *flow.Mux) { // Middleware declared within in the group will only be used on the routes // in the group. mux.Use(exampleMiddleware2) mux.HandleFunc("/admin", exampleHandlerFunc3, "GET") // Groups can be nested. mux.Group(func(mux *flow.Mux) { mux.Use(exampleMiddleware3) mux.HandleFunc("/admin/passwords", exampleHandlerFunc4, "GET") }) }) A note on performance I haven't done any benchmarking against other routers, so I can't speak about the relative performance of Flow. What I can say it has been plenty fast enough for all of my use-cases so far and not a hot spot when profiling my applications under load.
Alex Edwards May 25, 2022 -
When you're working on a project it's common for there to be some developer tooling dependencies. These aren't code dependencies, but rather tools that you run as part of the development, testing, build or deployment processes. For example, you might use golang.org/x/text/cmd/gotext in conjunction with go:generate to generate message catalogs for translation, or honnef.co/go/tools/cmd/staticcheck to perform static analysis on your code before committing a change. This raises a couple of interesting questions — especially in a team environment. How do you make sure that everyone has the necessary tools installed on their machines? And that the tools they are using are all the same version? Until Go 1.17, the convention for managing this was to create a tools.go file in your project containing import statements for the different tools and a //go:build tools build constraint. If you're not already familiar with this approach, it's described in the official Go Wiki. But since Go 1.17 there is an alternative approach you can take. It has pros and cons compared to the tools.go approach, but it's worth knowing about and may be a good fit for some projects. It hinges on the fact that go run now allows you to execute a specific version of a remote package. From the 1.17 release notes: go run now accepts arguments with version suffixes (for example, go run example.com/cmd@v1.0.0). This causes go run to build and run packages in module-aware mode, ignoring the go.mod file in the current directory or any parent directory, if there is one. In other words, you can use go run package@version to execute a remote package when you are outside of a module, or inside of a module even if the package isn't listed in the go.mod file. It's also useful as a quick way to run an executable package without installing it. Instead of this: $ go install honnef.co/go/tools/cmd/staticcheck@v0.3.1 $ staticcheck ./... You can now just do this: $ go run honnef.co/go/tools/cmd/staticcheck@v0.3.1 ./... Important: When you execute go run package@version the necessary modules will be downloaded and cached on your machine in the module cache. So when you execute the same go run command later, the cache will be used (rather than everything being downloaded again) and it should complete faster. Using with go:generate Let's take a look at an example where we use the golang.org/x/tools/cmd/stringer tool in conjunction with go:generate to generate String() methods for some iota constants. If you'd like to follow along, please run the following commands: $ mkdir tools $ go mod init example.com/tools $ touch main.go And then add the following code to main.go: File: main.go package main import "fmt" //go:generate go run golang.org/x/tools/cmd/stringer@v0.1.10 -type=Level type Level int const ( Info Level = iota Error Fatal ) func main() { fmt.Printf("%s: Hello world!\n", Info) } The important thing here is the //go:generate line. When you run go generate on this file, it will in turn use go run to execute v0.1.10 of the golang.org/x/tools/cmd/stringer package. Let's try it out: $ go generate . go: downloading golang.org/x/tools v0.1.10 go: downloading golang.org/x/sys v0.0.0-20211019181941-9d821ace8654 go: downloading golang.org/x/xerrors v0.0.0-20200804184101-5ec99f83aff1 go: downloading golang.org/x/mod v0.6.0-dev.0.20220106191415-9b9b3d81d5e3 You should see that the necessary modules are downloaded and then the go:generate command finishes executing successfully — resulting in a new level_string.go file being generated and a working application. Like so: $ ls go.mod level_string.go main.go $ go run . Info: Hello world! Using in a Makefile You can also use the go run package@version pattern to execute tools from your scripts or Makefiles. To illustrate, let's create a Makefile with an audit task that executes a specific version of the staticcheck tool. $ touch Makefile File: Makefile .PHONY: audit audit: go vet ./... go run honnef.co/go/tools/cmd/staticcheck@v0.3.1 ./... If you run make audit, the necessary modules will be downloaded and the staticcheck tool should complete its checks successfully. $ make audit go vet ./... go run honnef.co/go/tools/cmd/staticcheck@v0.3.1 ./... go: downloading honnef.co/go/tools v0.3.1 go: downloading golang.org/x/tools v0.1.11-0.20220316014157-77aa08bb151a go: downloading golang.org/x/exp/typeparams v0.0.0-20220218215828-6cf2b201936e go: downloading github.com/BurntSushi/toml v0.4.1 If you run it for a second time, you'll see that the module cache is used and it should finish much faster. $ make audit go vet ./... go run honnef.co/go/tools/cmd/staticcheck@v0.3.1 ./... Pros and cons In terms of positives, go run package@version has a couple of nice advantages over the tools.go approach: It's simpler to set up and requires less code — no tools.go file is needed, there are no build constraints, and no aliased imports. It avoids polluting your dependency graph with things that your binaries do not actually depend on. In terms of negatives: If you have the same go run package@version command in multiple places throughout your codebase and want to upgrade to a newer version, then you need to update all of the commands manually (or use sed or find-and-replace). With the tools.go approach you only need to update your go.mod file by running go get package@newversion. With the tools.go approach it's possible to verify that cached code in your module cache hasn't been changed by running go mod verify. I'm not aware of an equivalent check for go run package@version (if you know of a way to do this, please let me know!). From my limited testing, it seems to be possible to edit the cached code in the module cache on your machine, and go run package@version will use this edited code without complaining. If you are working offline, then go run package@version may fail with a dial tcp: lookup proxy.golang.org: Temporary failure in name resolution error because it can't reach the Go module mirror — even if there is a copy already in your local module cache. Similar to this: $ make audit go vet ./... go run honnef.co/go/tools/cmd/staticcheck@v0.3.1 ./... go: honnef.co/go/tools/cmd/staticcheck@v0.3.1: honnef.co/go/tools/cmd/staticcheck@v0.3.1: Get "https://proxy.golang.org/honnef.co/go/tools/cmd/staticcheck/@v/v0.3.1.info": dial tcp: lookup proxy.golang.org: Temporary failure in name resolution make: *** [Makefile:4: audit] Error 1 As far as I can see this isn't a problem when you use the tools.go approach, although you can work around it fairly easily by setting the GOPROXY environment variable to direct while you are offline. Doing this will force go run to bypass the Go module mirror and use the cached module on your machine straight away. $ export GOPROXY=direct $ make audit go vet ./... go run honnef.co/go/tools/cmd/staticcheck@v0.3.1 ./...
Alex Edwards May 10, 2022 -
Now that Go 1.18 has been released with support for generics, it's easier than ever to create helper functions for your test assertions. Using helpers for your test assertions can help to: Make your test functions clean and clear; Keep test failure messages consistent; And reduce the potential for errors in your code due to typos. To illustrate this, let's say that you have a simple greet() function that you want to test: package main import "fmt" func greet(name string) (string, int) { greeting := fmt.Sprintf("Hello %s", name) // Return the greeting and its length (in bytes). return greeting, len(greeting) } In the past, your test for the greet() function would probably look something like this: package main import "testing" func TestGreet(t *testing.T) { greeting, greetingLength := greet("Alice") // Test assertion to check the returned greeting string. if greeting != "Hello Alice" { t.Errorf("want: %s; got: %s", "Hello Alice", greeting) } // Test assertion to check the returned greeting length. if greetingLength != 11 { t.Errorf("want: %d; got: %d", 11, greetingLength) } } With Go 1.18, we can use generics and the comparable constraint to create an Equal() helper function which carries out our test assertions. Personally, I like to put this in a reusable assert package. Like so: package assert import "testing" func Equal[T comparable](t *testing.T, expected, actual T) { t.Helper() if expected != actual { t.Errorf("want: %v; got: %v", expected, actual) } } Note: The t.Helper() function indicates to the Go test runner that our Equal() function is a test helper. This means that when t.Errorf() is called from our Equal() function, the Go test runner will report the filename and line number of the code which called our Equal() function in the output. And with that in place, the TestGreet() test can be simplified like so: package main import ( "testing" "your.module.path/assert" // Import your assert package. ) func TestGreet(t *testing.T) { greeting, greetingLength := greet("Alice") assert.Equal(t, "Hello Alice", greeting) assert.Equal(t, 11, greetingLength) }
Alex Edwards Apr 3, 2022 -

In this post we're going to walk through how to use GitHub Actions to create a continuous integration (CI) pipeline that automatically tests, vets and lints your Go code. For solo projects I usually create a pre-commit Git hook to carry out these kinds of checks, but for team projects or open-source work — where you don't have control over everyone's development environment — using a CI workflow is a great way to flag up potential problems and help catch bugs before they make it into production or a versioned release. And if you're already using GitHub to host your repository, it's nice and easy to use their built-in functionality to do this without any need for additional third-party tools or services. To demonstrate how it works, let's run through a step-by-step example. If you'd like to follow along, please create a new repository and clone it to your local machine. For the purpose of this post I'm going to use the private repository alexedwards/example. $ git clone git@github.com:alexedwards/example.git Cloning into 'example'... remote: Enumerating objects: 3, done. remote: Counting objects: 100% (3/3), done. remote: Total 3 (delta 0), reused 0 (delta 0), pack-reused 0 Receiving objects: 100% (3/3), done. Then let's scaffold a simple Go application along with a (failing) test like so: $ cd example/ $ touch main.go main_test.go $ go mod init github.com/alexedwards/example File: main.go package main import "fmt" func main() { msg := sayHello("Alice") fmt.Println(msg) } func sayHello(name string) string { return fmt.Sprintf("Hi %s", name) } File: main_test.go package main import "testing" func Test_sayHello(t *testing.T) { name := "Bob" want := "Hello Bob" if got := sayHello(name); got != want { t.Errorf("hello() = %q, want %q", got, want) } } If you run this application it should compile correctly and print "Hi Alice", but executing go test . will result in a failure. Similar to this: $ go test . --- FAIL: Test_sayHello (0.00s) main_test.go:10: hello() = "Hi Bob", want "Hello Bob" FAIL FAIL github.com/alexedwards/example 0.002s FAIL Creating a workflow file The next thing that we want to do is create a workflow file which describes what we want to do in our CI checks, and when we want them to run. By convention this file should be stored in a .github/workflow directory in the root of your repository and should be in YAML format. Let's create this directory along with an audit.yml workflow file. $ mkdir -p .github/workflows $ touch .github/workflows/audit.yml There's an excellent introduction to the workflow file syntax here, and there's also a collection of templates for different languages and frameworks that you can use as a starting point. But for now, let's jump in and update the workflow file so that it looks like this: File: .github/workflows/audit.yml name: Audit on: push: branches: [main] pull_request: branches: [main] jobs: audit: runs-on: ubuntu-20.04 steps: - uses: actions/checkout@v2 - name: Set up Go uses: actions/setup-go@v2 with: go-version: 1.17 - name: Verify dependencies run: go mod verify - name: Build run: go build -v ./... - name: Run go vet run: go vet ./... - name: Install staticcheck run: go install honnef.co/go/tools/cmd/staticcheck@latest - name: Run staticcheck run: staticcheck ./... - name: Install golint run: go install golang.org/x/lint/golint@latest - name: Run golint run: golint ./... - name: Run tests run: go test -race -vet=off ./... Let's quickly step through this and explain what the different parts of the file do. First we use the on keyword to define when we want the workflow to run. In this case, I've configured the workflow so that it runs when a new commit is made to the main branch, or a pull request is submitted. Then we use the jobs keyword to define a list of the jobs that are to be run. At the moment our workflow only contains one job called audit, but you can specify multiple jobs if you want and (by default) they will be executed in parallel. An independent runner will be spun up for each job. This is essentially a virtual machine that will execute the steps for the job. In the file above we use the runs-on keyword to specify that we want the runner to use Ubuntu 20.04 as a base OS, but others operating systems are available. It's also worth noting that the runner has a lot of useful software and tooling pre-installed. In the first step for our audit job we use the uses keyword to execute the community action actions/checkout@v2. This action will checkout our project repository to the runner so that the following steps access the code. Then we use the actions/setup-go@v2 action to install Go version 1.17 on the runner. Once that's done, in the remaining steps we use the run keyword to execute specific commands on the runner. In this case we build our code and then audit it using the standard go build|vet|test commands and the additional golint and staticcheck tools. Important: If you're following along, please run $ git branch --show-current to check the name of your branch before continuing. In certain cases, your branch may have the name master instead of main, in which case please edit the on directive in your audit.yml file accordingly. Now that's in place, let's commit everything and push the changes to your repository: $ git add . $ git commit -m "Initial commit" $ git push Once the push has completed, head to your repository and select the Actions tab. You should see that the CI 'Audit' workflow is running, similar to the screenshot below. You can click through on the workflow name to see more details while it's running, and after a minute or two you should see that the workflow is terminated due to our failing test. Additionally, as the owner of the repository, you should also get an email notification to tell you that the workflow failed, and everyone who browses the repository will see a red cross symbol next to the commit in the Git history. Fixing the code Let's fix our codebase by updating the sayHello() function to return the correct output, like so: File: main.go package main import "fmt" func main() { msg := sayHello("Alice") fmt.Println(msg) } func sayHello(name string) string { // Change this to "Hello %s" instead of "Hi %s". return fmt.Sprintf("Hello %s", name) } If you want, you can commit this change and push it… $ git add . $ git commit -m "Fix sayHello() to return the correct value" $ git push … and you should see that the 'Audit' job in our workflow file now completes successfully and everything has a nice green check mark next to it. Great! That's working really well and, from now on, any time someone makes a push or pull request to the main branch, the tests and vetting and linter checks will be automatically run. From here, you can extend the workflow to carry out more checks or send additional notifications if you want to — or even expand it to act as a continuous deployment (CD) pipeline that builds and deploys your binaries. To give you some ideas, here are a couple of slightly more complicated workflows from my own projects: Run integration tests against a PostgreSQL database Run audit checks, then build a binary and deploy it to a remote server using Ansible
Alex Edwards Dec 6, 2021 -
In this short post we're going to discuss how to add, modify or delete URL query string parameters in Go. To illustrate, we'll look at how to change this URL: https://example.com?name=alice&age=28&gender=female To this: https://example.com?name=alice&age=29&occupation=carpenter If you want to change the URL query string in place: // Use url.Parse() to parse a string into a *url.URL type. If your URL is // already a url.URL type you can skip this step. urlA, err := url.Parse("https://example.com?name=alice&age=28&gender=female") if err != nil { log.Fatal(err) } // Use the Query() method to get the query string params as a url.Values map. values := urlA.Query() // Make the changes that you want using the Add(), Set() and Del() methods. If // you want to retrieve or check for a specific parameter you can use the Get() // and Has() methods respectively. values.Add("occupation", "carpenter") values.Del("gender") values.Set("age", strconv.Itoa(29)) // Use the Encode() method to transform the url.Values map into a URL-encoded // string (like "age=29&name=alice...") and assign it back to the URL. Note // that the encoded values will be sorted alphabetically based on the parameter // name. urlA.RawQuery = values.Encode() fmt.Printf("urlA: %s", urlA.String()) Running this will print out: urlA: https://example.com?age=29&name=alice&occupation=carpenter If you want to create a clone of the URL but with a different query string, while leaving the original URL unchanged, you need to create a copy of the original url.URL struct first. There are a couple of ways to do this. You can either re-parse the URL, or you can dereference the original url.URL and make a copy, like so: // This is equivalent to: var newUrl url.URL = *originalUrl newUrl := *originalUrl When you do this, you create a new newURL variable of type url.URL which is initialized to the (dereferenced) value of *originalURL. This means that newURL has a different address in memory to originalURL. Putting this together, the pattern for creating a new URL with different parameters is: urlA, err := url.Parse("https://example.com?name=alice&age=28&gender=female") if err != nil { log.Fatal(err) } // Make a copy of the original url.URL. urlB := *urlA // Make the param changes to the new url.URL type... values := urlB.Query() values.Add("occupation", "carpenter") values.Del("gender") values.Set("age", strconv.Itoa(29)) urlB.RawQuery = values.Encode() fmt.Printf("urlA: %s\n", urlA.String()) // This will be unchanged. fmt.Printf("urlB: %s\n", urlB.String()) // This will have the new params. Running this will print out: urlA: https://example.com?name=alice&age=28&gender=female urlB: https://example.com?age=29&name=alice&occupation=carpenter As a side note, you can use this technique any time you want to 'clone' a URL and make changes to it. For example to create a clone of a URL with a different path, you can do this: urlA, err := url.Parse("https://example.com/foo") if err != nil { log.Fatal(err) } urlB := *urlA urlB.Path = "/bar" fmt.Printf("%s\n", urlA.String()) // Prints https://example.com/foo fmt.Printf("%s\n", urlB.String()) // Prints https://example.com/bar
Alex Edwards Nov 28, 2021 -
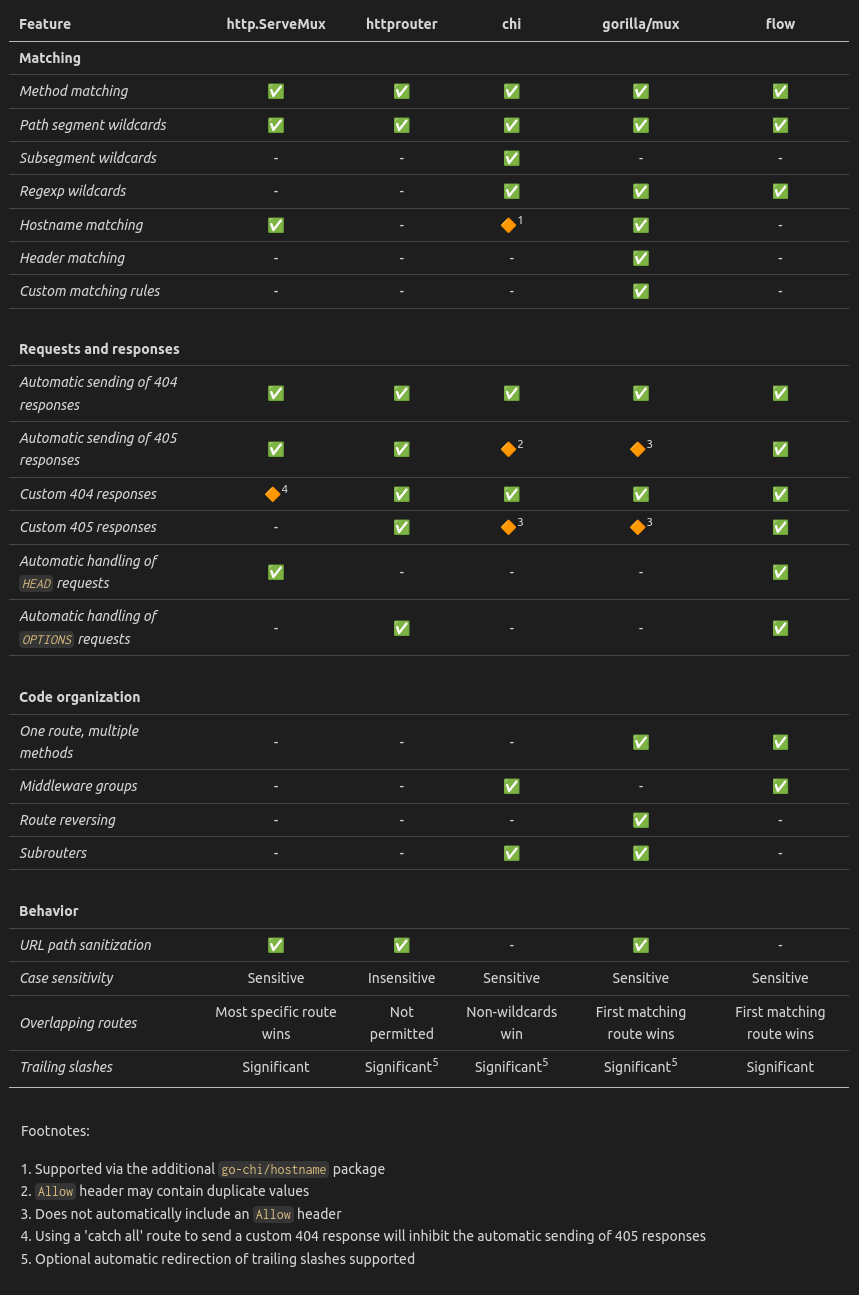
Note: This post has been fully updated to reflect the new http.ServeMux features released in Go 1.22. When you start to build web applications with Go, one of the first questions you'll probably ask is "which router should I use?". It's not an easy question to answer, either. You've got http.ServeMux in the Go standard library, and probably more than 100 different third-party routers also available — all with distinct APIs, features, and behaviors. Is http.ServeMux going to be sufficient? Or will you need to use a different router? And if so, which one is the right choice? For this blog post, I've evaluated 30 of the most popular third-party routers on GitHub (along with http.ServeMux), created a shortlist of the best options, and made a comparison table you can use to help make your choice. If you want, you can skip to the comparison table and summary. Shortlisted routers There are five routers which make the shortlist and that I recommend using. They are http.ServeMux, httprouter, chi, flow, and gorilla/mux. All the shortlisted routers are well-tested, well-documented, and actively maintained. They have stable APIs, and are compatible with http.Handler, http.HandlerFunc, and the standard Go middleware pattern. There are a few common features that all five of these routers support: Method matching: All let you register routes that require a matching HTTP method (GET, POST etc). Path segment wildcards: All let you declare routes like /movies/{id}/edit where {id} is a dynamic segment in the URL path. Automatic sending of 404 responses: All automatically send plaintext 404 responses when a matching route cannot be found. Automatic sending of 405 responses: All automatically send 405 responses when a route is found with a matching URL pattern, but not a matching HTTP method. Please note though that gorilla/mux does not automatically include an Allow header in 405 responses, and chi will potentially include duplicate values in the Allow header (there is an open issue about this here). In terms of speed, all five routers are fast enough for (almost) every application. Unless you have profiling that confirms your router is a bottleneck in your application, I recommend choosing between them based on the specific features that you need rather than performance. I've personally used all five routers in production applications at different times and have been happy with them. Note: One downside of httprouter is that the API and documentation is a bit confusing. The package was first published prior to the introduction of request context in Go 1.7, and lot of the current API still exists in order to support these older versions of Go. Nowadays, you can write your handlers using regular http.Handler and http.HandlerFunc signatures and all you need is the router.Handler() and router.HandlerFunc() methods to register them, like this. So with that out of the way, I'll start by saying… Use the standard library if you can If you can use http.ServeMux, you probably should. As part of the Go standard library, it's very battle tested and well documented. Using it means that you don't need to import any third-party dependencies, and most other Go developers will also be familiar with how it works. The Go compatibility promise also means that you should be able to rely on http.ServeMux working the same way in the long-term. All of those things are big positives in terms of application maintenance. It also has some really nice features that don't always appear in the third-party routers. Hostname matching: http.ServeMux lets you register routes that require a matching hostname, like example.com/post/{id} and example.org/post/{id}. Hostname matching is also supported by gorilla/mux, and chi supports it via the additional hostrouter package. URL path sanitization: http.ServeMux will automatically sanitize request URL paths and redirect the client if necessary. For example, if a client makes a request to /foo/bar/..//baz they will automatically be sent a 301 redirect to /foo/baz. URL sanitization is also done by gorilla/mux and httprouter in the same way. Automatic handling of HEAD requests: http.ServeMux automatically handles HEAD requests and sends the appropriate headers in the response. This is also supported by flow in the same way. Overlapping routes: If you register the routes /post/edit and /post/{id}, they overlap because a request to /post/edit matches both route patterns. The way that http.ServeMux matches overlapping wildcard routes is smart — the most specific matching route pattern wins and /post/edit is more specific than /post/{id}. This is nice because it means you can register patterns in any order and it won’t affect how http.ServeMux behaves. chi behaves in a similar-ish way to http.ServeMux and will prioritize non-wildcard matches. In contrast, gorilla/mux and flow will dispatch requests to the first matching route, and httprouter simply disallows overlapping routes and will panic if you try to register them. If you need additional features While I recommend using http.ServeMux as your go-to router, there may be times where you need a feature or a behavior that http.ServeMux doesn't provide or easily support. These include: Subsegment wildcards: chi is the only shortlisted router to support more than one wildcard within a single URL path segment, like /articles/{month}-{year}-{day}/{id}. Regexp wildcards: gorilla/mux, chi and flow support regexp wildcards, like /movies/{[a-z-]+}, where [a-z-]+ is a required regexp pattern in the URL path. Header matching: gorilla/mux is the only shortlisted router to easily support routing to different handlers based on the value of a request header (like Authorization or Content-Type). Custom matching rules: gorilla/mux is the only shortlisted router to support custom rules for matching requests (such as routing to different handlers based on IP address). Custom 404 responses: With http.ServeMux it's simple to implement a 'catch all' route "/" which will send a custom 404 response, but doing this will inhibit the automatic sending of 405 responses. There's an open issue about this, and hopefully it will get resolved soon. In contrast, httprouter, chi, gorilla/mux, and flow all allow you to set custom handlers for sending 404 response without this problem. Custom 405 responses: With http.ServeMux there is no simple way to send custom 405 responses. Whereas httprouter, chi, gorilla/mux, and flow all allow you to set custom handlers for sending 405 responses. But be aware that both chi and gorilla/mux will not automatically set an Allow header if you are using a custom 405 handler. Automatic handling of OPTIONS requests: Both httprouter and flow automatically send correct responses for OPTIONS requests. One route, multiple methods: Both gorilla/mux and flow support matching multiple HTTP methods in a single route declaration. Middleware groups: Both chi and flow provide 'grouping' functionality that lets you batch routes into groups that use specific middleware. Note that you can also wrap http.ServeMux to do this (and I've written about how to do that here). Route reversing: gorilla/mux is the only shortlisted router to support route reversing (like you get in Django, Rails, and Laravel). Subrouters: Both chi and gorilla/mux allow the creation of 'subrouters' that can be assigned to handle a subset of your application routes. Case sensitivity: All shortlisted routers require a case-sensitive match on non-wildcard parts of a route, apart from httprouter which is case-insensitive. Trailing slashes: All shortlisted routers treat trailing slashes as significant (i.e. /foo is a different route to /foo/). But... gorilla/mux has an optional StrictSlash setting where requests to /foo can automatically be redirected to /foo/. In contrast, chi has an optional RedirectSlashes middleware which will automatically redirect requests from /foo/ to /foo. And httprouter will automatically redirect requests from /foo to /foo/ and vice-versa if a matching route exists — this can be disabled via the RedirectTrailingSlash setting. Comparison table Summary If the comparison table is too overwhelming, or you don't yet know what your full requirements will be, I suggest falling back to the following guidelines: If you know you're going to have routes with complex matching requirements (i.e. more than just simple method, wildcard segment, and hostname matching), then opt for gorilla/mux or chi. If you're building something that requires custom 404 and 405 responses, and it's important that it adheres correctly to the HTTP specs (such as a JSON API for public use), opt for httprouter or flow. If you know that your application will require a lot of route-specific middleware, opt for chi or flow because of their middleware grouping functionality. Otherwise, start with http.ServeMux, and refactor to use a third-party router only if there is a specific feature or behavior that you need. Other routers For completeness, the other routers that I evaluated are listed below, along with a short note to explain why they didn't made the shortlist. Note: I used the question "does the repository contain a go.mod file?" as a proxy measure for whether a codebase is currently maintained or not. This seems reasonable — if the maintainer is still engaged with the Go world and caring for the code, my guess is that they would have updated the repository to use modules at some point. Repository Notes celrenheit/lion Currently unmaintained. claygod/Bxog Currently unmaintained. clevergo/clevergo Uses custom handler signature (not http.Handler or http.HandlerFunc). dimfeld/httptreemux Doesn’t fully support http.Handler. Requires middleware for setting custom 404/405 handlers. donutloop/mux Currently unmaintained. gernest/alien Currently unmaintained. go-ozzo/ozzo-routing Uses custom handler signature (not http.Handler or http.HandlerFunc). go-playground/lars Currently unmaintained. go-zoo/bone Good, but has similar use case to chi (which offers more). Incomplete tests. go101/tinyrouter Verbose route declarations. Doesn’t automatically send 405 responses. gocraft/web Currently unmaintained. goji/goji Slightly unusual, but flexible, API which supports custom matchers. Requires middleware for setting custom 404/405 handlers. Good, but I think gorilla/mux offers similar features and is easier to use. goroute/route Uses custom handler signature (not http.Handler or http.HandlerFunc). gowww/router Good, but has similar use case to chi (which offers more). No way to set custom 405 handler. GuilhermeCaruso/bellt No way to set custom 404 or 405 handlers. husobee/vestigo Currently unmaintained. Only supports http.HandlerFunc. naoina/denco Currently unmaintained. nbari/violetear Good, but has similar use case to chi (which offers more). Wraps http.ResponseWriter with own custom type, which may cause problems in some cases. nbio/hitch Lacking documentation. nissy/bon Currently unmaintained. razonyang/fastrouter Currently unmaintained. rs/xmux Currently unmaintained. Uses custom handler signature (not http.Handler or http.HandlerFunc). takama/router Currently unmaintained. vardius/gorouter Good, but has similar use case to chi (which offers more). Four major versions in 5 years suggests the API may not be reliable. VividCortex/siesta Good, but has similar use case to chi (which offers more). No way to set custom 405 handler. xujiajun/gorouter Currently unmaintained.
Alex Edwards Oct 4, 2021 -
Recently I've been building a fully internationalized (i18n) and localized (l10n) web application for the first time with Go's golang.org/x/text packages. I've found that the packages and tools that live under golang.org/x/text are really effective and well designed, although it's been a bit of a challenge to figure out how to put it all together in a real application. Note: Just in case you're not already aware, the packages that live under golang.org/x are part of the official Go Project but outside the main Go standard library tree. They are held to looser standards that the standard library packages, which means they aren't subject to the Go compatibility promise (i.e. their APIs might change), and documentation may not always be complete. In this tutorial I want to explain how you can use golang.org/x/text packages to manage translations in your application. Specifically: How to use the golang.org/x/text/language and golang.org/x/text/message packages to print translated messages from your Go code. How to use the gotext tool to automatically extract messages for translation from your code into JSON files. How to use gotext to parse translated JSON files and create a catalog containing translated messages. How to manage variables in messages and provided pluralized versions of translations. What we'll be building To help put this into context, we're going to create a simple pre-launch website for an imaginary online bookstore. We'll start off slowly and build up the code step-by-step. Our application will have just a single home page, and we'll localize the page content based on a locale identifier at the start of the URL path. We'll set up our application to support three different locales: the United Kingdom, Germany, and the French-speaking part of Switzerland. URL Localized for localhost:4018/en-gb United Kingdom localhost:4018/de-de Germany localhost:4018/fr-ch Switzerland (French-speaking) We're going to follow a common convention and use BCP 47 language tags as the locale identifier in our URLs. Simplifying things hugely for the sake of this tutorial, BCP 47 language tags typically take the format {language}-{region}. The language part is a ISO 639-1 code and the region is a two-letter country code from ISO_3166-1. It's conventional to uppercase the region (like en-GB), but BCP 47 tags are technically case-insensitive and it's OK for us to use all-lowercase versions in our URLs. Scaffolding a web application If you'd like to follow along with the application build, go ahead and run the following commands to setup a new project directory. $ mkdir bookstore $ cd bookstore $ go mod init bookstore.example.com go: creating new go.mod: module bookstore.example.com At this point, you should have a go.mod file in the root of the project directory with the module path bookstore.example.com. Next create a new cmd/www directory to hold the code for the bookstore web application, and add main.go and handlers.go files like so: $ mkdir -p cmd/www $ touch cmd/www/main.go cmd/www/handlers.go Your project directory should now look like this: . ├── cmd │ └── www │ ├── handlers.go │ └── main.go └── go.mod Let's begin in the cmd/www/main.go file and add the code to declare our application routes and start a HTTP server. Because our application URL paths will always use a (dynamic) locale as a prefix — like /en-gb/bestsellers or /fr-ch/bestsellers — it's simplest if our application uses a third-party router which supports dynamic values in URL path segments. I'm going to use pat, but feel free to use an alternative like chi or gorilla/mux if you prefer. Note: If you're not sure which router to use in your project, you might like to take a look at my comparison of Go routers blog post. OK, open up the main.go file and add the following code: File: cmd/www/main.go package main import ( "log" "net/http" "github.com/bmizerany/pat" ) func main() { // Initialize a router and add the path and handler for the homepage. mux := pat.New() mux.Get("/:locale", http.HandlerFunc(handleHome)) // Start the HTTP server using the router. log.Print("starting server on :4018...") err := http.ListenAndServe(":4018", mux) log.Fatal(err) } Then in the cmd/www/handlers.go file, add a handleHome() function which extracts the locale identifer from the URL path and echoes it in the HTTP response. File: cmd/www/handlers.go package main import ( "fmt" "net/http" ) func handleHome(w http.ResponseWriter, r *http.Request) { // Extract the locale from the URL path. This line of code is likely to // be different for you if you are using an alternative router. locale := r.URL.Query().Get(":locale") // If the locale matches one of our supported values, echo the locale // in the response. Otherwise send a 404 Not Found response. switch locale { case "en-gb", "de-de", "fr-ch": fmt.Fprintf(w, "The locale is %s\n", locale) default: http.NotFound(w, r) } } Once that's done, run go mod tidy to tidy your go.mod file and download any necessary dependencies, and then run the web application. $ go mod tidy go: finding module for package github.com/bmizerany/pat go: found github.com/bmizerany/pat in github.com/bmizerany/pat v0.0.0-20210406213842-e4b6760bdd6f $ go run ./cmd/www/ 2021/08/21 21:22:57 starting server on :4018... If you make some requests to the application using curl, you should find that the appropriate locale is echoed back to you like so: $ curl localhost:4018/en-gb The locale is en-gb $ curl localhost:4018/de-de The locale is de-de $ curl localhost:4018/fr-ch The locale is fr-ch $ curl localhost:4018/da-DK 404 page not found Extracting and translating text content Now that we've laid the groundwork for our web application, let's get into the core of this tutorial and update the handleHome() function so that it renders a "Welcome!" message translated for the specific locale. In this project we'll use British English (en-GB) as the default 'source' or 'base' language in our application, but we'll want to render a translated version of the welcome message in German and French for the other locales. To do this, we'll need to import the golang.org/x/text/language and golang.org/x/text/message packages and update our handleHome() function to do the following two things: Construct a language.Tag which identifies the target language that we want to translate the message in to. The language package contains some pre-defined tags for common language variants, but I find that it's easier to use the language.MustParse() function to create a tag. This let's you create a language.Tag for any valid BCP 47 value, like language.MustParse("fr-CH"). Once you have a language tag, you can use the message.NewPrinter() function to create a message.Printer instance that prints out messages in that specific language. If you're following along, please go ahead and update your cmd/www/handlers.go file to contain the following code: File: cmd/www/handlers.go package main import ( "net/http" "golang.org/x/text/language" "golang.org/x/text/message" ) func handleHome(w http.ResponseWriter, r *http.Request) { locale := r.URL.Query().Get(":locale") // Declare variable to hold the target language tag. var lang language.Tag // Use language.MustParse() to assign the appropriate language tag // for the locale. switch locale { case "en-gb": lang = language.MustParse("en-GB") case "de-de": lang = language.MustParse("de-DE") case "fr-ch": lang = language.MustParse("fr-CH") default: http.NotFound(w, r) return } // Initialize a message.Printer which uses the target language. p := message.NewPrinter(lang) // Print the welcome message translated into the target language. p.Fprintf(w, "Welcome!\n") } Again, run go mod tidy to download the necessary dependencies… $ go mod tidy go: finding module for package golang.org/x/text/message go: finding module for package golang.org/x/text/language go: downloading golang.org/x/text v0.3.7 go: found golang.org/x/text/language in golang.org/x/text v0.3.7 go: found golang.org/x/text/message in golang.org/x/text v0.3.7 And then run the application: $ go run ./cmd/www/ 2021/08/21 21:33:52 starting server on :4018... When you make a request to any of the supported URLs, you should now see the (untranslated) welcome message like this: $ curl localhost:4018/en-gb Welcome! $ curl localhost:4018/de-de Welcome! $ curl localhost:4018/fr-ch Welcome! So in all cases we're seeing the "Welcome!" message in our en-GB source language. That's because we still need to provide Go's message package with the actual translations that we want to use. Without the actual translations, it falls back to displaying the message in the source language. There are a number of ways to provide Go's message package with translations, but for most non-trivial applications it's probably sensible to use some automated tooling to help you manage the task. Fortunately, Go provides the gotext tool to assist with this. Note: The gotext tool we're using is the one from golang.org/x/text/cmd/gotext. It shouldn't be confused with the github.com/leonelquinteros/gotext package (which is designed to work with GNU gettext utilities and PO/MO files). If you're following along, please use go install to install the gotext executable on your machine: $ go install golang.org/x/text/cmd/gotext@latest All being well, the tool should be installed to your $GOBIN directory on your system path and you can run it like so: $ which gotext /home/alex/go/bin/gotext $ gotext gotext is a tool for managing text in Go source code. Usage: gotext command [arguments] The commands are: update merge translations and generate catalog extract extracts strings to be translated from code rewrite rewrites fmt functions to use a message Printer generate generates code to insert translated messages Use "gotext help [command]" for more information about a command. Additional help topics: Use "gotext help [topic]" for more information about that topic. I really like the gotext tool — it's functionality is excellent — but there are a couple of important things to point out before we carry on. The first thing is that go text is designed to work in conjunction with go generate, not as a standalone command-line tool. You can run it as a standalone tool, but weird things happen and it's a lot smoother if you use it in the way it's intended. The other thing is that documentation and help functionality is basically non-existent. The best guidance on how to use it are the examples in the repository and, probably, this article that you're reading right now. There is an open issue about the lack of help functionality, and hopefully this is something that will improve in the future. In this tutorial, we're going to store the all the code relating to translations in a new internal/translations package. We could keep all the translation code for our web application under cmd/www instead, but in my (limited) experience I've found that using a separate internal/translations package is better. It helps separate concerns and also makes it possible to reuse the same translations across different applications in the same project. YMMV. If you're following along, go ahead and create that new directory and a translations.go file like so: $ mkdir -p internal/translations $ touch internal/translations/translations.go At this point, your project structure should look like this: . ├── cmd │ └── www │ ├── handlers.go │ └── main.go ├── go.mod ├── go.sum └── internal └── translations └── translations.go Next, let's open up the internal/translations/translations.go file and add a go generate command which uses gotext to extract the messages for translation from our application. File: internal/translations/translations.go package translations //go:generate gotext -srclang=en-GB update -out=catalog.go -lang=en-GB,de-DE,fr-CH bookstore.example.com/cmd/www There's a lot going on in this command, so let's quickly break it down. The -srclang flag contains the BCP 47 tag for the source (or 'base') language that we are using in the application. In our case, the source language is en-GB. update is thegotext function that we want to execute. As well as update there are extract, rewrite and generate functions, but in the translation workflow for a web application the only one you actually need is update. The -out flag contains the path that you want the message catalog to be output to. This path should be relative to the file containing the go generate command. In our case, we've set the value to catalog.go, which means that the message catalog will be output to a new internal/translations/catalog.go file. We'll talk more about message catalogs and explain what they are shortly. The -lang flag contains a comma-separated list of the BCP 47 tags that you want to create translations for. You don't need to include the source language here, but (as we'll demonstrate later in this article) it can be helpful for dealing with pluralization of text content. Lastly, we have the fully-qualified module path for the package(s) that you want to create translations for (in this case bookstore.example.com/cmd/www). You can list multiple packages if necessary, separated by a whitespace character. When we execute this go generate command, gotext will walk the code for the cmd/www application and look for all calls to a message.Printer†. It then extracts the relevant message strings and outputs them to some JSON files for translation. † Important: It's critical to note when gotext walks your code it actually only looks for calls to message.Printer.Printf(), Fprintf() and Sprintf() — basically the three methods that end with an f. It ignores all other methods such as Sprint() or Println(). You can see this behavior in the gotext implementation here. OK, let's put this into action and call go generate on our translations.go file. In turn, this will execute the gotext command that we included at the top of that file. $ go generate ./internal/translations/translations.go de-DE: Missing entry for "Welcome!". fr-CH: Missing entry for "Welcome!". Cool, this looks like we're getting somewhere. We've got some useful feedback to indicate that we are missing the necessary German and French translations for our "Welcome!" message. If you take a look at the directory structure for your project, it should now look like this: . ├── cmd │ └── www │ ├── handlers.go │ └── main.go ├── go.mod ├── go.sum └── internal └── translations ├── catalog.go ├── locales │ ├── de-DE │ │ └── out.gotext.json │ ├── en-GB │ │ └── out.gotext.json │ └── fr-CH │ └── out.gotext.json └── translations.go We can see that the go generate command has automatically generated an internal/translations/catalog.go file for us (which we'll look at in a minute), and a locales folder containing out.gotext.json files for each of our target languages. Let's take a look at the internal/translations/locales/de-DE/out.gotext.json file: File: internal/translations/locales/de-DE/out.gotext.json { "language": "de-DE", "messages": [ { "id": "Welcome!", "message": "Welcome!", "translation": "" } ] } In this JSON file, the relevant BCP 47 language tag is defined at the top of the file, followed by a JSON array of the messages which require translation. The message value is the text for translation in the source language, and the (currently empty) translation value is where we should enter appropriate German translation. It's important to emphasize that you don't edit this file in place. Instead, the workflow for adding a translation goes like this: You generate the out.gotext.json files containing the messages which need to be translated (which we've just done). You send these files to a translator, who edits the JSON to include the necessary translations. They then send the updated files back to you. You then save these updated files with the name messages.gotext.json in the folder for the appropriate language. For demonstration purposes, let's quickly simulate this workflow by copying the out.gotext.json files to messages.gotext.json files, and updating them to include the translated messages like so: $ cp internal/translations/locales/de-DE/out.gotext.json internal/translations/locales/de-DE/messages.gotext.json $ cp internal/translations/locales/fr-CH/out.gotext.json internal/translations/locales/fr-CH/messages.gotext.json File: internal/translations/locales/de-DE/messages.gotext.json { "language": "de-DE", "messages": [ { "id": "Welcome!", "message": "Welcome!", "translation": "Willkommen!" } ] } File: internal/translations/locales/fr-CH/messages.gotext.json { "language": "fr-CH", "messages": [ { "id": "Welcome!", "message": "Welcome!", "translation": "Bienvenu !" } ] } If you like, you can also take a look at the out.gotext.json file for our en-GB source language. You'll see that the translation value for the message has been auto-filled for us. File: internal/translations/locales/en-GB/messages.gotext.json { "language": "en-GB", "messages": [ { "id": "Welcome!", "message": "Welcome!", "translation": "Welcome!", "translatorComment": "Copied from source.", "fuzzy": true } ] } The next step is to run our go generate command again. This time, it should execute without any warning messages about missing translations. $ go generate ./internal/translations/translations.go Now it's a good time to take a look at the internal/translations/catalog.go file, which is automatically generated for us by the gotext update command. This file contains a message catalog, which is — very roughly speaking — a mapping of messages and their relevant translations for each target language. Let's take a quick look inside the file: File: internal/translations/catalog.go // Code generated by running "go generate" in golang.org/x/text. DO NOT EDIT. package translations import ( "golang.org/x/text/language" "golang.org/x/text/message" "golang.org/x/text/message/catalog" ) type dictionary struct { index []uint32 data string } func (d *dictionary) Lookup(key string) (data string, ok bool) { p, ok := messageKeyToIndex[key] if !ok { return "", false } start, end := d.index[p], d.index[p+1] if start == end { return "", false } return d.data[start:end], true } func init() { dict := map[string]catalog.Dictionary{ "de_DE": &dictionary{index: de_DEIndex, data: de_DEData}, "en_GB": &dictionary{index: en_GBIndex, data: en_GBData}, "fr_CH": &dictionary{index: fr_CHIndex, data: fr_CHData}, } fallback := language.MustParse("en-GB") cat, err := catalog.NewFromMap(dict, catalog.Fallback(fallback)) if err != nil { panic(err) } message.DefaultCatalog = cat } var messageKeyToIndex = map[string]int{ "Welcome!\n": 0, } var de_DEIndex = []uint32{ // 2 elements 0x00000000, 0x00000011, } // Size: 32 bytes const de_DEData string = "\x04\x00\x01\n\f\x02Willkommen!" var en_GBIndex = []uint32{ // 2 elements 0x00000000, 0x0000000e, } // Size: 32 bytes const en_GBData string = "\x04\x00\x01\n\t\x02Welcome!" var fr_CHIndex = []uint32{ // 2 elements 0x00000000, 0x00000010, } // Size: 32 bytes const fr_CHData string = "\x04\x00\x01\n\v\x02Bienvenu !" // Total table size 143 bytes (0KiB); checksum: 385F6E56 I don't want to dwell on the details here, because it's OK for use to treat this file as something of a 'black box', and — as warned by the comment at the top of the file — we shouldn't make any changes to it directly. But the most important thing to point out is that this file contains an init() function which, when called, initializes a new message catalog containing all our translations and mappings. It then sets this as the default message catalog by assigning it to the message.DefaultCatalog global variable. When we call one of the message.Printer functions, the printer will lookup the relevant translation from the default message catalog for printing. This is really nice, because it means that all our translations are stored in memory at runtime, and any lookups are very fast and efficient. So, if we take a step back for a moment, we can see that the gotext update command that we're using with go generate actually does two things. One — it walks the code in our cmd/www application and extracts the necessary strings for translation into the out.gotext.json files; and two — it also parses any messages.gotext.json files (if present) and updates the message catalog accordingly. The final step in getting this working is to import the internal/translations package in our cmd/www/handlers.go file. This will ensure that the init() function in internal/translations/translations.go is called, and the default message catalog is updated to be the one containing our translations. Because we won't actually be referencing anything in the internal/translations package directly, we'll need to alias the import path to the blank identifer _ to prevent the Go compiler from complaining. Go ahead and do that now: File: cmd/www/handlers.go package main import ( "net/http" // Import the internal/translations package, so that its init() // function is called. _ "bookstore.example.com/internal/translations" "golang.org/x/text/language" "golang.org/x/text/message" ) func handleHome(w http.ResponseWriter, r *http.Request) { locale := r.URL.Query().Get(":locale") var lang language.Tag switch locale { case "en-gb": lang = language.MustParse("en-GB") case "de-de": lang = language.MustParse("de-DE") case "fr-ch": lang = language.MustParse("fr-CH") default: http.NotFound(w, r) return } p := message.NewPrinter(lang) p.Fprintf(w, "Welcome!\n") } Alright, let's try this out! When your restart the application and try making some requests, you should now see the "Welcome!" message translated into the appropriate language. $ curl localhost:4018/en-GB Welcome! $ curl localhost:4018/de-de Willkommen! $ curl localhost:4018/fr-ch Bienvenu ! Using variables in translations Now that we've got the basic translations working in our application, let's move on to something a bit more advanced and look at how to manage translations with interpolated variables in them. To demonstrate, we'll update the HTTP response from our handleHome() function to include a "{N} books available" line, where {N} is an integer containing the number of books in our imaginary bookstore. File: cmd/www/handlers.go package main ... func handleHome(w http.ResponseWriter, r *http.Request) { locale := r.URL.Query().Get(":locale") var lang language.Tag switch locale { case "en-gb": lang = language.MustParse("en-GB") case "de-de": lang = language.MustParse("de-DE") case "fr-ch": lang = language.MustParse("fr-CH") default: http.NotFound(w, r) return } // Define a variable to hold the number of books. In a real application // this would probably be retrieved by making a database query or // something similar. var totalBookCount = 1_252_794 p := message.NewPrinter(lang) p.Fprintf(w, "Welcome!\n") // Use the Fprintf() function to include the new message in the HTTP // response, with the book count as in interpolated integer value. p.Fprintf(w, "%d books available\n", totalBookCount) } Save the changes, then use go generate to output some new out.gotext.json files. You should see warning messages for the new missing translations like so: $ go generate ./internal/translations/translations.go de-DE: Missing entry for "{TotalBookCount} books available". fr-CH: Missing entry for "{TotalBookCount} books available". Let's take a look at the de-DE/out.gotext.json file: File: internal/translations/locales/de-DE/out.gotext.json { "language": "de-DE", "messages": [ { "id": "Welcome!", "message": "Welcome!", "translation": "Willkommen!" }, { "id": "{TotalBookCount} books available", "message": "{TotalBookCount} books available", "translation": "", "placeholders": [ { "id": "TotalBookCount", "string": "%[1]d", "type": "int", "underlyingType": "int", "argNum": 1, "expr": "totalBookCount" } ] } ] } The first thing to point out here is that the translation for our "Welcome!" message has been persisted across the workflow and is already present in the out.gotext.json file. This is obviously really important, because it means that when we send the file to the translator they won't need to provide the translation again. The second thing is that there is now an entry for our new message. We can see that this has the form "{TotalBookCount} books available", with the (capitalized) variable name from our Go code being used as the placeholder parameter. You should keep this in mind when writing your code, and try to use sensible and descriptive variable names that will make sense to your translators. The placeholders array also provides additional information about each placeholder value, the most useful part probably being the type value (which in this case tells the translator that the TotalBookCount value is an integer). So the next step is to send these new out.gotext.json files off to a translator for translation. Again, we'll simulate that here by copying them to messages.gotext.json files and adding the translations like so: $ cp internal/translations/locales/de-DE/out.gotext.json internal/translations/locales/de-DE/messages.gotext.json $ cp internal/translations/locales/fr-CH/out.gotext.json internal/translations/locales/fr-CH/messages.gotext.json File: internal/translations/locales/de-DE/messages.gotext.json { "language": "de-DE", "messages": [ { "id": "Welcome!", "message": "Welcome!", "translation": "Willkommen!" }, { "id": "{TotalBookCount} books available", "message": "{TotalBookCount} books available", "translation": "{TotalBookCount} Bücher erhältlich", "placeholders": [ { "id": "TotalBookCount", "string": "%[1]d", "type": "int", "underlyingType": "int", "argNum": 1, "expr": "totalBookCount" } ] } ] } File: internal/translations/locales/fr-CH/messages.gotext.json { "language": "fr-CH", "messages": [ { "id": "Welcome!", "message": "Welcome!", "translation": "Bienvenu !" }, { "id": "{TotalBookCount} books available", "message": "{TotalBookCount} books available", "translation": "{TotalBookCount} livres disponibles", "placeholders": [ { "id": "TotalBookCount", "string": "%[1]d", "type": "int", "underlyingType": "int", "argNum": 1, "expr": "totalBookCount" } ] } ] } Make sure that both messages.gotext.json files are saved, and then run go generate to update our message catalog. This should run without any warnings. $ go generate ./internal/translations/translations.go When you restart the cmd/www application and make some HTTP requests again, you should now see the new translated messages like so: $ curl localhost:4018/en-GB Welcome! 1,252,794 books available $ curl localhost:4018/de-de Willkommen! 1.252.794 Bücher erhältlich $ curl localhost:4018/fr-ch Bienvenu ! 1 252 794 livres disponibles Now this is really cool. As we'll as the translations being applied by our message.Printer, it's also smart enough to output the interpolated integer value with the correct number formatting for each language. We can see here that our en-GB locale uses the "," character as a thousands separator, whereas de-DE uses "." and fr-CH uses the whitespace " ". A similar thing is done for decimal separators too. Dealing with pluralization's This is working nicely, but what happens if there is only 1 book available in our bookstore? Let's update the handleHome() function so that the totalBookCount value is 1: File: cmd/www/handlers.go package main ... func handleHome(w http.ResponseWriter, r *http.Request) { locale := r.URL.Query().Get(":locale") var lang language.Tag switch locale { case "en-gb": lang = language.MustParse("en-GB") case "de-de": lang = language.MustParse("de-DE") case "fr-ch": lang = language.MustParse("fr-CH") default: http.NotFound(w, r) return } // Set the total book count to 1. var totalBookCount = 1 p := message.NewPrinter(lang) p.Fprintf(w, "Welcome!\n") p.Fprintf(w, "%d books available\n", totalBookCount) } (I know this is a bit of a tenuous example, but it helps illustrate Go's pluralization functionality without much extra code, so bear with me!) You can probably imagine what happens when we restart the application and make a request to localhost:4018/en-gb now. $ curl localhost:4018/en-gb Welcome! 1 books available That's right, we see the message "1 books available", which isn't correct English because of the plural noun books. It would be better if this message read 1 book available or — even better — One book available instead. Happily, it's possible for us to specify alternative translations based on the value of an interpolated variable in our messages.gotext.json files. Let's start by demonstrating this for our en-GB locale. If you're following along, copy the en-GB/out.gotext.json file to en-GB/messages.gotext.json: $ cp internal/translations/locales/en-GB/out.gotext.json internal/translations/locales/en-GB/messages.gotext.json And then update it like so: File: internal/translations/locales/en-GB/messages.gotext.json { "language": "en-GB", "messages": [ { "id": "Welcome!", "message": "Welcome!", "translation": "Welcome!", "translatorComment": "Copied from source.", "fuzzy": true }, { "id": "{TotalBookCount} books available", "message": "{TotalBookCount} books available", "translation": { "select": { "feature": "plural", "arg": "TotalBookCount", "cases": { "=1": { "msg": "One book available" }, "other": { "msg": "{TotalBookCount} books available" } } } }, "placeholders": [ { "id": "TotalBookCount", "string": "%[1]d", "type": "int", "underlyingType": "int", "argNum": 1, "expr": "totalBookCount" } ] } ] } Now, rather than the translation value being a simple string we have set it to a JSON object that instructs the message catalog to use different translations depending on the value of the TotalBookCount placeholder. The key part here is the cases value, which contains the translations to use for different values of the placeholder. The supported case rules are: Case Description "=x" Where x is an integer that equals the value of the placeholder "<x" Where x is an integer that is larger than the value of the placeholder "other" All other cases (a bit like default in a Go switch statement) Note: If you look at the documentation for the golang.org/x/text/feature/plural package (which is what gotext uses behind the scenes when generating the message catalog), you'll see that it also mentions the case rules "zero", "one", "two", "few", and "many". However, these rules aren't supported for all possible target languages, and you may get an error like gotext: generation failed: error: plural: form "many" not supported for language "de-DE" if you try to use them. It seems to be safer to stick with the three case rules in the table above. Additionally, it's important to be aware that the range of allowed values for x in the "=x" and "<x" case rules is 0 to 32767. Trying to use something outside of that range will result in an error. There's an open issue about these behaviors here. Let's complete work this by updating the messages.gotext.json files for our de-DE and fr-CH languages to include the appropriate pluralized variations, like so: File: internal/translations/locales/de-DE/messages.gotext.json { "language": "de-DE", "messages": [ { "id": "Welcome!", "message": "Welcome!", "translation": "Willkommen!" }, { "id": "{TotalBookCount} books available", "message": "{TotalBookCount} books available", "translation": { "select": { "feature": "plural", "arg": "TotalBookCount", "cases": { "=1": { "msg": "Ein Buch erhältlich" }, "other": { "msg": "{TotalBookCount} Bücher erhältlich" } } } }, "placeholders": [ { "id": "TotalBookCount", "string": "%[1]d", "type": "int", "underlyingType": "int", "argNum": 1, "expr": "totalBookCount" } ] } ] } File: internal/translations/locales/fr-CH/messages.gotext.json { "language": "fr-CH", "messages": [ { "id": "Welcome!", "message": "Welcome!", "translation": "Bienvenu !" }, { "id": "{TotalBookCount} books available", "message": "{TotalBookCount} books available", "translation": { "select": { "feature": "plural", "arg": "TotalBookCount", "cases": { "=1": { "msg": "Un livre disponible" }, "other": { "msg": "{TotalBookCount} livres disponibles" } } } }, "placeholders": [ { "id": "TotalBookCount", "string": "%[1]d", "type": "int", "underlyingType": "int", "argNum": 1, "expr": "totalBookCount" } ] } ] } Once those files are saved, use go generate again to update the message catalog: $ go generate ./internal/translations/translations.go And if you restart the web application and make some HTTP requests, you should now see the appropriate message for 1 book: $ curl localhost:4018/en-GB Welcome! One book available $ curl localhost:4018/de-de Willkommen! Ein Buch erhältlich $ curl localhost:4018/fr-ch Bienvenu ! Un livre disponible If you like, you can revert the totalBookCount variable back to a larger number... File: cmd/www/handlers.go package main ... func handleHome(w http.ResponseWriter, r *http.Request) { ... // Revert the total book count. var totalBookCount = 1_252_794 p := message.NewPrinter(lang) p.Fprintf(w, "Welcome!\n") p.Fprintf(w, "%d books available\n", totalBookCount) } And when you restart the application and make another request, you should see the "other" version of our message: $ curl localhost:4018/de-de Willkommen! 1.252.794 Bücher erhältlich Creating a localizer abstraction In the final part of this article we're going to create a new internal/localizer package which abstracts all our code for dealing with languages, printers and translations. If you're following along, go ahead and create a new internal/localizer directory containing a localizer.go file. $ mkdir -p internal/localizer $ touch internal/localizer/localizer.go At this point, your project structure should look like this: . ├── cmd │ └── www │ ├── handlers.go │ └── main.go ├── go.mod ├── go.sum └── internal ├── localizer │ └── localizer.go └── translations ├── catalog.go ├── locales │ ├── de-DE │ │ ├── messages.gotext.json │ │ └── out.gotext.json │ ├── en-GB │ │ ├── messages.gotext.json │ │ └── out.gotext.json │ └── fr-CH │ ├── messages.gotext.json │ └── out.gotext.json └── translations.go And then add the following code to the new localizer.go file: File: internal/localizer/localizer.go package localizer import ( // Import the internal/translations so that it's init() function // is run. It's really important that we do this here so that the // default message catalog is updated to use our translations // *before* we initialize the message.Printer instances below. _ "bookstore.example.com/internal/translations" "golang.org/x/text/language" "golang.org/x/text/message" ) // Define a Localizer type which stores the relevant locale ID (as used // in our URLs) and a (deliberately unexported) message.Printer instance // for the locale. type Localizer struct { ID string printer *message.Printer } // Initialize a slice which holds the initialized Localizer types for // each of our supported locales. var locales = []Localizer{ { // Germany ID: "de-de", printer: message.NewPrinter(language.MustParse("de-DE")), }, { // Switzerland (French speaking) ID: "fr-ch", printer: message.NewPrinter(language.MustParse("fr-CH")), }, { // United Kingdom ID: "en-gb", printer: message.NewPrinter(language.MustParse("en-GB")), }, } // The Get() function accepts a locale ID and returns the corresponding // Localizer for that locale. If the locale ID is not supported then // this returns `false` as the second return value. func Get(id string) (Localizer, bool) { for _, locale := range locales { if id == locale.ID { return locale, true } } return Localizer{}, false } // We also add a Translate() method to the Localizer type. This acts // as a wrapper around the unexported message.Printer's Sprintf() // function and returns the appropriate translation for the given // message and arguments. func (l Localizer) Translate(key message.Reference, args ...interface{}) string { return l.printer.Sprintf(key, args...) } Note: Notice here that we're initializing a single message.Printer for each locale at startup, and these will be used concurrently by our web application handlers. Although the golang.org/x/text/message documentation doesn't say that message.Printer is safe for concurrent use, I checked with Marcel van Lohuizen (the lead developer of the golang.org/x/text packages) and he confirmed that message.Printer is intended to be used concurrently and is concurrency safe (so long as access to any write destination is synchronized). Next let's update the cmd/www/handlers.go file to use our new Localizer type, and — while we're at it — let's also make our handleHome() function render an additional "Launching soon!" message. File: cmd/www/handlers.go package main import ( "fmt" // New import "net/http" "bookstore.example.com/internal/localizer" // New import ) func handleHome(w http.ResponseWriter, r *http.Request) { // Initialize a new Localizer based on the locale ID in the URL. l, ok := localizer.Get(r.URL.Query().Get(":locale")) if !ok { http.NotFound(w, r) return } var totalBookCount = 1_252_794 // Update these to use the new Translate() method. fmt.Fprintln(w, l.Translate("Welcome!")) fmt.Fprintln(w, l.Translate("%d books available", totalBookCount)) // Add an additional "Launching soon!" message. fmt.Fprintln(w, l.Translate("Launching soon!")) } It's worth pointing out that our use of the Translate() method here isn't just some syntactic sugar. You might remember earlier that I wrote the following warning: It's critical to note when gotext walks your code it actually only looks for calls to message.Printer.Printf(), Fprintf() and Sprintf() — basically the three methods that end with an f. It ignores all other methods such as Sprint() or Println(). By having all our translations go through the Translate() method — which uses Sprintf() behind-the-scenes — we avoid the scenario where you accidentally use a method like Sprint() or Println() and gotext doesn't extract the message to the out.gotext.json files. Let's try this out and run go generate again: $ go generate ./internal/translations/translations.go de-DE: Missing entry for "Launching soon!". fr-CH: Missing entry for "Launching soon!". So this is really smart. We can see that gotext has been clever enough to walk our entire codebase and identify what strings need to be translated, even when we abstract the message.Printer.Sprintf() call to a helper function in a different package. This is awesome, and one of the things that I really appreciate about the gotext tool. If you're following along, please go ahead and copy the out.gotext.json files to message.gotext.json files, and add the necessary translations for the new "Launching soon!" message. Then remember to run go generate again and restart the web application. When you make some HTTP requests again now, your responses should look similar to this: $ curl localhost:4018/en-gb Welcome! 1,252,794 books available Launching soon! $ curl localhost:4018/de-de Willkommen! 1.252.794 Bücher erhältlich Bald verfügbar! $ curl localhost:4018/fr-ch Bienvenu ! 1 252 794 livres disponibles Bientôt disponible ! Additional information Conflicting routes At this start of this post I'd deliberately didn't recommending using httprouter, despite it being an excellent and popular router. This is because using a dynamic locale as the first part of a URL path is likely to result in conflicts with other application routes which don't require a locale prefix, like /static/css/main.css or /admin/login. The httprouter package doesn't allow conflicting routes, which makes using it awkward in this scenario. If you do want to use httprouter, or want to avoid conflicting routes in your application, you could pass the locale as a query string parameter instead like /category/travel?locale=gb.
Alex Edwards Aug 25, 2021 -

When searching for examples of HTTP basic authentication with Go, every result I found unfortunately contained code which was either out-of-date (i.e. doesn't use the r.BasicAuth() functionality that was introduced in Go 1.4) or failed to mitigate the risk of timing attacks. So in this post, I'd like to discuss how to use it correctly in your Go applications. We'll start with a bit of background information, but if you're not interested in that you can skip straight to the code. What is basic authentication? When should I use it? As a developer, you're probably already familiar with the prompt that web browsers show when you visit a URL that is protected with basic authentication. When you input a username and password into this prompt, the web browser will send a HTTP request to the server containing an Authorization header — similar to this: Authorization: Basic YWxpY2U6cGE1NXdvcmQ= The Authorization header value is made up of the string Basic followed by the username and password in the format username:password and base-64 encoded. In this specific example, YWxpY2U6cGE1NXdvcmQ= is the base-64 encoding of the value alice:pa55word. When the server receives this request, it can decode the username and password from the Authorization header and check that they are valid. If the credentials are not valid, the server can return a 401 Unauthorized response and the browser can redisplay the prompt. Basic authentication can be used in lots of different scenarios, but it's often a good fit for when you have a low-value resource and want a quick and easy way to protect it from prying eyes. To help keep things secure you should: Only ever use it over HTTPS connections. If you don't use HTTPS, the Authorization header can potentially be intercepted and decoded by an attacker, who can then use the username and password to gain access to your protected resources. Use a strong password that is difficult for attackers to guess or brute-force. Consider adding rate limiting to your application, to make it harder for an attacker to brute-force the credentials. On the client side, basic auth is supported out-of-the-box by most programming languages and command-line tools such as curl and wget, as well as web browsers. Protecting a web application Probably the simplest way to use basic authentication in your application is to create some middleware. In this middleware we want to do two things: Extract the provided username and password from the request Authorization header, if it exists. The best way to do this is with the r.BasicAuth() method. Compare the provided username and password against the values that you expect. If the username and password are not correct, or the request didn't contain a valid Authorization header, then the middleware should send a 401 Unauthorized response and set a WWW-Authenticate header to inform the client that basic authentication should be used to gain access. Otherwise, the middleware should allow the request to proceed and call the next handler in the chain. When comparing the provided username and password against the expected values, to eliminate the risk of a timing attack you should use Go's subtle.ConstantTimeCompare() function instead of the == operator. Note: In Go (like most languages) the normal == comparison operator will return as soon as it finds a difference between two strings. So if the first character is different, it will return after just looking at one character. In theory, this opens the opportunity for a timing attack where an attacker could make lots of requests to your application, and look at discrepancies in the average response time. The time it takes for them receive a 401 Unauthorized response effectively tells them how many characters they got right. With enough requests, they could build up a picture of the complete username and password. Realistically though, string comparison is so fast that network jitter will obscure any differences in timing, meaning that it is probably impossible to pull off this attack successfully. But... there is some evidence that remote timing attacks are feasible, and given that we can quite easily eliminate this risk completely by using subtle.ConstantTimeCompare(), I think it makes sense to do so. It's also important to be aware that using subtle.ConstantTimeCompare() can leak information about username and password length. To prevent this, we should hash both the provided and expected username and password values using a fast cryptographic hash function like SHA-256 before comparing them. This ensures that both the provided and expected values that we are comparing are equal in length and prevents subtle.ConstantTimeCompare() itself from returning early. Putting that together, the pattern for implementing some middleware looks like this: func basicAuth(next http.HandlerFunc) http.HandlerFunc { return http.HandlerFunc(func(w http.ResponseWriter, r *http.Request) { // Extract the username and password from the request // Authorization header. If no Authorization header is present // or the header value is invalid, then the 'ok' return value // will be false. username, password, ok := r.BasicAuth() if ok { // Calculate SHA-256 hashes for the provided and expected // usernames and passwords. usernameHash := sha256.Sum256([]byte(username)) passwordHash := sha256.Sum256([]byte(password)) expectedUsernameHash := sha256.Sum256([]byte("your expected username")) expectedPasswordHash := sha256.Sum256([]byte("your expected password")) // Use the subtle.ConstantTimeCompare() function to check if // the provided username and password hashes equal the // expected username and password hashes. ConstantTimeCompare // will return 1 if the values are equal, or 0 otherwise. // Importantly, we should do the work to evaluate both the // username and password before checking the return values to // avoid leaking information. usernameMatch := (subtle.ConstantTimeCompare(usernameHash[:], expectedUsernameHash[:]) == 1) passwordMatch := (subtle.ConstantTimeCompare(passwordHash[:], expectedPasswordHash[:]) == 1) // If the username and password are correct, then call // the next handler in the chain. Make sure to return // afterwards, so that none of the code below is run. if usernameMatch && passwordMatch { next.ServeHTTP(w, r) return } } // If the Authentication header is not present, is invalid, or the // username or password is wrong, then set a WWW-Authenticate // header to inform the client that we expect them to use basic // authentication and send a 401 Unauthorized response. w.Header().Set("WWW-Authenticate", `Basic realm="restricted", charset="UTF-8"`) http.Error(w, "Unauthorized", http.StatusUnauthorized) }) } Important: If you're looking at the code above and thinking "I thought you should never use SHA-256 for hashing passwords...", it's important to emphasize that the username and password are not being hashed for the purpose of storage, they are only being hashed in order to get two equal-length byte slices that can be compared in constant-time. Low collision risk is the important thing here, and a hash like SHA-256 is a good fit for this purpose. You might also be wondering what the realm value is and why we are setting it to "restricted" in the WWW-Authenticate response header. Basically, the realm value is a string which allows you to create partitions of protected space in your application. So, for example, an application could have a "documents" realm and an "admin area" realm, which require different credentials. A web browser (or other type of client) can cache and automatically reuse the same username and password for any requests within the same realm, so that the prompt doesn't need to be shown for every single request. If you don't require multiple partitions for your application, you can set the realm to a single hardcoded value like "restricted", like we have in the code above. For the sake of security and/or flexibility, you may also prefer to store the expected username and password values in environment variables or pass them as command-line flag values when starting the application, rather than hard-coding them into your application. A working example Let's take a quick look at this in the context of a small — but fully functioning — web application. If you'd like to follow along, create a new basic-auth-example directory on your computer, add a main.go file, initialize a module, and create a pair of locally-trusted TLS certificates using the mkcert tool. Like so: $ mkdir basic-auth-example $ cd basic-auth-example $ touch main.go $ go mod init example.com/basic-auth-example go: creating new go.mod: module example.com/basic-auth-example $ mkcert localhost Created a new certificate valid for the following names 📜 - "localhost" The certificate is at "./localhost.pem" and the key at "./localhost-key.pem" ✅ It will expire on 21 September 2023 🗓 $ ls go.mod localhost-key.pem localhost.pem main.go Then add the following code to the main.go file, so that the application reads the expected username and password from environment variables and uses the middleware pattern that we described above. package main import ( "crypto/sha256" "crypto/subtle" "fmt" "log" "net/http" "os" "time" ) type application struct { auth struct { username string password string } } func main() { app := new(application) app.auth.username = os.Getenv("AUTH_USERNAME") app.auth.password = os.Getenv("AUTH_PASSWORD") if app.auth.username == "" { log.Fatal("basic auth username must be provided") } if app.auth.password == "" { log.Fatal("basic auth password must be provided") } mux := http.NewServeMux() mux.HandleFunc("GET /unprotected", app.unprotectedHandler) mux.HandleFunc("GET /protected", app.basicAuth(app.protectedHandler)) srv := &http.Server{ Addr: ":4000", Handler: mux, IdleTimeout: time.Minute, ReadTimeout: 10 * time.Second, WriteTimeout: 30 * time.Second, } log.Printf("starting server on %s", srv.Addr) err := srv.ListenAndServeTLS("./localhost.pem", "./localhost-key.pem") log.Fatal(err) } func (app *application) protectedHandler(w http.ResponseWriter, r *http.Request) { fmt.Fprintln(w, "This is the protected handler") } func (app *application) unprotectedHandler(w http.ResponseWriter, r *http.Request) { fmt.Fprintln(w, "This is the unprotected handler") } func (app *application) basicAuth(next http.HandlerFunc) http.HandlerFunc { return http.HandlerFunc(func(w http.ResponseWriter, r *http.Request) { username, password, ok := r.BasicAuth() if ok { usernameHash := sha256.Sum256([]byte(username)) passwordHash := sha256.Sum256([]byte(password)) expectedUsernameHash := sha256.Sum256([]byte(app.auth.username)) expectedPasswordHash := sha256.Sum256([]byte(app.auth.password)) usernameMatch := (subtle.ConstantTimeCompare(usernameHash[:], expectedUsernameHash[:]) == 1) passwordMatch := (subtle.ConstantTimeCompare(passwordHash[:], expectedPasswordHash[:]) == 1) if usernameMatch && passwordMatch { next.ServeHTTP(w, r) return } } w.Header().Set("WWW-Authenticate", `Basic realm="restricted", charset="UTF-8"`) http.Error(w, "Unauthorized", http.StatusUnauthorized) }) } You should then be able to start the application, using a pair of temporary AUTH_USERNAME and AUTH_PASSWORD environment variables. Like so: $ AUTH_USERNAME=alice AUTH_PASSWORD=p8fnxeqj5a7zbrqp go run . 2021/06/20 16:09:21 starting server on :4000 At this point, if you open your web browser and visit https://localhost:4000/protected you should be greeted by the basic authentication prompt. Alternatively, you can make some requests using curl to verify that the authentication checks are working correctly. $ curl -i https://localhost:4000/unprotected HTTP/2 200 content-type: text/plain; charset=utf-8 content-length: 32 date: Sun, 20 Jun 2021 14:09:56 GMT This is the unprotected handler $ curl -i https://localhost:4000/protected HTTP/2 401 content-type: text/plain; charset=utf-8 www-authenticate: Basic realm="restricted", charset="UTF-8" x-content-type-options: nosniff content-length: 13 date: Sun, 20 Jun 2021 14:09:59 GMT Unauthorized $ curl -i -u alice:p8fnxeqj5a7zbrqp https://localhost:4000/protected HTTP/2 200 content-type: text/plain; charset=utf-8 content-length: 30 date: Sun, 20 Jun 2021 14:10:14 GMT This is the protected handler $ curl -i -u alice:wrongPa55word https://localhost:4000/protected HTTP/2 401 content-type: text/plain; charset=utf-8 www-authenticate: Basic realm="restricted", charset="UTF-8" x-content-type-options: nosniff content-length: 13 date: Sun, 20 Jun 2021 14:15:30 GMT Unauthorized Making a request to a protected resource Finally, if you need to access a protected resource from your Go code as a client, all you need to do is call the r.SetBasicAuth() method on your request before executing it. Like so: package main import ( "fmt" "io" "log" "net/http" "time" ) func main() { client := http.Client{Timeout: 5 * time.Second} req, err := http.NewRequest(http.MethodGet, "https://localhost:4000/protected", http.NoBody) if err != nil { log.Fatal(err) } req.SetBasicAuth("alice", "p8fnxeqj5a7zbrqp") res, err := client.Do(req) if err != nil { log.Fatal(err) } defer res.Body.Close() resBody, err := io.ReadAll(res.Body) if err != nil { log.Fatal(err) } fmt.Printf("Status: %d\n", res.StatusCode) fmt.Printf("Body: %s\n", string(resBody)) }
Alex Edwards Jun 21, 2021 -
One of my favorite things about the recent Go 1.16 release is a small — but very welcome — addition to the flag package: the flag.Func() function. This makes it much easier to define and use custom command-line flags in your application. For example, if you want to parse a flag like --pause=10s directly into a time.Duration type, or parse --urls="http://example.com http://example.org" directly into a []string slice, then previously you had two options. You could either create a custom type to implement the flag.Value interface, or use a third-party package like pflag. But now the flag.Func() function gives you a simple and lightweight alternative. In this short post we're going to take a look at a few examples of how you can use it in your own code. Parsing custom flag types To demonstrate how this works, let's start with the two examples I gave above and create a sample application which accepts a list of URLs and then prints them out with a pause between them. Similar to this: $ go run . --pause=3s --urls="http://example.com http://example.org http://example.net" 2021/03/08 08:16:04 http://example.com 2021/03/08 08:16:07 http://example.org 2021/03/08 08:16:10 http://example.net To make this work, we'll need to do two things: Convert the --pause flag value from a 'human-readable' string like 200ms, 5s or 10m into a native Go time.Duration type. We can do this using the time.ParseDuration() function. Split the values in the --urls flag into a slice, so we can loop through them. The strings.Fields function is a good fit for this task. We can use those together with flag.Func() like so: package main import ( "flag" "log" "strings" "time" ) func main() { // First we need to declare variables to hold the values from the // command-line flags. Notice that we also need to set any defaults, // which will be used if the relevant flag is not provided at runtime. var ( urls []string // Default of the empty slice pause time.Duration = time.Second // Default of one second ) // The flag.Func() function takes three parameters: the flag name, // descriptive help text, and a function with the signature // `func(string) error` which is called to process the string value // from the command-line flag at runtime and assign it to the necessary // variable. In this case, we use strings.Fields() to split the string // based on whitespace and store the resulting slice in the urls // variable that we declared above. We then return nil from the // function to indicate that the flag was parsed without any errors. flag.Func("urls", "List of URLs to print", func(flagValue string) error { urls = strings.Fields(flagValue) return nil }) // Likewise we can do the same thing to parse the pause duration. The // time.ParseDuration() function may throw an error here, so we make // sure to return that from our function. flag.Func("pause", "Duration to pause between printing URLs", func(flagValue string) error { var err error pause, err = time.ParseDuration(flagValue) return err }) // Importantly, call flag.Parse() to trigger actual parsing of the // flags. flag.Parse() // Print out the URLs, pausing between each iteration. for _, u := range urls { log.Print(u) time.Sleep(pause) } } If you try to run this application, you should find that the flags are parsed and work just like you would expect. For example: $ go run . --pause=500ms --urls="http://example.com http://example.org http://example.net" 2021/03/08 08:22:33 http://example.com 2021/03/08 08:22:34 http://example.org 2021/03/08 08:22:34 http://example.net Whereas if you provide an invalid flag value that triggers an error in one of the flag.Func() functions, Go will automatically display the corresponding error message and exit. For example: $ go run . --pause=500xx --urls="http://example.com http://example.org http://example.net" invalid value "500xx" for flag -pause: time: unknown unit "xx" in duration "500xx" Usage of /tmp/go-build3141872390/b001/exe/example.text: -pause value Duration to pause between printing URLs -urls value List of URLs to print exit status 2 It's really important to point out here that if a flag isn't provided, the corresponding flag.Func() function will not be called at all. This means that you cannot set a default value inside a flag.Func() function, so trying to do something like this won't work: flag.Func("pause", "Duration to pause between printing URLs (default 1s)", func(flagValue string) error { // DON'T DO THIS! This function wont' be called if the flag value is "". if flagValue == "" { pause = time.Second return nil } var err error pause, err = time.ParseDuration(flagValue) return err }) On the plus side though, there are no restrictions on the code that can be contained in a flag.Func() function, so if you want, you could get even fancier with this and parse the URLs into a []*url.URL slice instead of a []string. Like so: var ( urls []*url.URL pause time.Duration = time.Second ) flag.Func("urls", "List of URLs to print", func(flagValue string) error { for _, u := range strings.Fields(flagValue) { parsedURL, err := url.Parse(u) if err != nil { return err } urls = append(urls, parsedURL) } return nil }) Validating flag values The flag.Func() function also opens up some new opportunities for validating input data from command-line flags. For example, let's say that your application has an --environment flag and you want to restrict the possible values to development, staging or production. To do that, you can implement a flag.Func() function similar to this: package main import ( "errors" "flag" "fmt" ) func main() { var ( environment string = "development" ) flag.Func("environment", "Operating environment", func(flagValue string) error { for _, allowedValue := range []string{"development", "staging", "production"} { if flagValue == allowedValue { environment = flagValue return nil } } return errors.New(`must be one of "development", "staging" or "production"`) }) flag.Parse() fmt.Printf("The operating environment is: %s\n", environment) } Making reusable helpers If you find yourself repeating the same code in your flag.Func() functions, or the logic is getting too complex, it's possible to break it out into a reusable helper. For example, we could rewrite the example above to process our --environment flag via a generic enumFlag() function, like so: package main import ( "flag" "fmt" ) func main() { var ( environment string = "development" ) enumFlag(&environment, "environment", []string{"development", "staging", "production"}, "Operating environment") flag.Parse() fmt.Printf("The operating environment is: %s\n", environment) } func enumFlag(target *string, name string, safelist []string, usage string) { flag.Func(name, usage, func(flagValue string) error { for _, allowedValue := range safelist { if flagValue == allowedValue { *target = flagValue return nil } } return fmt.Errorf("must be one of %v", safelist) }) }
Alex Edwards Mar 8, 2021 -
This is a list of things about Go's encoding/json package which, over the years, have either confused or surprised me when I first encountered them. Many of these things are mentioned in the official package documentation if you read it carefully enough, so in theory they shouldn't come as a surprise. But a few of them aren't mentioned in the documentation at all — or at least, they aren't pointed out explicitly — and are worth being aware of! Map entries are sorted alphabetically Byte slices are encoded as base-64 strings Nil and empty slices are encoded differently Integer, time.Time and net.IP values can be used as map keys Angle brackets and ampersands in strings are escaped Trailing zeroes are removed from floats Using omitempty on an zero-valued struct doesn't work Using omitempty on a zero-value time.Time doesn't work There is a 'string' struct tag Non-ASCII punctuation characters aren't supported in struct tags Decoding a JSON number into an interface{} yields a float64 Don't use More() to check if there are remaining JSON objects in a stream String values returned by custom MarshalJSON() methods must be quoted Map entries are sorted alphabetically When encoding a Go map to JSON, the entries will be sorted alphabetically based on the map key. For example, the following map: m := map[string]int{ "z": 123, "0": 123, "a": 123, "_": 123, } Will be encoded to the JSON: {"0":123,"_":123,"a":123,"z":123} Byte slices are encoded as base-64 strings Any []byte slices will be converted to a base64-encoded string when encoding them to JSON. The base64 string uses padding and the standard encoding characters, as defined in RFC 4648. For example, the following map: m := map[string][]byte{ "foo": []byte("bar baz"), } Will be encoded to the JSON: {"foo":"YmFyIGJheg=="} Nil and empty slices are encoded differently Nil slices in Go will be encoded to the null JSON value. In contrast, an empty (but not nil) slice will be encoded as an empty JSON array. For example: var nilSlice []string emptySlice := []string{} m := map[string][]string{ "nilSlice": nilSlice, "emptySlice": emptySlice, } Will be encoded to the JSON: {"emptySlice":[],"nilSlice":null} Integer, time.Time and net.IP values can be used as map keys It's possible to encode a map which has integer values as the map keys. These integers will be automatically converted to strings in the resulting JSON (because the keys in a JSON object must always be strings). For example: m := map[int]string{ 123: "foo", 456_000: "bar", } Will be encoded to the JSON: {"123":"foo","456000":"bar"} In addition, Go allows you to encode maps with keys that implement the encoding.TextMarshaler interface. This means that you can also use time.Time and net.IP values as map keys out-of-the-box. For example: t1 := time.Now() t2 := t1.Add(24 * time.Hour) m := map[time.Time]string{ t1: "foo", t2: "bar", } Will be encoded to the JSON: {"2009-11-10T23:00:00Z":"foo","2009-11-11T23:00:00Z":"bar"} Note that trying to encode a map with any other type of key will result in a json.UnsupportedTypeError error. Angle brackets and ampersands in strings are escaped If a string contains angle brackets<> these will be escaped to \u003c and \u003e in the JSON output. Likewise the & character will be escaped to \u0026. This is to prevent some web browsers from accidentally interpreting the JSON as HTML. For example: s := []string{ "<foo>", "bar & baz", } Will be encoded to the JSON: ["\u003cfoo\u003e","bar \u0026 baz"] If you need to prevent these characters being escaped, you should use a json.Encoder instance and call SetEscapeHTML(false). An example is here. Trailing zeroes are removed from floats When encoding a floating-point number with a fractional part that ends in zero(es), any trailing zeroes will not appear in the JSON. For example: s := []float64{ 123.0, 456.100, 789.990, } Will be encoded to the JSON: [123,456.1,789.99] Using omitempty on an zero-valued struct doesn't work The omitempty directive never considers a struct type to be empty — even if all the struct fields have their zero value, and you use omitempty on those fields too. It will always appear as an object in the encoded JSON. For example: s := struct { Foo struct { Bar string `json:",omitempty"` } `json:",omitempty"` }{} Will be encoded to the JSON: {"Foo":{}} There’s a long-standing proposal which discusses changing this behavior, but the Go 1 compatibility promise means that it's unlikely to happen any time soon. Instead, you can get around this by making the field a pointer to a struct, which works because omitempty considers nil pointers to be empty. For example: s := struct { Foo *struct { Bar string `json:",omitempty"` } `json:",omitempty"` }{} Using omitempty on a zero-value time.Time doesn't work Using omitempty on a zero-value time.Time field won't hide it in the encoded JSON. This is because the time.Time type is a struct behind the scenes and, as mentioned above, omitempty never considers a struct type to be empty. Instead, the string "0001-01-01T00:00:00Z" will appear in the JSON (which is the value returned by calling the MarshalJSON() method on an zero-value time.Time. For example: s := struct { Foo time.Time `json:",omitempty"` }{} Will be encoded to the JSON: {"Foo":"0001-01-01T00:00:00Z"} There is a 'string' struct tag Go provides a string struct tag directive which forces the data in an individual field to be encoded as a string in the resulting JSON. For example, if you want to force an integer to be represented as a string instead of an JSON number you can use the string directive like so: s := struct { Foo int `json:",string"` }{ Foo: 123, } And this will be encoded to the JSON: {"Foo":"123"} Note that the string struct tag directive will only work on fields which contain float, integer or bool types. For any other type it will have no effect. Non-ASCII punctuation characters aren't supported in struct tags When using struct tags to change key names in JSON, any tags containing non-ASCII punctuation characters will be ignored. Notably this means that you can't use en or em dashes, or most currency signs, in struct tags. For example: s := struct { CostUSD string `json:"cost $"` // OK CostEUR string `json:"cost €"` // Contains the non-ASCII punctuation character €. Will be ignored. }{ CostUSD: "100.00", CostEUR: "100.00", } Will be encoded to the following JSON (notice that the struct tag renaming the CostEUR field has been ignored): {"cost $":"100.00","CostEUR":"100.00"} Likewise, any struct tags containing non-ASCII punctuation characters will be ignored when decoding values from a JSON object into a struct, and the struct field will be left with its zero value. For example the following code: js := []byte(`{"cost $":"100.00","cost €":"100.00"}`) s := struct { CostUSD string `json:"cost $"` CostEUR string `json:"cost €"` }{} err := json.Unmarshal(js, &s) if err != nil { log.Fatal(err) } fmt.Printf("%+v", s) Will print out: {CostUSD:100.00 CostEUR:} This can be annoying in situations where you need to decode a JSON object that has keys containing non-ASCII characters, and you can't change the JSON. To work around this limitation, you can decode to a map as an intermediary step, and then copy the data from the map to the struct. For example the following code: js := []byte(`{"cost $":"100.00","cost €":"100.00"}`) var aux map[string]string err := json.Unmarshal([]byte(js), &aux) if err != nil { log.Fatal(err) } s := struct { CostUSD string `json:"cost $"` CostEUR string `json:"cost €"` }{ CostUSD: aux["cost $"], CostEUR: aux["cost €"], } fmt.Printf("%+v", s) Will print out: {CostUSD:100.00 CostEUR:100.00} Decoding a JSON number into an interface{} yields a float64 When decoding a JSON number into an interface{}, the value will have the underlying type float64 — even if it is an integer in the original JSON. If you want to get the value as an integer (instead of a float64) the most robust approach is to decode the JSON using a json.Decoder instance with the UseNumber() method set on it. This will decode all JSON numbers to the underlying type json.Number instead of float64, and you can then access the number as an integer using its Int64() method. For example: js := `{"foo": 123, "bar": true}` var m map[string]interface{} dec := json.NewDecoder(strings.NewReader(js)) dec.UseNumber() err := dec.Decode(&m) if err != nil { log.Fatal(err) } i, err := m["foo"].(json.Number).Int64() if err != nil { log.Fatal(err) } fmt.Printf("foo: %d", i) Will print: foo: 123 Don't use More() to check if there are remaining JSON objects in a stream When processing a stream of JSON objects with json.Decoder, don't use the More() method to check if there is a remaining object in the stream. Depsite its name, More() is not designed for this purpose†, and trying to use it in this way may cause some subtle problems. †The More() method is intended to be used in conjunction with Token(), and exists specifically to check if there is another element in the array or object currently being parsed. For example, if you use it when decoding an invalid JSON stream like {"name": "alice"}{"name": "bob"}] (notice the additional square bracket at the end) it won't result in an error (when it should!). Like so: js := `{"name": "alice"}{"name": "bob"}]` dec := json.NewDecoder(strings.NewReader(js)) for { var user map[string]string err := dec.Decode(&user) if err != nil { log.Fatal(err) } fmt.Printf("%v\n", user) // Don't do this! if !dec.More() { break } } This code will run without error and output: map[name:alice] map[name:bob] The correct technique to see if a stream contains another JSON object is to check for an io.EOF error, which will be returned when there are no more objects to process in the stream. Like so: js := `{"name": "alice"}{"name": "bob"}]` dec := json.NewDecoder(strings.NewReader(js)) for { var user map[string]string err := dec.Decode(&user) if err != nil { if errors.Is(err, io.EOF) { break } log.Fatal(err) } fmt.Printf("%v\n", user) } Running this will correctly result in an error, as we would expect given the invalid input: map[name:alice] map[name:bob] 2009/11/10 23:00:00 invalid character ']' looking for beginning of value String values returned by custom MarshalJSON() methods must be quoted If you are creating a custom MarshalJSON() method which returns a string value, you must wrap the string in double quotes before returning it, otherwise it won't be interpreted as a JSON string and will result in a runtime error. For example: type Age int func (age Age) MarshalJSON() ([]byte, error) { encodedAge := fmt.Sprintf("%d years", age) encodedAge = strconv.Quote(encodedAge) // Wrap the string in quotes before returning. return []byte(encodedAge), nil } func main() { users := map[string]Age{ "alice": 21, "bob": 84, } js, err := json.Marshal(users) if err != nil { log.Fatal(err) } fmt.Printf("%s", js) } Will result in the following JSON being printed: {"alice":"21 years","bob":"84 years"} If, in the code above, you didn't quote the return value from MarshalJSON() you will get the error: 2009/11/10 23:00:00 json: error calling MarshalJSON for type main.Age: invalid character 'y' after top-level value
Alex Edwards Sep 24, 2020 -
One of the great features of Go's database/sql package is that it's possible to cancel database queries while they are still running via a context.Context instance. On the face of it, usage of this functionality is quite straightforward (here's a basic example). But once you start digging into the details there's a lot a nuance and quite a few gotchas... especially if you are using this functionality in the context of a web application or API. So in this post I want to explain how to cancel database queries in a web application, what behavioral quirks and edge cases it is important to be aware of, and try to provide answers to the questions that you might have when working through all this. But first off, why would you want to cancel a database query? Two scenarios spring to mind: When a query is taking a lot longer to complete than expected. If this happens, it suggests a problem — either with that particular query or your database or application more generally. In this scenario, you would probably want to cancel the query after a set period of time (so that resources are freed-up and the database connection is returned to the sql.DB connection pool for reuse), log an error for further investigation, and return a 500 Internal Server Error response to the client. When a client goes away unexpectedly before the query completes. This could happen for a number of reasons, such as a user closing a browser tab or terminating a process. In this scenario, nothing has really gone 'wrong', but there is no client left to return a response to so you may as well cancel the query and free-up the resources. Mimicking a long-running query Let's start with the first scenario. To demonstrate this, I'll make a very basic web application with a handler that executes a SELECT pg_sleep(10) SQL query against a PostgreSQL database using the pq driver. The pg_sleep(10) function will make the query sleep for 10 seconds before returning, essentially mimicking a slow-running query. package main import ( "database/sql" "fmt" "log" "net/http" _ "github.com/lib/pq" ) var db *sql.DB func slowQuery() error { _, err := db.Exec("SELECT pg_sleep(10)") return err } func main() { var err error db, err = sql.Open("postgres", "postgres://user:pa$$word@localhost/example_db") if err != nil { log.Fatal(err) } if err = db.Ping(); err != nil { log.Fatal(err) } mux := http.NewServeMux() mux.HandleFunc("/", exampleHandler) log.Print("Listening...") err = http.ListenAndServe(":5000", mux) if err != nil { log.Fatal(err) } } func exampleHandler(w http.ResponseWriter, r *http.Request) { err := slowQuery() if err != nil { serverError(w, err) return } fmt.Fprintln(w, "OK") } func serverError(w http.ResponseWriter, err error) { log.Printf("ERROR: %s", err.Error()) http.Error(w, "Sorry, something went wrong", http.StatusInternalServerError) } If you were to run this code, then make a GET / request to the application you should find that the request hangs for 10 seconds before you finally get an "OK" response. Like so: $ curl -i localhost:5000/ HTTP/1.1 200 OK Date: Fri, 17 Apr 2020 07:46:40 GMT Content-Length: 3 Content-Type: text/plain; charset=utf-8 OK Note: The structure of the application code above is deliberately over-simplified. In a real project I would recommend using dependency injection to make the sql.DB connection pool and logger available to your handlers, instead of using global variables. Adding a context timeout OK, now that we've got some code that mimics a long-running query, let's enforce a timeout on the query so it is automatically canceled if it doesn't complete within 5 seconds. To do this we need to: Use the context.WithTimeout() function to create a context.Context instance with a 5-second timeout duration. Execute the SQL query using the ExecContext() method, passing the context.Context instance as a parameter. I'll demonstrate: package main import ( "context" // New import "database/sql" "fmt" "log" "net/http" "time" // New import _ "github.com/lib/pq" ) var db *sql.DB func slowQuery(ctx context.Context) error { // Create a new child context with a 5-second timeout, using the // provided ctx parameter as the parent. ctx, cancel := context.WithTimeout(ctx, 5*time.Second) defer cancel() // Pass the child context (the one with the timeout) as the first // parameter to ExecContext(). _, err := db.ExecContext(ctx, "SELECT pg_sleep(10)") return err } ... func exampleHandler(w http.ResponseWriter, r *http.Request) { // Pass the request context to slowQuery(), so it can be used as the // parent context. err := slowQuery(r.Context()) if err != nil { serverError(w, err) return } fmt.Fprintln(w, "OK") } ... There are a few things about this that I'd like to emphasize and explain: Note that we pass r.Context() (the request context) to slowQuery() to use as the parent context. As we'll see in the next section, this is important because it means that any cancellation signal on the request context will be able to 'bubble down' to the context that we use in ExecContext(). The defer cancel() line is important because it ensures that the resources associated with our child context (the one with the timeout) will be released before the slowQuery() function returns. If we don't call cancel() it may cause a memory leak: the resources won't be released until either the parent r.Context() is canceled or the 5-second timeout is hit (whichever happens first). The timeout countdown begins from the moment that the child context is created using context.WithTimeout(). If you want more control over this you could use the alternative context.WithDeadline() function, which allows you to set an explicit time.Time value for when the context should timeout instead. OK, let's try this out. If you run the application again and make a GET / request, after a 5-second delay you should get a response like this: $ curl -i localhost:5000/ HTTP/1.1 500 Internal Server Error Content-Type: text/plain; charset=utf-8 X-Content-Type-Options: nosniff Date: Fri, 17 Apr 2020 08:21:14 GMT Content-Length: 28 Sorry, something went wrong And if you go back to the terminal window running the application you should see a log message similar to this: $ go run . 2020/04/17 10:21:07 Listening... 2020/04/17 10:21:14 ERROR: pq: canceling statement due to user request That log message might seem a bit odd... until you realize that the error message is actually coming from PostgreSQL. In that light it makes sense: our web application is the user and we're canceling the query after 5 seconds. So this is actually really good; things are working as we want. Specifically, after 5 seconds the context timeout is reached and the pq driver sends a cancellation signal to PostgreSQL†. PostgreSQL then terminates the running query (thereby freeing-up resources). The client is sent a 500 Internal Server Error response, and the error message is logged so we know that something has gone wrong. † More precisely, our child context (the one with the 5-second timeout) has a Done channel, and when the timeout is reached it will close the Done channel. While the SQL query is running, our database driver pq is also running a background goroutine which listens on this Done channel. If the channel is closed, then it sends a cancellation signal to PostgreSQL. PostgreSQL terminates the query, and then sends the error message that we see above as a response to the original pq goroutine. That error message is then returned to our slowQuery() function. Dealing with closed connections OK, let's try one more thing. Let's use curl to make a GET / request and then very quickly (within 5 seconds) press Ctrl+C to cancel the request. If you look at the logs for the application again, you should see another log line with exactly the same error message that we saw before. $ go run . 2020/04/17 10:21:07 Listening... 2020/04/17 10:21:14 ERROR: pq: canceling statement due to user request 2020/04/17 10:41:18 ERROR: pq: canceling statement due to user request So what's happening here? In this case, the request context (which we use as the parent in our code above) is canceled because the client closed the connection. From the net/http docs: For incoming server requests, the [request] context is canceled when the client's connection closes, the request is canceled (with HTTP/2), or when the ServeHTTP method returns. This cancellation signal bubbles down to our child context, it's Done channel is closed, and the pq driver terminates the running query in exactly the same way as before. With that in mind, it's not surprising that we see the same error message... From a PostgreSQL point of view exactly the same thing is happening as when the timeout was reached. But from the perspective of our web application the scenario is very different. A client connection being closed can happen for many different, innocuous, reasons. It's not really an error from our application's point of view, although it is probably sensible to log it as a warning (if we start to see elevated rates, it could be a sign that something is wrong). Fortunately, it's possible to tell these two scenarios apart by calling the ctx.Err() method on our child context. If the context was canceled (due to a client closing the connection), then ctx.Err() will return context.Canceled. If the timeout was reached, then it will return context.DeadlineExceeded. If both the deadline is reached and the context is canceled, then ctx.Err() will surface whichever happened first. There's another important thing to point out here: it's possible that a timeout/cancellation will happen before the PostgreSQL query even starts. For example you might have set MaxOpenConns() on your sql.DB connection pool, and if that open connection limit is reached and all connections are in-use, then the query will be 'queued' by sql.DB until a connection becomes available. In this scenario — or any other which causes a delay — it's quite possible that the timeout/cancellation will occur before a free database connection even becomes available. In this case ExecContext() will directly return the ctx.Err() value as the error response (instead of the "pq: canceling statement due to user request" error that we see above). If you're using the QueryContext() method then it's also possible that the timeout/cancellation will occur when processing the data with Scan(). If this happens, then Scan() will directly return the ctx.Err() value as an error. As far as I can see this behavior isn't mentioned in the database/sql docs, but I can confirm that this is the case with Go 1.14 and the comments on issue #28842 suggest that it is intentional. Putting all that together, a sensible approach is to check for the error "pq: canceling statement due to user request" and then wrap this with the error from ctx.Err() before returning from our slowQuery() function. Then in our handler, we can use the errors.Is() function to check if the error from slowQuery() is equal to (or wraps) context.Canceled and manage it accordingly. Like so: package main import ( "context" "database/sql" "errors" // New import "fmt" "log" "net/http" "time" _ "github.com/lib/pq" ) var db *sql.DB func slowQuery(ctx context.Context) error { ctx, cancel := context.WithTimeout(ctx, 5*time.Second) defer cancel() _, err := db.ExecContext(ctx, "SELECT pg_sleep(10)") // If we get a "pq: canceling statement..." error wrap it with the // context error before returning. if err != nil && err.Error() == "pq: canceling statement due to user request" { return fmt.Errorf("%w: %v", ctx.Err(), err) } return err } ... func exampleHandler(w http.ResponseWriter, r *http.Request) { err := slowQuery(r.Context()) if err != nil { // Check if the returned error equals or wraps context.Canceled and // record a warning if it does. switch { case errors.Is(err, context.Canceled): serverWarning(err) default: serverError(w, err) } return } fmt.Fprintln(w, "OK") } func serverWarning(err error) { log.Printf("WARNING: %s", err.Error()) } ... If you were to run this application again now and make two different GET / requests — one that times out, and the other that you cancel — you should see clearly different messages in the application log, like so: $ go run . 2020/04/17 13:09:25 Listening... 2020/04/17 13:09:45 ERROR: context deadline exceeded: pq: canceling statement due to user request 2020/04/17 13:09:47 WARNING: context canceled: pq: canceling statement due to user request Other context-aware methods The database/sql package provides context-aware variants for most actions on sql.DB, including PingContext(), QueryContext(), and QueryRowContext(). We can (and should!) update the main() function in the code above to use PingContext() instead of Ping(). In this case there is no request context to use as the parent, so we need to create an empty parent context with context.Background() instead. Like so: ... func main() { var err error db, err = sql.Open("postgres", "postgres://user:pa$$word@localhost/example_db") if err != nil { log.Fatal(err) } // Create a context with a 10-second timeout, using the empty // context.Background() as the parent. ctx, cancel := context.WithTimeout(context.Background(), 10*time.Second) defer cancel() // Use this when testing the connection pool. if err = db.PingContext(ctx); err != nil { log.Fatal(err) } mux := http.NewServeMux() mux.HandleFunc("/", exampleHandler) log.Print("Listening...") err = http.ListenAndServe(":5000", mux) if err != nil { log.Fatal(err) } } ... Can I set a global timeout for all requests? Sure, you could create and use some middleware on your routes which adds a timeout to the current request context, similar to this: func setTimeout(next http.Handler) http.Handler { return http.HandlerFunc(func(w http.ResponseWriter, r *http.Request) { ctx, cancel := context.WithTimeout(r.Context(), 5*time.Second) defer cancel() // This gives you a copy of the request with a the request context // changed to the new context with the 5-second timeout created // above. r = r.WithContext(ctx) next.ServeHTTP(w, r) }) } If you take this approach there are a few of things to be aware of: The timeout starts from the moment the context is created, so any code running in your handlers before the database query counts towards the timeout. If you have multiple queries being executed in a handler, then they all have to complete within that one time. The timeout will continue to apply even if you derive a child context with a different timeout duration. So while you can enforce an earlier timeout in a child context, you can't make it longer. What about http.TimeoutHandler? Go provides a http.TimeoutHandler() middleware function which you can use to wrap your handlers or router/servemux. This works similar to the middleware above in the sense that it sets a timeout on the request context... so the warnings above also apply when using this. However, http.TimeoutHandler() also sends the client a 503 Service Unavailable response and a HTML error message. So, if you're using this in your application, you shouldn't (or at least, you don't need to) send the client an error response yourself when encountering a context.DeadlineExceeded error. How about transactions? How does context work in those? The database/sql package provides a BeginTx() method which you can use to initiate a context-aware transaction. A code example can be seen here. It's important to understand that the context you provide to BeginTx() applies to the whole transaction. In the event of a timeout/cancellation on the context, then the queries in the transaction will automatically be rolled-back. It's perfectly fine to pass the same context as a parameter for all the queries in the transaction, in which case it ensures that they all (as a whole) complete before any timeout/cancellation . Alternatively, if you want per-query timeouts you can create different child contexts with different timeouts for each in the queries in the transaction. But you must derive these child contexts from the context you passed to BeginTX(). Otherwise there is a risk that the BeginTX() context timeout/cancellation occurs and the automatic rollback happens, but your code still may try to execute the query with a still-live context. If that happened you would receive the error "sql: transaction has already been committed or rolled back". What about background processing? When doing background-processing in a different goroutine, bear in mind that if a parent context is canceled, the cancellation signal 'bubbles down' to its children. And also bear in mind what I quoted earlier about request context cancellation: For incoming server requests, the [request] context is canceled ... when the ServeHTTP method returns. Combine those two things, and it means that if you use a context which is a child of the request context in the background-process, the background-process will get a cancellation signal when the HTTP response is sent for the initial request. If you don't want that to be the case (and you probably don't), then you should create a brand-new context for the background-process using context.Background() and copy over any values that you need... or just pass them as regular parameters instead. If a context is canceled, can I be confident that it's due to a closed connection? Yes — so long as it's within the main goroutine for the request, it's a child of the request context, and you haven't manually canceled it yourself yet using defer cancel(). Otherwise, no. Is the behavior the same with other databases and drivers? I'm not sure. I've only used these features extensively with PostgreSQL and the pq driver. I imagine that things will be roughly the same with other databases and drivers, but you'll need to check. Anything else I should know? Yep. This is a strange one and it's not officially documented yet, but if a client makes a request with a non-empty request body then closes the connection, the context won't be canceled until after you have read the request body. This doesn’t apply to requests without a request body, where the cancellation signal will be received immediately. You should also be aware of the WriteTimeout setting on your http.Server (if you have set one). Your context timeouts should always be shorter than your WriteTimeout value, otherwise the WriteTimeout will be hit first, the connection will be closed, and the client won’t get any response.
Alex Edwards Apr 20, 2020 -
Let's say that you're building a JSON API with Go. And in some of the handlers — probably as part of a POST or PUT request — you want to read a JSON object from the request body and assign it to a struct in your code. After a bit of research, there's a good chance that you'll end up with some code that looks similar to the personCreate handler here: // File: main.go package main import ( "encoding/json" "fmt" "log" "net/http" ) type Person struct { Name string Age int } func personCreate(w http.ResponseWriter, r *http.Request) { // Declare a new Person struct. var p Person // Try to decode the request body into the struct. If there is an error, // respond to the client with the error message and a 400 status code. err := json.NewDecoder(r.Body).Decode(&p) if err != nil { http.Error(w, err.Error(), http.StatusBadRequest) return } // Do something with the Person struct... fmt.Fprintf(w, "Person: %+v", p) } func main() { mux := http.NewServeMux() mux.HandleFunc("/person/create", personCreate) err := http.ListenAndServe(":4000", mux) log.Fatal(err) } If you're putting together a quick prototype, or building an API for personal/internal use only, then the code in the personCreate handler is probably OK. But if you're building an API for public use in production then there are a few issues with this to be aware of, and things that can be improved. Not all errors returned by Decode() are caused by a bad request from the client. Specifically, Decode() can return a json.InvalidUnmarshalError error — which is caused by an unmarshalable target destination being passed to Decode(). If that happens, then it indicates a problem with our application — not the client request — so really the error should be logged and a 500 Internal Server Error response sent to the client instead. The error messages returned by Decode() aren't ideal for sending to a client. Some are arguably too detailed and expose information about the underlying program (like "json: cannot unmarshal number into Go struct field Person.Name of type string"). Others aren't descriptive enough (like "unexpected EOF") and some are just plain confusing (like "invalid character 'A' looking for beginning of object key string"). There also isn't consistency in the formatting or language used. A client can include extra unexpected fields in their JSON, and these fields will be silently ignored without the client receiving any error. We can fix this by using the decoder's DisallowUnknownFields() method. There's no upper limit on the size of the request body that will be read by the Decode() method. Limiting this would help prevent our server resources being wasted if a malcious client sends a very large request body, and it's something we can easily do by using the http.MaxBytesReader() function. There's no check for a Content-Type: application/json header in the request. Of course, this header may not always be present, and mistakes and malicious clients mean that it isn't a guarantee of the actual content type. But checking for an incorrect Content-Type header would allow us to 'fail fast' and send a helpful error message without spending unnecessary resources on parsing the body. The Decode() method is designed to decode streams of JSON objects. This means a request body like '{"Name": "Bob"}{"Name": "Carol": "Age": 54}' or '{"Name": "Dave"}{}' is considered valid and won't result in the client receiving an error message. But in each case, only the first JSON object in the request body will actually be parsed. There are two solutions here. We can either check the decoder's More() method after decoding to see if there any any other JSON objects in the request body. Or we could avoid using Decode() altogether and read the body into a byte slice and pass it to json.Unmarshal(), which would return an error if the body contains multiple JSON objects. The downside of using json.Unmarshal() is that there is no way to disallow extra unexpected fields in the JSON, so we can't address point 3 above. An Improved Handler Let's implement an alternative version of the personCreate handler which addresses all of these issues. You'll notice here that we're using the new errors.Is() and errors.As() functions, which have been introduced in Go 1.13, to help intercept the errors from Decode(). // File: main.go package main import ( "encoding/json" "errors" "fmt" "io" "log" "net/http" "strings" "github.com/golang/gddo/httputil/header" ) type Person struct { Name string Age int } func personCreate(w http.ResponseWriter, r *http.Request) { // If the Content-Type header is present, check that it has the value // application/json. Note that we are using the gddo/httputil/header // package to parse and extract the value here, so the check works // even if the client includes additional charset or boundary // information in the header. if r.Header.Get("Content-Type") != "" { value, _ := header.ParseValueAndParams(r.Header, "Content-Type") if value != "application/json" { msg := "Content-Type header is not application/json" http.Error(w, msg, http.StatusUnsupportedMediaType) return } } // Use http.MaxBytesReader to enforce a maximum read of 1MB from the // response body. A request body larger than that will now result in // Decode() returning a "http: request body too large" error. r.Body = http.MaxBytesReader(w, r.Body, 1048576) // Setup the decoder and call the DisallowUnknownFields() method on it. // This will cause Decode() to return a "json: unknown field ..." error // if it encounters any extra unexpected fields in the JSON. Strictly // speaking, it returns an error for "keys which do not match any // non-ignored, exported fields in the destination". dec := json.NewDecoder(r.Body) dec.DisallowUnknownFields() var p Person err := dec.Decode(&p) if err != nil { var syntaxError *json.SyntaxError var unmarshalTypeError *json.UnmarshalTypeError switch { // Catch any syntax errors in the JSON and send an error message // which interpolates the location of the problem to make it // easier for the client to fix. case errors.As(err, &syntaxError): msg := fmt.Sprintf("Request body contains badly-formed JSON (at position %d)", syntaxError.Offset) http.Error(w, msg, http.StatusBadRequest) // In some circumstances Decode() may also return an // io.ErrUnexpectedEOF error for syntax errors in the JSON. There // is an open issue regarding this at // https://github.com/golang/go/issues/25956. case errors.Is(err, io.ErrUnexpectedEOF): msg := fmt.Sprintf("Request body contains badly-formed JSON") http.Error(w, msg, http.StatusBadRequest) // Catch any type errors, like trying to assign a string in the // JSON request body to a int field in our Person struct. We can // interpolate the relevant field name and position into the error // message to make it easier for the client to fix. case errors.As(err, &unmarshalTypeError): msg := fmt.Sprintf("Request body contains an invalid value for the %q field (at position %d)", unmarshalTypeError.Field, unmarshalTypeError.Offset) http.Error(w, msg, http.StatusBadRequest) // Catch the error caused by extra unexpected fields in the request // body. We extract the field name from the error message and // interpolate it in our custom error message. There is an open // issue at https://github.com/golang/go/issues/29035 regarding // turning this into a sentinel error. case strings.HasPrefix(err.Error(), "json: unknown field "): fieldName := strings.TrimPrefix(err.Error(), "json: unknown field ") msg := fmt.Sprintf("Request body contains unknown field %s", fieldName) http.Error(w, msg, http.StatusBadRequest) // An io.EOF error is returned by Decode() if the request body is // empty. case errors.Is(err, io.EOF): msg := "Request body must not be empty" http.Error(w, msg, http.StatusBadRequest) // Catch the error caused by the request body being too large. Again // there is an open issue regarding turning this into a sentinel // error at https://github.com/golang/go/issues/30715. case err.Error() == "http: request body too large": msg := "Request body must not be larger than 1MB" http.Error(w, msg, http.StatusRequestEntityTooLarge) // Otherwise default to logging the error and sending a 500 Internal // Server Error response. default: log.Print(err.Error()) http.Error(w, http.StatusText(http.StatusInternalServerError), http.StatusInternalServerError) } return } // Check that the request body only contained a single JSON object. if dec.More() { msg := "Request body must only contain a single JSON object" http.Error(w, msg, http.StatusBadRequest) return } fmt.Fprintf(w, "Person: %+v", p) } func main() { mux := http.NewServeMux() mux.HandleFunc("/person/create", personCreate) err := http.ListenAndServe(":4000", mux) log.Fatal(err) } The clear downside here is that this code is a lot more verbose, and IMO, a little bit ugly. Things aren't helped by the fact that there are quite a few open issues with json/encoding which are on hold pending a wider review of the package. But from a security and client perspective it's a lot better : ) The handler is now stricter about the content it will accept; we're reducing the amount of server resources used unnecessarily; and the client gets clear and consistent error messages that provide a decent amount of information without over-sharing. As a side note, you might have noticed that the json/encoding package contains some other error types (like json.UnmarshalFieldError) which aren't checked in the code above — but these have been deprecated and not used by Go 1.13. Making a Helper Function If you've got a few handlers that need to to process JSON request bodies, you probably don't want to repeat this code in all of them. A solution which I've found works well is to create a decodeJSONBody helper function, and have this return a custom malformedRequest error type which wraps the errors and relevant status codes. For example: // File: helpers.go package main import ( "encoding/json" "errors" "fmt" "io" "net/http" "strings" "github.com/golang/gddo/httputil/header" ) type malformedRequest struct { status int msg string } func (mr *malformedRequest) Error() string { return mr.msg } func decodeJSONBody(w http.ResponseWriter, r *http.Request, dst interface{}) error { if r.Header.Get("Content-Type") != "" { value, _ := header.ParseValueAndParams(r.Header, "Content-Type") if value != "application/json" { msg := "Content-Type header is not application/json" return &malformedRequest{status: http.StatusUnsupportedMediaType, msg: msg} } } r.Body = http.MaxBytesReader(w, r.Body, 1048576) dec := json.NewDecoder(r.Body) dec.DisallowUnknownFields() err := dec.Decode(&dst) if err != nil { var syntaxError *json.SyntaxError var unmarshalTypeError *json.UnmarshalTypeError switch { case errors.As(err, &syntaxError): msg := fmt.Sprintf("Request body contains badly-formed JSON (at position %d)", syntaxError.Offset) return &malformedRequest{status: http.StatusBadRequest, msg: msg} case errors.Is(err, io.ErrUnexpectedEOF): msg := fmt.Sprintf("Request body contains badly-formed JSON") return &malformedRequest{status: http.StatusBadRequest, msg: msg} case errors.As(err, &unmarshalTypeError): msg := fmt.Sprintf("Request body contains an invalid value for the %q field (at position %d)", unmarshalTypeError.Field, unmarshalTypeError.Offset) return &malformedRequest{status: http.StatusBadRequest, msg: msg} case strings.HasPrefix(err.Error(), "json: unknown field "): fieldName := strings.TrimPrefix(err.Error(), "json: unknown field ") msg := fmt.Sprintf("Request body contains unknown field %s", fieldName) return &malformedRequest{status: http.StatusBadRequest, msg: msg} case errors.Is(err, io.EOF): msg := "Request body must not be empty" return &malformedRequest{status: http.StatusBadRequest, msg: msg} case err.Error() == "http: request body too large": msg := "Request body must not be larger than 1MB" return &malformedRequest{status: http.StatusRequestEntityTooLarge, msg: msg} default: return err } } if dec.More() { msg := "Request body must only contain a single JSON object" return &malformedRequest{status: http.StatusBadRequest, msg: msg} } return nil } Once that's written, the code in your handlers can be kept really nice and compact: // File: main.go package main import ( "errors" "fmt" "log" "net/http" ) type Person struct { Name string Age int } func personCreate(w http.ResponseWriter, r *http.Request) { var p Person err := decodeJSONBody(w, r, &p) if err != nil { var mr *malformedRequest if errors.As(err, &mr) { http.Error(w, mr.msg, mr.status) } else { log.Print(err.Error()) http.Error(w, http.StatusText(http.StatusInternalServerError), http.StatusInternalServerError) } return } fmt.Fprintf(w, "Person: %+v", p) } func main() { mux := http.NewServeMux() mux.HandleFunc("/person/create", personCreate) log.Print("Starting server on :4000...") err := http.ListenAndServe(":4000", mux) log.Fatal(err) }
Alex Edwards Oct 21, 2019 -
For the past few months I've been running a survey which asks people what they're finding difficult about learning Go. And something that keeps coming up in the responses is the concept of interfaces. I get that. Go was the first language I ever used that had interfaces, and I remember at the time that the whole concept felt pretty confusing. So in this tutorial I want to do a few things: Provide a plain-English explanation of what interfaces are; Explain why they are useful and how you might want to use them in your code; Talk about what interface{} (the empty interface) is; And run through some of the helpful interface types that you'll find in the standard library. So what is an interface? An interface type in Go is kind of like a definition. It defines and describes the exact methods that some other type must have. One example of an interface type from the standard library is the fmt.Stringer interface, which looks like this: type Stringer interface { String() string } We say that something satisfies this interface (or implements this interface) if it has a method with the exact signature String() string. For example, the following Book type satisfies the interface because it has a String() string method: type Book struct { Title string Author string } func (b Book) String() string { return fmt.Sprintf("Book: %s - %s", b.Title, b.Author) } It's not really important what this Book type is or does. The only thing that matters is that is has a method called String() which returns a string value. Or, as another example, the following Count type also satisfies the fmt.Stringer interface — again because it has a method with the exact signature String() string. type Count int func (c Count) String() string { return strconv.Itoa(int(c)) } The important thing to grasp is that we have two different types, Book and Count, which do different things. But the thing they have in common is that they both satisfy the fmt.Stringer interface. You can think of this the other way around too. If you know that an object satisfies the fmt.Stringer interface, you can rely on it having a method with the exact signature String() string that you can call. Now for the important part. Wherever you see declaration in Go (such as a variable, function parameter or struct field) which has an interface type, you can use an object of any type so long as it satisfies the interface. For example, let's say that you have the following function: func WriteLog(s fmt.Stringer) { log.Print(s.String()) } Because this WriteLog() function uses the fmt.Stringer interface type in its parameter declaration, we can pass in any object that satisfies the fmt.Stringer interface. For example, we could pass either of the Book and Count types that we made earlier to the WriteLog() method, and the code would work OK. Additionally, because the object being passed in satisfies the fmt.Stringer interface, we know that it has a String() string method that the WriteLog() function can safely call. Let's put this together in an example, which gives us a peek into the power of interfaces. package main import ( "fmt" "strconv" "log" ) // Declare a Book type which satisfies the fmt.Stringer interface. type Book struct { Title string Author string } func (b Book) String() string { return fmt.Sprintf("Book: %s - %s", b.Title, b.Author) } // Declare a Count type which satisfies the fmt.Stringer interface. type Count int func (c Count) String() string { return strconv.Itoa(int(c)) } // Declare a WriteLog() function which takes any object that satisfies // the fmt.Stringer interface as a parameter. func WriteLog(s fmt.Stringer) { log.Print(s.String()) } func main() { // Initialize a Count object and pass it to WriteLog(). book := Book{"Alice in Wonderland", "Lewis Carrol"} WriteLog(book) // Initialize a Count object and pass it to WriteLog(). count := Count(3) WriteLog(count) } This is pretty cool. In the main function we've created different Book and Count types, but passed both of them to the same WriteLog() function. In turn, that calls their relevant String() functions and logs the result. If you run the code, you should get some output which looks like this: 2009/11/10 23:00:00 Book: Alice in Wonderland - Lewis Carrol 2009/11/10 23:00:00 3 I don't want to labor the point here too much. But the key thing to take away is that by using a interface type in our WriteLog() function declaration, we have made the function agnostic (or flexible) about the exact type of object it receives. All that matters is what methods it has. Why are they useful? There are all sorts of reasons that you might end up using a interface in Go, but in my experience the three most common are: To help reduce duplication or boilerplate code. To make it easier to use mocks instead of real objects in unit tests. As an architectural tool, to help enforce decoupling between parts of your codebase. Let's step through these three use-cases and explore them in a bit more detail. Reducing boilerplate code OK, imagine that we have a Customer struct containing some data about a customer. In one part of our codebase we want to write the customer information to a bytes.Buffer, and in another part of our codebase we want to write the customer information to an os.File on disk. But in both cases, we want to serialize the customer struct to JSON first. This is a scenario where we can use Go's interfaces to help reduce boilerplate code. The first thing you need to know is that Go has an io.Writer interface type which looks like this: type Writer interface { Write(p []byte) (n int, err error) } And we can leverage the fact that both bytes.Buffer and the os.File type satisfy this interface, due to them having the bytes.Buffer.Write() and os.File.Write() methods respectively. Let's take a look at a simple implementation: package main import ( "bytes" "encoding/json" "io" "log" "os" ) // Create a Customer type type Customer struct { Name string Age int } // Implement a WriteJSON method that takes an io.Writer as the parameter. // It marshals the customer struct to JSON, and if the marshal worked // successfully, then calls the relevant io.Writer's Write() method. func (c *Customer) WriteJSON(w io.Writer) error { js, err := json.Marshal(c) if err != nil { return err } _, err = w.Write(js) return err } func main() { // Initialize a customer struct. c := &Customer{Name: "Alice", Age: 21} // We can then call the WriteJSON method using a buffer... var buf bytes.Buffer err := c.WriteJSON(&buf) if err != nil { log.Fatal(err) } // Or using a file. f, err := os.Create("/tmp/customer") if err != nil { log.Fatal(err) } defer f.Close() err = c.WriteJSON(f) if err != nil { log.Fatal(err) } } Of course, this is just a toy example (and there are other ways we could structure the code to achieve the same end result). But it nicely illustrates the benefit of using an interface — we can create the Customer.WriteJSON() method once, and we can call that method any time that we want to write to something that satisfies the io.Writer interface. But if you're new to Go, this still begs a couple of questions: How do you know that the io.Writer interface even exists? And how do you know in advance that bytes.Buffer and os.File both satisfy it? There's no easy shortcut here I'm afraid — you simply need to build up experience and familiarity with the interfaces and different types in the standard library. Spending time thoroughly reading the standard library documentation, and looking at other people's code will help here. But as a quick-start I've included a list of some of the most useful interface types at the end of this post. But even if you don't use the interfaces from the standard library, there's nothing to stop you from creating and using your own interface types. We'll cover how to do that next. Unit testing and mocking To help illustrate how interfaces can be used to assist in unit testing, let's take a look at a slightly more complex example. Let's say you run a shop, and you store information about the number of customers and sales in a PostgreSQL database. You want to write some code that calculates the sales rate (i.e. sales per customer) for the past 24 hours, rounded to 2 decimal places. A minimal implementation of the code for that could look something like this: // File: main.go package main import ( "fmt" "log" "time" "database/sql" _ "github.com/lib/pq" ) type ShopDB struct { *sql.DB } func (sdb *ShopDB) CountCustomers(since time.Time) (int, error) { var count int err := sdb.QueryRow("SELECT count(*) FROM customers WHERE timestamp > $1", since).Scan(&count) return count, err } func (sdb *ShopDB) CountSales(since time.Time) (int, error) { var count int err := sdb.QueryRow("SELECT count(*) FROM sales WHERE timestamp > $1", since).Scan(&count) return count, err } func main() { db, err := sql.Open("postgres", "postgres://user:pass@localhost/db") if err != nil { log.Fatal(err) } defer db.Close() shopDB := &ShopDB{db} sr, err := calculateSalesRate(shopDB) if err != nil { log.Fatal(err) } fmt.Printf(sr) } func calculateSalesRate(sdb *ShopDB) (string, error) { since := time.Now().Add(-24 * time.Hour) sales, err := sdb.CountSales(since) if err != nil { return "", err } customers, err := sdb.CountCustomers(since) if err != nil { return "", err } rate := float64(sales) / float64(customers) return fmt.Sprintf("%.2f", rate), nil } Now, what if we want to create a unit test for the calculateSalesRate() function to make sure that the math logic in it is working correctly? Currently this is a bit of a pain. We would need to set up a test instance of our PostgreSQL database, along with setup and teardown scripts to scaffold the database with dummy data. That's quite lot of work when all we really want to do is test our math logic. So what can we do? You guessed it — interfaces to the rescue! A solution here is to create our own interface type which describes the CountSales() and CountCustomers() methods that the calculateSalesRate() function relies on. Then we can update the signature of calculateSalesRate() to use this custom interface type as a parameter, instead of the concrete *ShopDB type. Like so: // File: main.go package main import ( "database/sql" "fmt" "log" "time" _ "github.com/lib/pq" ) // Create our own custom ShopModel interface. Notice that it is perfectly // fine for an interface to describe multiple methods, and that it should // describe input parameter types as well as return value types. type ShopModel interface { CountCustomers(time.Time) (int, error) CountSales(time.Time) (int, error) } // The ShopDB type satisfies our new custom ShopModel interface, because it // has the two necessary methods -- CountCustomers() and CountSales(). type ShopDB struct { *sql.DB } func (sdb *ShopDB) CountCustomers(since time.Time) (int, error) { var count int err := sdb.QueryRow("SELECT count(*) FROM customers WHERE timestamp > $1", since).Scan(&count) return count, err } func (sdb *ShopDB) CountSales(since time.Time) (int, error) { var count int err := sdb.QueryRow("SELECT count(*) FROM sales WHERE timestamp > $1", since).Scan(&count) return count, err } func main() { db, err := sql.Open("postgres", "postgres://user:pass@localhost/db") if err != nil { log.Fatal(err) } defer db.Close() shopDB := &ShopDB{db} sr, err := calculateSalesRate(shopDB) if err != nil { log.Fatal(err) } fmt.Printf(sr) } // Swap this to use the ShopModel interface type as the parameter, instead of the // concrete *ShopDB type. func calculateSalesRate(sm ShopModel) (string, error) { since := time.Now().Add(-24 * time.Hour) sales, err := sm.CountSales(since) if err != nil { return "", err } customers, err := sm.CountCustomers(since) if err != nil { return "", err } rate := float64(sales) / float64(customers) return fmt.Sprintf("%.2f", rate), nil } With that done, it's straightforward for us to create a mock which satisfies our ShopModel interface. We can then use that mock during unit tests to test that the math logic in our calculateSalesRate() function works correctly. Like so: // File: main_test.go package main import ( "testing" "time" ) type MockShopDB struct{} func (m *MockShopDB) CountCustomers(_ time.Time) (int, error) { return 1000, nil } func (m *MockShopDB) CountSales(_ time.Time) (int, error) { return 333, nil } func TestCalculateSalesRate(t *testing.T) { // Initialize the mock. m := &MockShopDB{} // Pass the mock to the calculateSalesRate() function. sr, err := calculateSalesRate(m) if err != nil { t.Fatal(err) } // Check that the return value is as expected, based on the mocked // inputs. exp := "0.33" if sr != exp { t.Fatalf("got %v; expected %v", sr, exp) } } You could run that test now, everything should work fine. Application architecture In the previous examples, we've seen how interfaces can be used to decouple certain parts of your code from relying on concrete types. For instance, the calculateSalesRate() function is totally flexible about what you pass to it — the only thing that matters is that it satisfies the ShopModel interface. You can extend this idea to create decoupled 'layers' in larger projects. Let's say that you are building a web application which interacts with a database. If you create an interface that describes the exact methods for interacting with the database, you can refer to the interface throughout your HTTP handlers instead of a concrete type. Because the HTTP handlers only refer to an interface, this helps to decouple the HTTP layer and database-interaction layer. It makes it easier to work on the layers independently, and to swap out one layer in the future without affecting the other. I've written about this pattern in this previous blog post, which goes into more detail and provides some practical example code. What is the empty interface? If you've been programming with Go for a while, you've probably come across the empty interface type: interface{}. This can be a bit confusing, but I'll try to explain it here. At the start of this blog post I said: An interface type in Go is kind of like a definition. It defines and describes the exact methods that some other type must have. The empty interface type essentially describes no methods. It has no rules. And because of that, it follows that any and every object satisfies the empty interface. Or to put it in a more plain-English way, the empty interface type interface{} is kind of like a wildcard. Wherever you see it in a declaration (such as a variable, function parameter or struct field) you can use an object of any type. Take a look at the following code: package main import "fmt" func main() { person := make(map[string]interface{}, 0) person["name"] = "Alice" person["age"] = 21 person["height"] = 167.64 fmt.Printf("%+v", person) } In this code snippet we initialize a person map, which uses the string type for keys and the empty interface type interface{} for values. We've assigned three different types as the map values (a string, int and float32) — and that's OK. Because objects of any and every type satisfy the empty interface, the code will work just fine. You can give it a try here, and when you run it you should see some output which looks like this: map[age:21 height:167.64 name:Alice] But there's an important thing to point out when it comes to retrieving and using a value from this map. For example, let's say that we want to get the "age" value and increment it by 1. If you write something like the following code, it will fail to compile: package main import "log" func main() { person := make(map[string]interface{}, 0) person["name"] = "Alice" person["age"] = 21 person["height"] = 167.64 person["age"] = person["age"] + 1 fmt.Printf("%+v", person) } And you'll get the following error message: invalid operation: person["age"] + 1 (mismatched types interface {} and int) This happens because the value stored in the map takes on the type interface{}, and ceases to have it's original, underlying, type of int. Because it's no longer an int type we cannot add 1 to it. To get around this this, you need to type assert the value back to an int before using it. Like so: package main import "log" func main() { person := make(map[string]interface{}, 0) person["name"] = "Alice" person["age"] = 21 person["height"] = 167.64 age, ok := person["age"].(int) if !ok { log.Fatal("could not assert value to int") return } person["age"] = age + 1 log.Printf("%+v", person) } If you run this now, everything should work as expected: 2009/11/10 23:00:00 map[age:22 height:167.64 name:Alice] So when should you use the empty interface type in your own code? The answer is probably not that often. If you find yourself reaching for it, pause and consider whether using interface{} is really the right option. As a general rule it's clearer, safer and more performant to use concrete types — or non-empty interface types — instead. In the code snippet above, it would have been more appropriate to define a Person struct with relevant typed fields similar to this: type Person struct { Name string Age int Height float32 } But that said, the empty interface is useful in situations where you need to accept and work with unpredictable or user-defined types. You'll see it used in a a number of places throughout the standard library for that exact reason, such as in the gob.Encode, fmt.Print and template.Execute functions. Comman and useful types Lastly, here's a short list of some of the most common and useful interfaces in the standard library. If you're not familiar with them already, then I recommend taking out a bit of time to look at the relevant documentation for them. builtin.Error fmt.Stringer io.Reader io.Writer io.ReadWriteCloser http.ResponseWriter http.Handler There is also a longer and more comprehensive listing of standard libraries available in this gist.
Alex Edwards Aug 7, 2019 -
PostgreSQL provides two JSON-related data types that you can use — JSON and JSONB. The principal differences are: JSON stores an exact copy of the JSON input. JSONB stores a binary representation of the JSON input. This makes it slower to insert but faster to query. It may change the key order, and will remove whitespace and delete duplicate keys. JSONB also supports the ? (existence) and @> (containment) operators, whereas JSON doesn't. The PostgreSQL documentation recommends that you should generally use JSONB, unless you have a specific reason not too (like needing to preserve key order). Here's a cribsheet for the essential commands: -- Create a table with a JSONB column. CREATE TABLE items ( id SERIAL PRIMARY KEY, attrs JSONB ); -- You can insert any well-formed json input into the column. Note that only -- lowercase `true` and `false` spellings are accepted. INSERT INTO items (attrs) VALUES ('{ "name": "Pasta", "ingredients": ["Flour", "Eggs", "Salt", "Water"], "organic": true, "dimensions": { "weight": 500.00 } }'); -- Create an index on all key/value pairs in the JSONB column. CREATE INDEX idx_items_attrs ON items USING gin (attrs); -- Create an index on a specific key/value pair in the JSONB column. CREATE INDEX idx_items_attrs_organic ON items USING gin ((attrs->'organic')); -- The -> operator is used to get the value for a key. The returned value has -- the type JSONB. SELECT attrs->'dimensions' FROM items; SELECT attrs->'dimensions'->'weight' FROM items; -- Or you can use ->> to do the same thing, but this returns a TEXT value -- instead. SELECT attrs->>'dimensions' FROM items; -- You can use the returned values as normal, although you may need to type -- cast them first. SELECT * FROM items WHERE attrs->>'name' ILIKE 'p%'; SELECT * FROM items WHERE (attrs->'dimensions'->>'weight')::numeric < 100.00; -- Use ? to check for the existence of a specific key. SELECT * FROM items WHERE attrs ? 'ingredients'; -- The ? operator only works at the top level. If you want to check for the -- existence of a nested key you can do this: SELECT * FROM items WHERE attrs->'dimensions' ? 'weight'; -- The ? operator can also be used to check for the existence of a specific -- text value in json arrays. SELECT * FROM items WHERE attrs->'ingredients' ? 'Salt'; -- Use @> to check if the JSONB column contains some specific json. This can -- be useful to filter for a specific key/value pair like so: SELECT * FROM items WHERE attrs @> '{"organic": true}'::jsonb; SELECT * FROM items WHERE attrs @> '{"dimensions": {"weight": 10}}'::jsonb; -- Note that @> looks for *containment*, not for an exact match. The -- followingquery will return records which have both "Flour" and "Water" -- as ingredients, rather than *only* "Flour" and "Water" as the ingredients. SELECT * FROM items WHERE attrs @> '{"ingredients": ["Flour", "Water"]}'::jsonb; For a full description of all available operators please see the official JSON Functions and Operators documentation. Using with Go If you're not familiar with the general patterns for working with SQL databases in Go, you might want to read my introduction to the database/sql package before continuing. Known JSON fields When the fields in a JSON/JSONB column are known in advance, you can map the contents of the JSON/JSONB column to and from a struct. To do this, you'll need make sure the struct implements: The driver.Valuer interface, such that it marshals the object into a JSON byte slice that can be understood by the database. The sql.Scanner interface, such that it unmarshals a JSON byte slice from the database into the struct fields. Here's a demonstration: package main import ( "database/sql" "database/sql/driver" "encoding/json" "errors" "log" _ "github.com/lib/pq" ) type Item struct { ID int Attrs Attrs } // The Attrs struct represents the data in the JSON/JSONB column. We can use // struct tags to control how each field is encoded. type Attrs struct { Name string `json:"name,omitempty"` Ingredients []string `json:"ingredients,omitempty"` Organic bool `json:"organic,omitempty"` Dimensions struct { Weight float64 `json:"weight,omitempty"` } `json:"dimensions,omitempty"` } // Make the Attrs struct implement the driver.Valuer interface. This method // simply returns the JSON-encoded representation of the struct. func (a Attrs) Value() (driver.Value, error) { return json.Marshal(a) } // Make the Attrs struct implement the sql.Scanner interface. This method // simply decodes a JSON-encoded value into the struct fields. func (a *Attrs) Scan(value interface{}) error { b, ok := value.([]byte) if !ok { return errors.New("type assertion to []byte failed") } return json.Unmarshal(b, &a) } func main() { db, err := sql.Open("postgres", "postgres://user:pass@localhost/db") if err != nil { log.Fatal(err) } // Initialize a new Attrs struct and add some values. attrs := new(Attrs) attrs.Name = "Pesto" attrs.Ingredients = []string{"Basil", "Garlic", "Parmesan", "Pine nuts", "Olive oil"} attrs.Organic = false attrs.Dimensions.Weight = 100.00 // The database driver will call the Value() method and and marshall the // attrs struct to JSON before the INSERT. _, err = db.Exec("INSERT INTO items (attrs) VALUES($1)", attrs) if err != nil { log.Fatal(err) } // Similarly, we can also fetch data from the database, and the driver // will call the Scan() method to unmarshal the data to an Attr struct. item := new(Item) err = db.QueryRow("SELECT id, attrs FROM items ORDER BY id DESC LIMIT 1").Scan(&item.ID, &item.Attrs) if err != nil { log.Fatal(err) } // You can then use the struct fields as normal... weightKg := item.Attrs.Dimensions.Weight / 1000 log.Printf("Item: %d, Name: %s, Weight: %.2fkg", item.ID, item.Attrs.Name, weightKg) } Unknown JSON fields The above pattern works great if you know in advance what keys and values your JSON/JSONB data will contain. And it has the major advantage of being type safe. For the times that you don't know this in advance (for example, the data contains user-generated keys and values) you can map the contents of the JSON/JSONB column to and from a map[string]interface{} instead. The big downside of this is that you will need to type assert any values that you retrieve from the database in order to use them. Here's the same example, but re-written to use a map[string]interface{}: package main import ( "database/sql" "database/sql/driver" "encoding/json" "errors" "log" _ "github.com/lib/pq" ) type Item struct { ID int Attrs Attrs } type Attrs map[string]interface{} func (a Attrs) Value() (driver.Value, error) { return json.Marshal(a) } func (a *Attrs) Scan(value interface{}) error { b, ok := value.([]byte) if !ok { return errors.New("type assertion to []byte failed") } return json.Unmarshal(b, &a) } func main() { db, err := sql.Open("postgres", "postgres://user:pass@localhost/db") if err != nil { log.Fatal(err) } item := new(Item) item.Attrs = Attrs{ "name": "Passata", "ingredients": []string{"Tomatoes", "Onion", "Olive oil", "Garlic"}, "organic": true, "dimensions": map[string]interface{}{ "weight": 250.00, }, } _, err = db.Exec("INSERT INTO items (attrs) VALUES($1)", item.Attrs) if err != nil { log.Fatal(err) } item = new(Item) err = db.QueryRow("SELECT id, attrs FROM items ORDER BY id DESC LIMIT 1").Scan(&item.ID, &item.Attrs) if err != nil { log.Fatal(err) } name, ok := item.Attrs["name"].(string) if !ok { log.Fatal("unexpected type for name") } dimensions, ok := item.Attrs["dimensions"].(map[string]interface{}) if !ok { log.Fatal("unexpected type for dimensions") } weight, ok := dimensions["weight"].(float64) if !ok { log.Fatal("unexpected type for weight") } weightKg := weight / 1000 log.Printf("%s: %.2fkg", name, weightKg) }
Alex Edwards May 14, 2019 -

Occasionally I get asked “why do you like using Go?” And one of the things I often mention is the thoughtful tooling that exists alongside the language as part of the go command. There are some tools that I use everyday — like go fmt and go build — and others like go tool pprof that I only use to help solve a specific issue. But in all cases I appreciate the fact that they make managing and maintaining my projects easier. In this post I hope to provide a little background and context about the tools I find most useful, and importantly, explain how they can fit into the workflow of a typical project. I hope it'll give you a good start if you're new to Go. Or if you've been working with Go for a while, and that stuff's not applicable to you, hopefully you'll still discover a command or flag that you didn't know existed before : ) The information in this post is written for Go 1.12 and assumes that you're working on a project which has modules enabled. Installing Tooling Viewing Environment Information Development Running Code Fetching Dependencies Refactoring Code Viewing Go Documentation Testing Running Tests Profiling Test Coverage Stress Testing Testing all Dependencies Pre-Commit Checks Formatting Code Performing Static Analysis Linting Code Tidying and Verifying your Dependencies Build and Deployment Building an Executable Cross-Compilation Using Compiler and Linker Flags Diagnosing Problems and Making Optimizations Running and Comparing Benchmarks Profiling and Tracing Checking for Race Conditions Managing Dependencies Upgrading to a New Go Release Reporting Bugs Installing Tooling In this post I'll mainly be focusing on tools that are a part of the go command. But there are a few I'll be mentioning which aren't part of the standard Go 1.12 release. To install these while using Go 1.12 you'll first need to make sure that you're outside of a module-enabled directory (I usually just change into /tmp). Then you can use the GO111MODULE=on go get command to install the tool. For example: $ cd /tmp $ GO111MODULE=on go get golang.org/x/tools/cmd/stress This will download the relevant package and dependencies, build the executable and add it to your GOBIN directory. If you haven't explicitly set a GOBIN directory, then the executable will be added to your GOPATH/bin folder. Either way, you should make sure that the appropriate directory is on your system path. Note: This process is a bit clunky and will hopefully improve in future versions of Go. Issue 30515 is tracking the discussion about this. Viewing Environment Information You can use the go env tool to display information about your current Go operating environment. This can be particularly useful if you're working on an unfamiliar machine. $ go env GOARCH="amd64" GOBIN="" GOCACHE="/home/alex/.cache/go-build" GOEXE="" GOFLAGS="" GOHOSTARCH="amd64" GOHOSTOS="linux" GOOS="linux" GOPATH="/home/alex/go" GOPROXY="" GORACE="" GOROOT="/usr/local/go" GOTMPDIR="" GOTOOLDIR="/usr/local/go/pkg/tool/linux_amd64" GCCGO="gccgo" CC="gcc" CXX="g++" CGO_ENABLED="1" GOMOD="" CGO_CFLAGS="-g -O2" CGO_CPPFLAGS="" CGO_CXXFLAGS="-g -O2" CGO_FFLAGS="-g -O2" CGO_LDFLAGS="-g -O2" PKG_CONFIG="pkg-config" GOGCCFLAGS="-fPIC -m64 -pthread -fmessage-length=0 -fdebug-prefix-map=/tmp/go-build245740092=/tmp/go-build -gno-record-gcc-switches" If there are specific values that you're interested in, you can pass them as arguments to go env. For example: $ go env GOPATH GOOS GOARCH /home/alex/go linux amd64 To show documentation for all go env variables and values you can run: $ go help environment Development Running Code During development the go run tool is a convenient way to try out your code. It's essentially a shortcut that compiles your code, creates an executable binary in your /tmp directory, and then runs this binary in one step. $ go run . # Run the package in the current directory $ go run ./cmd/foo # Run the package in the ./cmd/foo directory Note: As of Go 1.11 you can pass the path of a package to go run, like we have above. This means that you no longer have to use workarounds like go run *.go wildcard expansion to run multiple files. I like this improvement a lot! Fetching Dependencies Assuming that you've got modules enabled, when you use go run (or go test or go build for that matter) any external dependencies will automatically (and recursively) be downloaded to fulfill the import statements in your code. By default the latest tagged release of the dependency will be downloaded, or if no tagged releases are available, then the dependency at the latest commit. If you know in advance that you need a specific version of a dependency (instead of the one that Go would fetch by default) you can use go get with the relevant version number or commit hash. For example: $ go get github.com/foo/bar@v1.2.3 $ go get github.com/foo/bar@8e1b8d3 If the dependency being fetched has a go.mod file, then its dependencies won't be listed in your go.mod file. In contrast, if the dependency you're downloading doesn't have a go.mod file, then it's dependencies will be listed in your go.mod file with an // indirect comment next to them. So that means your go.mod file doesn't necessarily show all the dependencies for your project in one place. Instead, you can view them all using the go list tool like so: $ go list -m all Sometimes you might wonder why is that a dependency? You can answer this with the go mod why command, which will show you the shortest path from a package in your main module to a given dependency. For example: $ go mod why -m golang.org/x/sys # golang.org/x/sys github.com/alexedwards/argon2id golang.org/x/crypto/argon2 golang.org/x/sys/cpu Note: The go mod why command will return an answer for most, but not all, dependencies. Issue 27900 is tracking this. If you're interested in analyzing or visualizing the dependencies for your application, then you might want to also check out the go mod graph tool. There's a great tutorial and example code for generating visualizations here. Lastly, downloaded dependencies are stored in the module cache located at GOPATH/pkg/mod. If you ever need to clear the module cache you can use the go clean tool. But be aware: this will remove the downloaded dependencies for all projects on your machine. $ go clean -modcache Refactoring Code Chances are you're probably familiar with using the gofmt tool to automatically format your code. But it also supports rewrite rules that you can use to help refactor your code. I'll demonstrate. Let's say that you have the following code and you want to change the foo variable to Foo so it is exported. var foo int func bar() { foo = 1 fmt.Println("foo") } To do this you can use gofmt with the -r flag to implement a rewrite rule, the -d flag to display a diff of the changes, and the -w flag to make the changes in place, like so: $ gofmt -d -w -r 'foo -> Foo' . -var foo int +var Foo int func bar() { - foo = 1 + Foo = 1 fmt.Println("foo") } Notice how this is smarter than a find-and-replace? The foo variable has been changed, but the "foo" string in the fmt.Println() statement has been left unchanged. Another thing to note is that the gofmt command works recursively, so the above command will run on all *.go files in your current directory and subdirectories. If you want to use this functionality, I recommend running rewrite rules without the -w flag first, and checking the diff first to make sure that the changes to the code are what you expect. Let's take a look at a slightly more complicated example. Say you want to update your code to use the new Go 1.12 strings.ReplaceAll() function instead of strings.Replace(). To make this change you can run: $ gofmt -w -r 'strings.Replace(a, b, c, -1) -> strings.ReplaceAll(a, b, c)' . In rewrite rules, single lowercase characters act as wildcards matching arbitrary expressions, and those expressions will be substituted-in in the replacement. Viewing Go Documentation You can view documentation for the standard library packages via your terminal using the go doc tool. I often use this during development to quickly check something — like the name or signature of a specific function. I find it faster than navigating the web-based documentation and it's always available offline too. $ go doc strings # View simplified documentation for the strings package $ go doc -all strings # View full documentation for the strings package $ go doc strings.Replace # View documentation for the strings.Replace function $ go doc sql.DB # View documentation for the database/sql.DB type $ go doc sql.DB.Query # View documentation for the database/sql.DB.Query method You can also include the -src flag to display the relevant Go source code. For example: $ go doc -src strings.Replace # View the source code for the strings.Replace function Testing Running Tests You can use the go test tool to run tests in your project like so: $ go test . # Run all tests in the current directory $ go test ./... # Run all tests in the current directory and sub-directories $ go test ./foo/bar # Run all tests in the ./foo/bar directory Typically I run my tests with Go's race detector enabled, which can help pick up some of the data races that might occur in real-life usage. Like so: $ go test -race ./... It's important to note that enabling the race detector will increase the overall running time of your tests. So if you're running tests very frequently part of a TDD workflow, you might prefer to save using this for a pre-commit test run only. Since 1.10, Go caches test results at the package-level. If a package hasn't changed between test runs — and you're using the same, cachable, flags for go test — then the cached test result will be displayed with a "(cached)" next to it. This is hugely helpful in speeding up the test runtime for large codebases. If you want force your tests to run in full (and avoid the cache) you can use the -count=1 flag, or clear all cached test results by using the go clean tool. $ go test -count=1 ./... # Bypass the test cache when running tests $ go clean -testcache # Delete all cached test results Note: Cached test results are stored alongside cached build results in your GOCACHE directory. Check go env GOCACHE if you're not sure where this is on your machine. You can limit go test to running specific tests (and sub-tests) by using the -run flag. This accepts a regular expression, and only tests which have names that match the regular expression will be run. I like to combine this with the -v flag to enable verbose mode, so the names of running tests and sub-tests are displayed. It's a useful way to make sure that I haven't screwed up the regexp and that the tests I expect are actually being run! $ go test -v -run=^TestFooBar$ . # Run the test with the exact name TestFooBar $ go test -v -run=^TestFoo . # Run tests whose names start with TestFoo $ go test -v -run=^TestFooBar$/^Baz$ . # Run the Baz subtest of the TestFooBar test only A couple more flags that it's good to be aware of are -short (which you can use to skip long-running tests) and -failfast (which will stop running further tests after the first failure). Note that -failfast will prevent test results from being cached. $ go test -short ./... # Skip long running tests $ go test -failfast ./... # Don't run further tests after a failure. Profiling Test Coverage You can enable coverage analysis when running tests by using the -cover flag. This will display the percentage of code covered by the tests in the output for each package, similar to this: $ go test -cover ./... ok github.com/alexedwards/argon2id 0.467s coverage: 78.6% of statements You can also generate a coverage profile using the -coverprofile flag and view it in your web browser by using the go tool cover -html command like so: $ go test -coverprofile=/tmp/profile.out ./... $ go tool cover -html=/tmp/profile.out This will gives you a navigable listing of all the test files, with code covered by the tests displayed in green, and uncovered code in red. If you want you can go a step further and set the -covermode=count flag to make the coverage profile record the exact number of times that each statement is executed during the tests. $ go test -covermode=count -coverprofile=/tmp/profile.out ./... $ go tool cover -html=/tmp/profile.out When viewed in the browser, statements which are executed more frequently are shown in a more saturated shade of green, similar to this: Note: If you’re using the t.Parallel() command in any of your tests, then you should use the flag -covermode=atomic instead of -covermode=count instead to ensure an accurate count. Lastly, if you don't have a web browser available to view a coverage profile, you can see a breakdown of test coverage by function/method in your terminal with the command: $ go tool cover -func=/tmp/profile.out github.com/alexedwards/argon2id/argon2id.go:77: CreateHash 87.5% github.com/alexedwards/argon2id/argon2id.go:96: ComparePasswordAndHash 85.7% ... Stress Testing You can use the go test -count command to run a test multiple times in succession, which can be useful if you want to check for sporadic or intermittent failures. For example: $ go test -run=^TestFooBar$ -count=500 . In this example, the TestFooBar test will be repeated 500 times in a row. But it's important to note that the test will be repeated in serial — even if it contains a t.Parallel() instruction. So if your test is doing something relatively slow, like making a round trip to a database, hard disk or the internet, running a large number of tests can take quite a long time. In that case you might want to use the stress tool to repeat the same test multiple times in parallel instead. You can install it like so: $ cd /tmp $ GO111MODULE=on go get golang.org/x/tools/cmd/stress To use the stress tool, you'll first need to compile a test binary for the specific package you want to test. You can do using the go test -c command. For example, to create a test binary for the package in your current directory: $ go test -c -o=/tmp/foo.test . In this example, the test binary will be outputted to /tmp/foo.test. You can then use the stress tool to execute a specific test in the test binary like so: $ stress -p=4 /tmp/foo.test -test.run=^TestFooBar$ 60 runs so far, 0 failures 120 runs so far, 0 failures ... Note: In the example above I've used the -p flag to restrict the number of parallel processes used by stress to 4. Without this flag, the tool will default to using a number of processes equal to runtime.NumCPU(). Testing all Dependencies Before you build an executable for release or deployment, or distribute your code publicly, you may want to run the go test all command: $ go test all This will run tests on all packages in your module and all dependencies — include testing test dependencies and the necessary standard library packages — and it can help validate that the exact versions of the dependencies being used are compatible with each other. This can take quite a long time to run, but the results cache well so any subsequent tests should be faster in the future. If you want, you could also use go test -short all to skip any long-running tests. Pre-Commit Checks Formatting Code Go provides two tools to automatically format your code according to the Go conventions: gofmt and go fmt. Using these helps keep your code consistent across your files and projects, and — if you use them before committing code — helps reduce noise when examining a diff between file versions. I like to use the gofmt tool with the following flags: $ gofmt -w -s -d foo.go # Format the foo.go file $ gofmt -w -s -d . # Recursively format all files in the current directory and sub-directories In these commands, the -w flag instructs the tool to rewrite files in place, the -s instructs the tool to apply simplifications to the code where possible, and the -d flag instructs the tool to output diffs of the changes (because I'm curious to see what is changed). If you want to only display the names of changed files, instead of diffs, you can swap this for the -l flag instead. Note: The gofmt command works recursively. If you pass it a directory like . or ./cmd/foo it'll format all .go files under the directory. The other formatting tool — go fmt — tool is a wrapper which essentially calls gofmt -l -w on a specified file or directory. You can use it like this: $ go fmt ./... Performing Static Analysis The go vet tool carries out static analysis of your code and warns you of things which might be wrong with your code but wouldn't be picked up by the compiler. Issues like unreachable code, unnecessary assignments and badly-formed build tags. You can use it like so: $ go vet foo.go # Vet the foo.go file $ go vet . # Vet all files in the current directory $ go vet ./... # Vet all files in the current directory and sub-directories $ go vet ./foo/bar # Vet all files in the ./foo/bar directory Behind the scenes, go vet runs a bunch of different analyzers which are listed here and you can disable specific ones on a case-by-case basis. For example to disable the composite analyzer you can use: $ go vet -composites=false ./... There are a couple of experimental analyzers in golang.org/x/tools which you might want to try: nilness (which checks for redundant or impossible nil comparisons) and shadow (which check for possible unintended shadowing of variables). If you want to use these, you'll need to install and run them separately. For example, to install nilness you would run: $ cd /tmp $ GO111MODULE=on go get golang.org/x/tools/go/analysis/passes/nilness/cmd/nilness And you can then use it like so: $ go vet -vettool=$(which nilness) ./... Note: when the -vettool flag is used it will only run the specified analyzer — all the other go vet analyzers won't be run. As a side note, since Go 1.10 the go test tool automatically executes a small, high-confidence, subset of the go vet checks before running any tests. You can turn this behavior off when running tests like so: $ go test -vet=off ./... Linting Code You can use the golint tool to identify style mistakes in your code. Unlike go vet, this isn't concerned with correctness of the code, but helps you to align your code with the style conventions in Effective Go and the Go CodeReviewComments. It's not part of the standard library, so you'll need to install it like so: $ cd /tmp $ GO111MODULE=on go get golang.org/x/lint/golint You can then run it as follows: $ golint foo.go # Lint the foo.go file $ golint . # Lint all files in the current directory $ golint ./... # Lint all files in the current directory and sub-directories $ golint ./foo/bar # Lint all files in the ./foo/bar directory Tidying and Verifying your Dependencies Before you commit any changes to your code I recommend running the following two commands to tidy and verify your dependencies: $ go mod tidy $ go mod verify The go mod tidy command will prune any unused dependencies from your go.mod and go.sum files, and update the files to include dependencies for all possible build tags/OS/architecture combinations (note: go run, go test, go build etc are ‘lazy' and will only fetch packages needed for the current build tags/OS/architecture). Running this before each commit will make it easier to determine which of your code changes were responsible for adding or removing which dependencies when looking at the version control history. I also recommend using the go mod verify command to check that the dependencies on your computer haven't accidentally (or purposely) been changed since they were downloaded and that they match the cryptographic hashes in your go.sum file. Running this helps ensure that the dependencies being used are the exact ones that you expect, and any build for that commit will be reproducible at a later point. Build and Deployment Building an Executable To compile a main package and create an executable binary you can use the go build tool. Typically I use it in conjunction with the -o flag, which let's you explicitly set the output directory and name of the binary like so: $ go build -o=/tmp/foo . # Compile the package in the current directory $ go build -o=/tmp/foo ./cmd/foo # Compile the package in the ./cmd/foo directory In these examples, go build will compile the specified package (and any dependent packages), then invoke the linker to generate an executable binary, and output this to /tmp/foo. It's important to note that, as of Go 1.10, the go build tool caches build output in the build cache. This cached output will be reused again in future builds where appropriate, which can significantly speed up the overall build time. This new caching behavior means that the old maxim of “prefer go install to go build to improve caching” no longer applies. If you're not sure where your build cache is, you can check by running the go env GOCACHE command: $ go env GOCACHE /home/alex/.cache/go-build Using the build cache comes with one important caveat — it does not detect changes to C libraries imported with cgo. So if your code imports a C library via cgo and you've made changes to it since the last build, you'll need to use the -a flag which forces all packages to be rebuilt. Alternatively, you could use go clean to purge the cache: $ go build -a -o=/tmp/foo . # Force all packages to be rebuilt $ go clean -cache # Remove everything from the build cache Note: Running go clean -cache will delete cached test results too. If you're interested in what go build is doing behind the scenes, you might like to use the following commands: $ go list -deps . | sort -u # List all packages that are used to build the executable $ go build -a -x -o=/tmp/foo . # Rebuild everything and show the commands that are run Finally, if you run go build on a non-main package, it will be compiled in a temporary location and again, the result will be stored in the build cache. No executable is produced. Cross-Compilation This is one of my favorite features of Go. By default go build will output a binary suitable for use on your current operating system and architecture. But it also supports cross-compilation, so you can generate a binary suitable for use on a different machine. This is particularly useful if you're developing on one operating system and deploying on another. You can specify the operating system and architecture that you want to create the binary for by setting the GOOS and GOARCH environment variables respectively. For example: $ GOOS=linux GOARCH=amd64 go build -o=/tmp/linux_amd64/foo . $ GOOS=windows GOARCH=amd64 go build -o=/tmp/windows_amd64/foo.exe . To see a list of all supported OS/architecture combinations you can run go tool dist list: $ go tool dist list aix/ppc64 android/386 android/amd64 android/arm android/arm64 darwin/386 darwin/amd64 ... Hint: You can use Go's cross-compilation to create WebAssembly binaries. For a bit more in-depth information about cross compilation I recommend reading this excellent post. Using Compiler and Linker Flags When building your executable you can use the -gcflags flag to change the behavior of the compiler and see more information about what it's doing. You can see a complete list of available compiler flags by running: $ go tool compile -help One flag that you might find interesting is -m, which triggers the printing of information about optimization decisions made during compilation. You can use it like this: $ go build -gcflags="-m -m" -o=/tmp/foo . # Print information about optimization decisions In the above example I used the -m flag twice to indicate that I want to print decision information two-levels deep. You can get simpler output by using just one. Also, as of Go 1.10, compiler flags only apply to the specific packages passed to go build — which in the example above is the package in the current directory (represented by .). If you want to print optimization decisions for all packages including dependencies can use this command instead: $ go build -gcflags="all=-m" -o=/tmp/foo . As of Go 1.11, you should find it easier to debug optimized binaries than before. However, you can still use the flags -N to disable optimizations and -l to disable inlining if you need to. For example: $ go build -gcflags="all=-N -l" -o=/tmp/foo . # Disable optimizations and inlining You can see a list of available linker flags by running: $ go tool link -help Probably the most well-known of these is the -X flag, which allows you to "burn in" a (string) value to a specific variable in your application. This is commonly used to add a version number or commit hash. For example: $ go build -ldflags="-X main.version=1.2.3" -o=/tmp/foo . For more information about the -X flag and some sample code see this StackOverflow question and this post and this post. You may also be interested in using the -s and -w flags to strip debugging information from the binary. This typically shaves about 25% off the final size. For example: $ go build -ldflags="-s -w" -o=/tmp/foo . # Strip debug information from the binary Note: If binary size is something that you need to optimize for you might want to use upx to compress it. See this post for more information. Diagnosing Problems and Making Optimizations Running and Comparing Benchmarks A nice feature of Go is that it makes it easy to benchmark your code. If you're not familiar with the general process for writing benchmarks there are good guides here and here. To run benchmarks you'll need to use the go test tool, with the -bench flag set to a regular expression that matches the benchmarks you want to execute. For example: $ go test -bench=. ./... # Run all benchmarks and tests $ go test -run=^$ -bench=. ./... # Run all benchmarks (and no tests) $ go test -run=^$ -bench=^BenchmarkFoo$ ./... # Run only the BenchmarkFoo benchmark (and no tests) I almost always run benchmarks using the -benchmem flag, which forces memory allocation statistics to be included in the output. $ go test -bench=. -benchmem ./... By default, each benchmark test will be run for a minimum of 1 second, once only. You can change this with the -benchtime and -count flags: $ go test -bench=. -benchtime=5s ./... # Run each benchmark test for at least 5 seconds $ go test -bench=. -benchtime=500x /.... # Run each benchmark test for exactly 500 iterations $ go test -bench=. -count=3 ./... # Repeat each benchmark test 3 times over If the code that you're benchmarking uses concurrency, you can use the -cpu flag to see the performance impact of changing your GOMAXPROCS value (essentially, the number of OS threads that can execute your Go code simultaneously). For example, to run benchmarks with GOMAXPROCS set to 1, 4 and 8: $ go test -bench=. -cpu=1,4,8 ./... To compare changes between benchmarks you might want to use the benchcmp tool. This isn't part of the standard go command, so you'll need to install it like so: $ cd /tmp $ GO111MODULE=on go get golang.org/x/tools/cmd/benchcmp You can then use it like this: $ go test -run=^$ -bench=. -benchmem ./... > /tmp/old.txt # make changes $ go test -run=^$ -bench=. -benchmem ./... > /tmp/new.txt $ benchcmp /tmp/old.txt /tmp/new.txt benchmark old ns/op new ns/op delta BenchmarkExample-8 21234 5510 -74.05% benchmark old allocs new allocs delta BenchmarkExample-8 17 11 -35.29% benchmark old bytes new bytes delta BenchmarkExample-8 8240 3808 -53.79% Profiling and Tracing Go makes it possible to create diagnostic profiles for CPU use, memory use, goroutine blocking and mutex contention. You can use these to dig a bit deeper and see exactly how your application is using (or waiting on) resources. There are three ways to generate profiles: If you have a web application you can import the net/http/pprof package. This will register some handlers with the http.DefaultServeMux which you can then use to generate and download profiles for your running application. This post provides a good explanation and some sample code. For other types of applications, you can profile your running application using the pprof.StartCPUProfile() and pprof.WriteHeapProfile() functions. See the runtime/pprof documentation for sample code. Or you can generate profiles while running benchmarks or tests by using the various -***profile flags like so: $ go test -run=^$ -bench=^BenchmarkFoo$ -cpuprofile=/tmp/cpuprofile.out . $ go test -run=^$ -bench=^BenchmarkFoo$ -memprofile=/tmp/memprofile.out . $ go test -run=^$ -bench=^BenchmarkFoo$ -blockprofile=/tmp/blockprofile.out . $ go test -run=^$ -bench=^BenchmarkFoo$ -mutexprofile=/tmp/mutexprofile.out . Note: Using the -***profile flags when running benchmarks or tests will result in a test binary being outputted to your current directory. If you want to output this to an alternative location you should use the -o flag like so: $ go test -run=^$ -bench=^BenchmarkFoo$ -o=/tmp/foo.test -cpuprofile=/tmp/cpuprofile.out . Whichever way you choose to create a profile, when profiling is enabled your Go program will stop about 100 times per second and take a snapshot at that moment in time. These samples are collected together to form a profile that you can analyze using the pprof tool. My favourite way to inspect a profile is to use the go tool pprof -http command to open it in a web browser. For example: $ go tool pprof -http=:5000 /tmp/cpuprofile.out This will default to displaying a graph showing the execution tree for the sampled aspects of your application, which makes it possible to quickly get a feel for any resource usage 'hotspots'. In the graph above, we can see that the hotspots in terms of CPU usage are two system calls originating from ioutil.ReadFile(). You can also navigate to other views of the profile including top usage by function and source code. If the amount of information is overwhelming, you might want to use the --nodefraction flag to ignore nodes that account for less than a certain percentage of samples. For example to ignore nodes that use appear in less than 10% of samples you can run pprof like so: $ go tool pprof --nodefraction=0.1 -http=:5000 /tmp/cpuprofile.out This makes the graph a lot less 'noisy' and if you zoom in on this screenshot, it's now much clearer to see and understand where the CPU usage hotspots are. Profiling and optimizing resource usage is big, nuanced, topic and I've barely scratched the surface here. If you're interested in knowing more then I encourage you to read the following blog posts: Profiling and optimizing Go web applications Debugging performance issues in Go programs Daily code optimization using benchmarks and profiling Profiling Go programs with pprof Another tool that you can use to help diagnose issues is the runtime execution tracer. This gives you a view of how Go is creating and scheduling goroutines to run, when the garbage collector is running, and information about blocking syscall/network/sync operations. Again, you can generate trace from your tests or benchmarks, or use net/http/pprof to create and download a trace for your web application. You can then use go tool trace to view the output in your web browser like so: $ go test -run=^$ -bench=^BenchmarkFoo$ -trace=/tmp/trace.out . $ go tool trace /tmp/trace.out Important: This is currently only viewable in Chrome/Chromium. For more information about Go's execution tracer and how to interpret the output please see Rhys Hiltner's dotGo 2016 talk and this excellent blog post. Checking for Race Conditions I talked earlier about enabling Go's race detector during tests by using go test -race. But you can also enable it for running programs when building a executable, like so: $ go build -race -o=/tmp/foo . It's critical to note that race-detector-enabled binaries will use more CPU and memory than normal, so you shouldn't use the -race flag when building binaries for production under normal circumstances. But you may want to deploy a race-detector-enabled binary on one server within a pool of many. Or use it to help track down a suspected race-condition by using a load-test tool to throw traffic concurrently at a race-detector-enabled binary. By default, if any races are detected while the binary is running a log will be written to stderr. You can change this by using the GORACE environment variable if necessary. For example, to run the binary located at /tmp/foo and output any race logs to /tmp/race.<pid> you can use: $ GORACE="log_path=/tmp/race" /tmp/foo Managing Dependencies You can use the go list tool to check whether a specific dependency has a newer version available like so: $ go list -m -u github.com/alecthomas/chroma github.com/alecthomas/chroma v0.6.2 [v0.6.3] This will output the dependency name and version that you're currently using, followed by the latest version in square brackets [], if a newer one exists. You can also use go list to check for updates to all dependencies (and sub-dependencies) like so: $ go list -m -u all You can upgrade (or downgrade) a dependency to the latest version, specific tagged-release or commit hash with the go get command like so: $ go get github.com/foo/bar@latest $ go get github.com/foo/bar@v1.2.3 $ go get github.com/foo/bar@7e0369f If the dependency you're updating has a go.mod file, then based on the information in this go.mod file, updates to any sub-dependencies will also be downloaded if necessary. If you use the go get -u flag, the contents of the go.mod file will be ignored and all sub-dependencies will be upgraded to their latest minor/patch version… even if the go.mod specifies a different version. After upgrading or downgrading any dependencies it's a good idea to tidy your modfiles. And you might also want to run the tests for all packages to help check for incompatibilities. Like so: $ go mod tidy $ go test all Occasionally you might want to use a local version of a dependency (for example, you need to use a local fork until a patch is merged upstream). To do this, you can use the go mod edit command to replace a dependency in your go.mod file with a local version. For example: $ go mod edit -replace=github.com/alexedwards/argon2id=/home/alex/code/argon2id This will add a replace rule to your go.mod file like so, and any future invocations of go run, go build etc will use the local version. File: go.mod module alexedwards.net/example go 1.12 require github.com/alexedwards/argon2id v0.0.0-20190109181859-24206601af6c replace github.com/alexedwards/argon2id => /home/alex/Projects/playground/argon2id Once it's no longer necessary, you can remove the replace rule with the command: $ go mod edit -dropreplace=github.com/alexedwards/argon2id You can use the same general technique to import packages that exist only on your own file system. This can be useful if you're working on multiple modules in development at the same time, one of which depends on the other. Note: If you don't want to use the go mod edit command, you can edit your go.mod file manually to make these changes. Either way will work. Upgrading to a New Go Release The go fix tool was originally released back in 2011 (when regular changes were still being made to Go's API) to help users automatically update their old code to be compatible with the latest version of Go. Since then, Go's compatibility promise means if you're upgrading from one Go 1.x version to a newer 1.x version everything should Just Work and using go fix should generally be unnecessary. However, there are a handful of very specific issues that it does deal with. You can see a summary of them by running go tool fix -help. If you decide that you want or need to run go fix after upgrading, you should you run the following command, then inspect a diff of the changes before you commit them. $ go fix ./... Reporting Bugs If you're confident that you've found an unreported issue with Go's standard library, tooling or documentation, you can use the go bug command to create a new Github issue. $ go bug This will open a browser window containing an issue pre-filled with your system information and reporting template.
Alex Edwards Apr 15, 2019 -
Thanks to Andreas Auernhammer, author of the golang.org/x/crypto/argon2 package, for checking over this post before publication. If you're planning to store user passwords it's good practice (essential really) to hash them using a computationally expensive key-derivation function (KDF) like Bcrypt, Scrypt or Argon2. Hashing and verifying passwords in Go with Bcrypt and Scrypt is already easy to do thanks to the golang.org/x/crypto/bcrypt package and Matt Silverlock's elithrar/simple-scrypt package. I recommend them both. If you want to use Argon2 — which is widely considered to be the best in class KDF for hashing passwords — then you've got a couple of choices. The tvdburgt/go-argon2 package provides Go bindings to the libargon2 C library, or you can implement a pure Go solution by wrapping the golang.org/x/crypto/argon2 package with helpers for hashing and verifying passwords. In the rest of this post I'm going to explain exactly how to use this pure Go approach. A Brief Introduction to Argon2 But first, a little bit of background. It's important to explain that the Argon2 algorithm has 3 variants which work slightly differently: Argon2d, Argon2i and Argon2id. In general, for password hashing you should use the Argon2id variant. This is essentially a hybrid of the Argon2d and Argon2i algorithms and uses a combination of data-independent memory access (for resistance against side-channel timing attacks) and data-depending memory access (for resistance against GPU cracking attacks). The Argon2 algorithm accepts a number of configurable parameters: Memory — The amount of memory used by the algorithm (in kibibytes). Iterations — The number of iterations (or passes) over the memory. Parallelism — The number of threads (or lanes) used by the algorithm. Salt length — Length of the random salt. 16 bytes is recommended for password hashing. Key length — Length of the generated key (or password hash). 16 bytes or more is recommended. The memory and iterations parameters control the computational cost of hashing the password. The higher these figures are, the greater the cost of generating the hash. It also follows that the greater the cost will be for any attacker trying to guess the password. But there's a balance that you need to strike. As you increase the cost, the time taken to generate the hash also increases. If you're generating the hash in response to a user action (like signing up or logging in to a website) then you probably want to keep the runtime to less than 500ms to avoid a negative user experience. If the Argon2 algorithm is running on a machine with multiple cores, then one way to decrease the runtime without reducing the cost is to increase the parallelism parameter. This controls the number of threads that the work is spread across. There's an important thing to note here though: changing the value of the parallelism parameter changes the output of the algorithm. So — for example — running Argon2 with a parallelism parameter of 2 will result in a different password hash to running it with a parallelism parameter of 4. Choosing Parameters Picking the right parameters for Argon2 depends heavily on the machine that the algorithm is running on, and you'll probably need to do some experimentation in order to set them appropriately. The recommended process for choosing the parameters can be paraphrased as follows: Set the parallelism and memory parameters to the largest amount you are willing to afford, bearing in mind that you probably don't want to max these out completely unless your machine is dedicated to password hashing. Increase the number of iterations until you reach your maximum runtime limit (for example, 500ms). If you're already exceeding the your maximum runtime limit with the number of iterations = 1, then you should reduce the memory parameter. Hashing Passwords Now that those explanations are out of the way let's jump into writing the code to hash a password with Argon2. First, you'll need to go get the golang.org/x/crypto/argon2 package which implements the Argon2 algorithm: $ go get golang.org/x/crypto/argon2 And you can use it to hash a specific password like so: File: main.go package main import ( "crypto/rand" "fmt" "log" "golang.org/x/crypto/argon2" ) type params struct { memory uint32 iterations uint32 parallelism uint8 saltLength uint32 keyLength uint32 } func main() { // Establish the parameters to use for Argon2. p := ¶ms{ memory: 64 * 1024, iterations: 3, parallelism: 2, saltLength: 16, keyLength: 32, } // Pass the plaintext password and parameters to our generateFromPassword // helper function. hash, err := generateFromPassword("password123", p) if err != nil { log.Fatal(err) } fmt.Println(hash) } func generateFromPassword(password string, p *params) (hash []byte, err error) { // Generate a cryptographically secure random salt. salt, err := generateRandomBytes(p.saltLength) if err != nil { return nil, err } // Pass the plaintext password, salt and parameters to the argon2.IDKey // function. This will generate a hash of the password using the Argon2id // variant. hash = argon2.IDKey([]byte(password), salt, p.iterations, p.memory, p.parallelism, p.keyLength) return hash, nil } func generateRandomBytes(n uint32) ([]byte, error) { b := make([]byte, n) _, err := rand.Read(b) if err != nil { return nil, err } return b, nil } A quick note on terminology and naming. Formally, Argon2 is a key-derivation function and it produces a key derived from the provided password and salt. This derived key is our 'hashed password'. The other important thing to point out here is the generateRandomBytes() function. In this we're using Go's crypto/rand package to generate a cryptographically secure random salt, rather than using a fixed salt or a pseudo-random salt. If you run the program at this point it should print a slice containing the bytes of the hashed password, similar to this: $ go run main.go [9 18 35 54 101 221 120 189 57 241 229 248 140 1 102 58 93 211 115 49 131 162 24 50 167 142 227 198 85 186 200 248] Each time you run the program you'll see that it results in a completely different output for the same password, thanks to the addition of our random salt. Storing Passwords So, creating a hashed password with some specific parameters is straightforward enough. But in most cases you'll want to store the salt and specific parameters that you used alongside the hashed password, so that it can be reproducibly verified at a later point. The standard way to do this is to create an encoded representation of the hashed password which looks like this: $argon2id$v=19$m=65536,t=3,p=2$c29tZXNhbHQ$RdescudvJCsgt3ub+b+dWRWJTmaaJObG Let's break down what this represents: $argon2id — the variant of Argon2 being used. $v=19 — the version of Argon2 being used. $m=65536,t=3,p=2 — the memory (m), iterations (t) and parallelism (p) parameters being used. $c29tZXNhbHQ — the base64-encoded salt, using standard base64-encoding and no padding. $c29tZXNhbHQ$RdescudvJCsgt3ub+b+dWRWJTmaaJObG — the base64-encoded hashed password (derived key), using standard base64-encoding and no padding. Let's update the generateHash() function so that it returns a string in this format: File: main.go package main import ( "crypto/rand" "encoding/base64" "fmt" "log" "golang.org/x/crypto/argon2" ) ... func generateFromPassword(password string, p *params) (encodedHash string, err error) { salt, err := generateRandomBytes(p.saltLength) if err != nil { return "", err } hash := argon2.IDKey([]byte(password), salt, p.iterations, p.memory, p.parallelism, p.keyLength) // Base64 encode the salt and hashed password. b64Salt := base64.RawStdEncoding.EncodeToString(salt) b64Hash := base64.RawStdEncoding.EncodeToString(hash) // Return a string using the standard encoded hash representation. encodedHash = fmt.Sprintf("$argon2id$v=%d$m=%d,t=%d,p=%d$%s$%s", argon2.Version, p.memory, p.iterations, p.parallelism, b64Salt, b64Hash) return encodedHash, nil } ... And if you run the code again now, the output should look similar to this: $ go run run.go $argon2id$v=19$m=65536,t=3,p=2$Woo1mErn1s7AHf96ewQ8Uw$D4TzIwGO4XD2buk96qAP+Ed2baMo/KbTRMqXX00wtsU Verifying Passwords The final aspect to cover is how to verify passwords. In most cases, you'll take the encoded password hash that we've just produced and store it in a database of some kind. Then at a later point, you'll want to check whether a plaintext password provided by a user matches the one represented by the encoded password hash. In essence, the steps to do this check are: Extract the salt and parameters from the encoded password hash stored in the database. Derive the hash of the plaintext password using the exact same Argon2 variant, version, salt and parameters. Check whether this new hash is the same as the original one. You can implement this like so: File: main.go package main import ( "crypto/rand" "crypto/subtle" "encoding/base64" "errors" "fmt" "log" "strings" "golang.org/x/crypto/argon2" ) var ( ErrInvalidHash = errors.New("the encoded hash is not in the correct format") ErrIncompatibleVersion = errors.New("incompatible version of argon2") ) type params struct { memory uint32 iterations uint32 parallelism uint8 saltLength uint32 keyLength uint32 } func main() { p := ¶ms{ memory: 64 * 1024, iterations: 3, parallelism: 2, saltLength: 16, keyLength: 32, } encodedHash, err := generateFromPassword("password123", p) if err != nil { log.Fatal(err) } match, err := comparePasswordAndHash("password123", encodedHash) if err != nil { log.Fatal(err) } fmt.Printf("Match: %v\n", match) } ... func comparePasswordAndHash(password, encodedHash string) (match bool, err error) { // Extract the parameters, salt and derived key from the encoded password // hash. p, salt, hash, err := decodeHash(encodedHash) if err != nil { return false, err } // Derive the key from the other password using the same parameters. otherHash := argon2.IDKey([]byte(password), salt, p.iterations, p.memory, p.parallelism, p.keyLength) // Check that the contents of the hashed passwords are identical. Note // that we are using the subtle.ConstantTimeCompare() function for this // to help prevent timing attacks. if subtle.ConstantTimeCompare(hash, otherHash) == 1 { return true, nil } return false, nil } func decodeHash(encodedHash string) (p *params, salt, hash []byte, err error) { vals := strings.Split(encodedHash, "$") if len(vals) != 6 { return nil, nil, nil, ErrInvalidHash } var version int _, err = fmt.Sscanf(vals[2], "v=%d", &version) if err != nil { return nil, nil, nil, err } if version != argon2.Version { return nil, nil, nil, ErrIncompatibleVersion } p = ¶ms{} _, err = fmt.Sscanf(vals[3], "m=%d,t=%d,p=%d", &p.memory, &p.iterations, &p.parallelism) if err != nil { return nil, nil, nil, err } salt, err = base64.RawStdEncoding.DecodeString(vals[4]) if err != nil { return nil, nil, nil, err } p.saltLength = uint32(len(salt)) hash, err = base64.RawStdEncoding.DecodeString(vals[5]) if err != nil { return nil, nil, nil, err } p.keyLength = uint32(len(hash)) return p, salt, hash, nil } If you run this code now, you should get a positive match when comparing the plaintext and hashed password and see output like this: $ go run main.go Match: true If you change the plaintext password used in one of the function calls, like so: File: main.go package main ... func main() { p := ¶ms{ memory: 64 * 1024, iterations: 3, parallelism: 2, saltLength: 16, keyLength: 32, } encodedHash, err := generateFromPassword("password123", p) if err != nil { log.Fatal(err) } // Use a different password... match, err := comparePasswordAndHash("pa$$word", encodedHash) if err != nil { log.Fatal(err) } fmt.Printf("Match: %v\n", match) } ... Then running the code should result in a negative match: $ go run main.go Match: false The complete sample code for this post is available in this gist.
Alex Edwards Dec 10, 2018 -
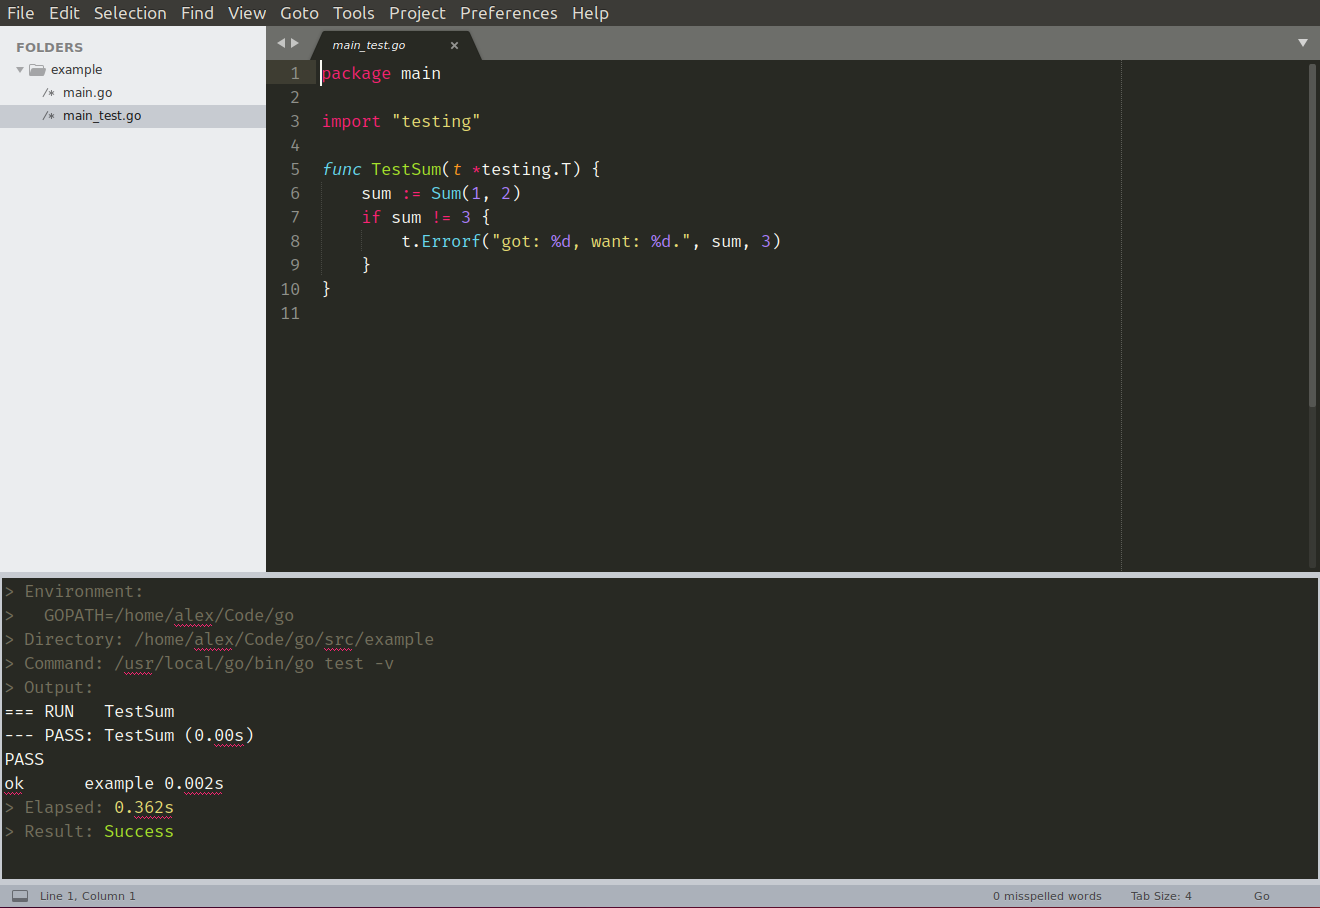
For the past couple of years I've used Sublime Text as my primary code editor, along with the GoSublime plugin to provide some extra IDE-like features. But I've recently swapped GoSublime for a more modular plugin setup and have been really happy with the way it's worked out. Although it took a while to configure, it's resulted in a coding environment that feels clearer to use and more streamlined than before. I've opted for: Tooling integration with the official sublime-build plugin. Automatic formatting with the Gofmt plugin and goimports. Code linting with the SublimeLinter plugin and gometalinter. Autocompletion with the gocode package. Code navigation with the GoGuru plugin. Snippet management with Sublime Text's inbuilt tool and the PackageResourceViewer plugin. In this post I'm going to run through the process of setting these up. If you haven't come across these plugins before, I recommend giving them a try! Prerequisites To work correctly some of these Sublime Text plugins need an explicit $GOPATH environment variable to be set. And if you're following along, you should also make sure that your workspace's bin directory is on your system path. Accordingly my bash ~/.profile configuration includes these lines: ... export GOPATH=/home/alex/Code/go export PATH=$PATH:$GOPATH/bin You'll also need to install Package Control, if you haven't already. In the latest version of Sublime Text the easiest way to do that by going to Tools > Install Package Control…. Tooling integration The official sublime-build plugin provides integrations so you can execute common go commands (like go run, go test and go get) without leaving your editor. You can install it like so: Open the Sublime Text command palette by pressing Ctrl+Shift+P. Run the Package Control: Install Package command. Type Golang Build and hit Enter to install the package. After installation should see a bunch of new tools in your command palette. Their names are pretty self explanatory: Build With: Go Build With: Go - Clean Build With: Go - Install Build With: Go - Run Build With: Go - Test Build With: Go - Cross-Compile Go: Get Go: Open Terminal When you run these commands they will open and execute in a panel within Sublime Text. As an example, here's a screenshot of output from the Build With: Go - Test command: Automatic formatting For automatic formatting of .go files I've been using the Gofmt plugin. You can install it as follows: Open the Sublime Text command palette by pressing Ctrl+Shift+P. Run the Package Control: Install Package command. Type Gofmt and hit Enter to install the package. By default this will run go fmt -s -e on the current file each time it is saved. I've customised this further to use the goimports tool. If you're not already familiar with goimports, it runs go fmt and fixes your import lines — adding missing packages and removing unreferenced ones as necessary. To set this up you'll need to install goimports and make sure it's available on your system path: $ go get golang.org/x/tools/cmd/goimports $ which goimports /home/alex/Code/go/bin/goimports When that's installed, you'll then need to change the Gofmt plugin settings in Sublime Text by opening Preferences > Package Settings > Gofmt > Settings - User and adding the following configuration settings: { "cmds": [ ["goimports"] ], "format_on_save": true } (You'll probably need to restart Sublime Text for this to take effect.) Each time you now save a .go file, you'll find that it gets automatically formatted and the import packages are updated. No more "imported and not used" errors! Code linting For linting of source code I'm using the SublimeLinter plugin. This plugin isn't a linter itself, but provides a framework for running linters and displaying error messages. You can install it like so: Open command palette by pressing Ctrl+Shift+P. Run the Package Control: Install Package command. Type SublimeLinter and hit Enter to install the package. The next step is to install an actual linter. I'm using gometalinter, which acts as a wrapper around a bunch of different linters and picks up more potential problems and inefficiencies than using go vet and golint alone. You can install it with the commands: $ go get github.com/alecthomas/gometalinter $ which gometalinter /home/alex/Code/go/bin/gometalinter $ gometalinter --install Once that's done, you'll need to install the SublimeLinter-contrib-gometalinter plugin. This acts as the bridge between SublimeLinter and gometalinter. Open command palette by pressing Ctrl+Shift+P. Run the Package Control: Install Package command. Type SublimeLinter-contrib-gometalinter and hit Enter to install the package. By default the linter will run in the background as you type, and errors will be shown in the Sublime Text status bar at the bottom of the screen. But I've found suits me more to only lint when saving a file and to display all errors at once in a panel. If you want to do the same, go to Preferences > Package Settings > SublimeLinter > Settings and add the following settings to the SublimeLinter Settings - User file: { "show_panel_on_save": "window", "lint_mode": "save", } I should mention that the SublimeLinter-contrib-gometalinter plugin only executes the 'fast' linters included in gometalinter. You can see exactly which ones are run by checking the source code. Autocompletion For autocompletion I'm using the gocode package, which provides a deamon for code completion. You can install it like so: $ go get github.com/mdempsky/gocode $ which gocode /home/alex/Code/go/bin/gocode There isn't currently a gocode plugin available via Sublime Text package control (I might add one soon!)… but there is a plugin included in the subl3 directory within the gocode source itself. You should be able to copy it into your Sublime Text Packages directory with the following command: $ cp -r $GOPATH/src/github.com/mdempsky/gocode/subl3 ~/.config/sublime-text-3/Packages/gocode If you open the command palette and run Package Control: List Packages you should see a gocode entry in the list. By default Sublime Text will make autocomplete suggestions whenever a letter is pressed. But when working with Go I like also to display potential method names whenever I hit the . character. You can make that happen by going to Preferences > Settings and adding a new trigger in the Preferences.sublime-settings - User file: { ... "auto_complete_triggers": [ {"selector": "text.html", "characters": "<"}, {"selector": "source.go", "characters": "."} ], } You'll need to then restart Sublime Text for the settings to take effect. Once you have, you should have autocomplete working nicely and looking something like this: Code navigation To help with navigating code I use the guru tool, which you can install with the following command: $ go get golang.org/x/tools/cmd/guru $ which guru /home/alex/Code/go/bin/guru To integrate this with Sublime Text you'll also need to install the GoGuru plugin like so: Open command palette by pressing Ctrl+Shift+P. Run the Package Control: Install Package command. Type GoGuru and hit Enter to install the package. To use the GoGuru tool, first place your cursor over the piece of code you're interested in. Then if you open the command palette and type the GoGuru prefix you'll see a list of available commands, including: GoGuru: callees – Show possible targets of selected function call GoGuru: callers – Show possible callers of selected function GoGuru: callstack – Show path from callgraph root to selected function GoGuru: definition – Show declaration of selected identifier GoGuru: describe – Describe selected syntax: definition, methods, etc GoGuru: freevars – Show free variables of selection GoGuru: implements – Show 'implements' relation for selected type or method GoGuru: jump to definition – Open the file at the declaration of selected identifier GoGuru: peers – Show send/receive corresponding to selected channel op GoGuru: pointsto – Show variables the selected pointer may point to GoGuru: referrers – Show all refs to thing denoted by selected identifier GoGuru: what – Show basic information about the selected syntax node GoGuru: whicherrs – Show possible values of the selected error variable You can find a detailed description these commands and their behaviour in this GoogleDoc. I don't use the GoGuru plugin as often as the others, but when working on a unfamiliar codebase it definitely makes navigating code and building up a mental map of how things work easier. I find the GoGuru: jump to definition and GoGuru: callers commands particularly useful, and easier to use than grepping or running Ctrl+F on the repository. As an illustration, here's a screenshot of running GoGuru: callers on the Sum function: Snippets Sublime Text ships with a pretty good workflow for creating and using custom snippets. If you're not already familiar with this Jimmy Zhang has written a great in-depth guide that I recommend reading. My most frequently-used snippet is probably this one for creating a HTTP handler function: <snippet> <content><![CDATA[ func ${1:name}(w http.ResponseWriter, r *http.Request) { ${2:} } ]]></content> <tabTrigger>hf</tabTrigger> <scope>source.go</scope> </snippet> One thing that bugged me for a while was the built-in snippets for Go that Sublime Text ships with. In particular I didn't like the way that the main() snippet kept triggering whenever I wrote out "package main". If, like me, you want to edit these built-in snippets the easiest way is probably with the PackageResourceViewer plugin. You can install this as follows: Open command palette by pressing Ctrl+Shift+P. Run the Package Control: Install Package command. Type PackageResourceViewer and hit Enter to install the package. Once installed you can open the command palette and run PackageResourceViewer: Open Resource which will list all packages on your system. If you navigate through Go > Snippets/ you should see a list of all the built-in snippets and you can open and edit them as you wish. Hint: You can also use PackageResourceViewer to edit your own custom snippets without leaving SublimeText. If – for example – your custom snippets are saved under your Packages/User directory, you can open them by running PackageResourceViewer: Open Resource and navigating to the User folder.
Alex Edwards Jun 5, 2018 -
A.K.A. HTTP method overriding. As a web developer you probably already know that HTML forms only support the GET and POST HTTP methods. If you want to send a PUT, PATCH or DELETE request you need to resort to either sending a XMLHttpRequest from JavaScript (where they are supported by most major browsers) or implement a workaround in your server-side application code to support 'spoofed' HTTP methods. The de-facto workaround — which you might be familiar with if you've used frameworks like Ruby on Rails, Laravel or Express — is to include a hidden _method input in your form containing the spoofed HTTP method. A bit like this: <form method="POST" action="/"> <input type="hidden" name="_method" value="PUT"> <button type="submit">Submit</button> </form> Another common workaround is to send a spoofed HTTP method in a X-HTTP-Method-Override header. So how can we support these things in a Go application? MethodOverride Middleware Intercepting and dealing with spoofed HTTP methods is the perfect task for some custom middleware. We want the middleware to: Intercept POST requests before they reach any application handlers. Check for a spoofed HTTP method, either in a _method parameter of the request body or a X-HTTP-Method-Override header. If a spoofed method exists — and is equal to "PUT", "PATCH" or "DELETE" — the current http.Request.Method value should be updated accordingly. It's pretty quick to implement: package main import ( "net/http" ) func MethodOverride(next http.Handler) http.Handler { return http.HandlerFunc(func(w http.ResponseWriter, r *http.Request) { // Only act on POST requests. if r.Method == "POST" { // Look in the request body and headers for a spoofed method. // Prefer the value in the request body if they conflict. method := r.PostFormValue("_method") if method == "" { method = r.Header.Get("X-HTTP-Method-Override") } // Check that the spoofed method is a valid HTTP method and // update the request object accordingly. if method == "PUT" || method == "PATCH" || method == "DELETE" { r.Method = method } } // Call the next handler in the chain. next.ServeHTTP(w, r) }) } You can then use the middleware in your application like so: package main import ( "html/template" "io" "log" "net/http" ) const form = ` <!DOCTYPE HTML> <html> <body> <form method="POST" action="/"> <input type="hidden" name="_method" value="PUT"> <label>Example field</label> <input type="text" name="example"> <button type="submit">Submit</button> </form> </body> </html> ` func main() { mux := http.NewServeMux() mux.HandleFunc("/", formHandler) // Wrap the servemux with the MethodOverride middleware. err := http.ListenAndServe(":4000", MethodOverride(mux)) log.Print(err) } func formHandler(w http.ResponseWriter, r *http.Request) { switch r.Method { case "GET": t, err := template.New("form").Parse(form) if err != nil { http.Error(w, err.Error(), 500) } t.Execute(w, nil) case "PUT": io.WriteString(w, "This is a PUT request") default: http.Error(w, http.StatusText(405), 405) } }
Alex Edwards May 10, 2018 -
Earlier this year AWS announced that their Lambda service would now be providing first-class support for the Go language, which is a great step forward for any gophers (like myself) who fancy experimenting with serverless technology. So in this post I'm going to talk through how to create a HTTPS API backed by AWS Lambda, building it up step-by-step. I found there to be quite a few gotchas in the process — especially if you're not familiar the AWS permissions system — and some rough edges in the way that Lamdba interfaces with the other AWS services. But once you get your head around these it works pretty well. There's a lot of content to cover in this tutorial, so I've broken it down into the following seven steps: Setting up the AWS CLI Creating and deploying an Lambda function Hooking it up to DynamoDB Setting up the HTTPS API Working with events Deploying the API Supporting multiple actions Throughout this post we'll work towards building an API with two actions: MethodPathAction GET/books?isbn=xxxDisplay information about a book with a specific ISBN POST/booksCreate a new book Where a book is a basic JSON record which looks like this: {"isbn":"978-1420931693","title":"The Republic","author":"Plato"} I'm keeping the API deliberately simple to avoid getting bogged-down in application-specific code, but once you've grasped the basics it's fairly clear how to extend the API to support additional routes and actions. Setting up the AWS CLI Throughout this tutorial we'll use the AWS CLI (command line interface) to configure our lambda functions and other AWS services. Installation and basic usage instructions can be found here, but if you’re using a Debian-based system like Ubuntu you can install the CLI with apt and run it using the aws command: $ sudo apt install awscli $ aws --version aws-cli/1.11.139 Python/3.6.3 Linux/4.13.0-37-generic botocore/1.6.6 Next we need to set up an AWS IAM user with programmatic access permission for the CLI to use. A guide on how to do this can be found here. For testing purposes you can attach the all-powerful AdministratorAccess managed policy to this user, but in practice I would recommend using a more restrictive policy. At the end of setting up the user you'll be given a access key ID and secret access key. Make a note of these — you’ll need them in the next step. Configure the CLI to use the credentials of the IAM user you've just created using the configure command. You’ll also need to specify the default region and output format you want the CLI to use. $ aws configure AWS Access Key ID [None]: access-key-ID AWS Secret Access Key [None]: secret-access-key Default region name [None]: us-east-1 Default output format [None]: json (Throughout this tutorial I'll assume you're using the us-east-1 region — you'll need to change the code snippets accordingly if you're using a different region.) Creating and deploying an Lambda function Now for the exciting part: making a lambda function. If you're following along, go to your $GOPATH/src folder and create a books repository containing a main.go file. $ cd ~/go/src $ mkdir books && cd books $ touch main.go Next you'll need to install the github.com/aws-lambda-go/lambda package. This provides the essential libraries and types we need for creating a lambda function in Go. $ go get github.com/aws/aws-lambda-go/lambda Then open up the main.go file and add the following code: File: books/main.gopackage main import ( "github.com/aws/aws-lambda-go/lambda" ) type book struct { ISBN string `json:"isbn"` Title string `json:"title"` Author string `json:"author"` } func show() (*book, error) { bk := &book{ ISBN: "978-1420931693", Title: "The Republic", Author: "Plato", } return bk, nil } func main() { lambda.Start(show) } In the main() function we call lambda.Start() and pass in the show function as the lambda handler. In this case the handler simply initializes and returns a new book object. Lamdba handlers can take a variety of different signatures and reflection is used to determine exactly which signature you're using. The full list of supported forms is… func() func() error func(TIn) error func() (TOut, error) func(TIn) (TOut, error) func(context.Context) error func(context.Context, TIn) error func(context.Context) (TOut, error) func(context.Context, TIn) (TOut, error) … where the TIn and TOut parameters are objects that can be marshaled (and unmarshalled) by Go's encoding/json package. The next step is to build an executable from the books package using go build. In the code snippet below I'm using the -o flag to save the executable to /tmp/main but you can save it to any location (and name it whatever) you wish. $ env GOOS=linux GOARCH=amd64 go build -o /tmp/main books Important: as part of this command we're using env to temporarily set two environment variables for the duration for the command (GOOS=linux and GOARCH=amd64). These instruct the Go compiler to create an executable suitable for use with a linux OS and amd64 architecture — which is what it will be running on when we deploy it to AWS. AWS requires us to upload our lambda functions in a zip file, so let's make a main.zip zip file containing the executable we just made: $ zip -j /tmp/main.zip /tmp/main Note that the executable must be in the root of the zip file — not in a folder within the zip file. To ensure this I've used the -j flag in the snippet above to junk directory names. The next step is a bit awkward, but critical to getting our lambda function working properly. We need to set up an IAM role which defines the permission that our lambda function will have when it is running. For now let's set up a lambda-books-executor role and attach the AWSLambdaBasicExecutionRole managed policy to it. This will give our lambda function the basic permissions it need to run and log to the AWS cloudwatch service. First we have to create a trust policy JSON file. This will essentially instruct AWS to allow lambda services to assume the lambda-books-executor role: File: /tmp/trust-policy.json{ "Version": "2012-10-17", "Statement": [ { "Effect": "Allow", "Principal": { "Service": "lambda.amazonaws.com" }, "Action": "sts:AssumeRole" } ] } Then use the aws iam create-role command to create the role with this trust policy: $ aws iam create-role --role-name lambda-books-executor \ --assume-role-policy-document file:///tmp/trust-policy.json { "Role": { "Path": "/", "RoleName": "lambda-books-executor", "RoleId": "AROAIWSQS2RVEWIMIHOR2", "Arn": "arn:aws:iam::account-id:role/lambda-books-executor", "CreateDate": "2018-04-05T10:22:32.567Z", "AssumeRolePolicyDocument": { "Version": "2012-10-17", "Statement": [ { "Effect": "Allow", "Principal": { "Service": "lambda.amazonaws.com" }, "Action": "sts:AssumeRole" } ] } } } Make a note of the returned ARN (Amazon Resource Name) — you'll need this in the next step. Now the lambda-books-executor role has been created we need to specify the permissions that the role has. The easiest way to do this it to use the aws iam attach-role-policy command, passing in the ARN of AWSLambdaBasicExecutionRole permission policy like so: $ aws iam attach-role-policy --role-name lambda-books-executor \ --policy-arn arn:aws:iam::aws:policy/service-role/AWSLambdaBasicExecutionRole Note: you can find a list of other permission policies that might be useful here. Now we're ready to actually deploy the lambda function to AWS, which we can do using the aws lambda create-function command. This takes the following flags and can take a minute or two to run. --function-name Thethat name your lambda function will be called within AWS --runtime The runtime environment for the lambda function (in our case "go1.x") --role The ARN of the role you want the lambda function to assume when it is running (from step 6 above) --handler The name of the executable in the root of the zip file --zip-file Path to the zip file Go ahead and try deploying it: $ aws lambda create-function --function-name books --runtime go1.x \ --role arn:aws:iam::account-id:role/lambda-books-executor \ --handler main --zip-file fileb:///tmp/main.zip { "FunctionName": "books", "FunctionArn": "arn:aws:lambda:us-east-1:account-id:function:books", "Runtime": "go1.x", "Role": "arn:aws:iam::account-id:role/lambda-books-executor", "Handler": "main", "CodeSize": 2791699, "Description": "", "Timeout": 3, "MemorySize": 128, "LastModified": "2018-04-05T10:25:05.343+0000", "CodeSha256": "O20RZcdJTVcpEiJiEwGL2bX1PtJ/GcdkusIEyeO9l+8=", "Version": "$LATEST", "TracingConfig": { "Mode": "PassThrough" } } So there it is. Our lambda function has been deployed and is now ready to use. You can try it out by using the aws lambda invoke command (which requires you to specify an output file for the response — I've used /tmp/output.json in the snippet below). $ aws lambda invoke --function-name books /tmp/output.json { "StatusCode": 200 } $ cat /tmp/output.json {"isbn":"978-1420931693","title":"The Republic","author":"Plato"} If you're following along hopefully you've got the same response. Notice how the book object we initialized in our Go code has been automatically marshaled to JSON? Hooking it up to DynamoDB In this section we're going to add a persistence layer for our data which can be accessed by our lambda function. For this I'll use Amazon DynamoDB (it integrates nicely with AWS lambda and has a generous free-usage tier). If you're not familiar with DynamoDB, there's a decent run down of the basics here. The first thing we need to do is create a Books table to hold the book records. DynanmoDB is schema-less, but we do need to define the partion key (a bit like a primary key) on the ISBN field. We can do this in one command like so: $ aws dynamodb create-table --table-name Books \ --attribute-definitions AttributeName=ISBN,AttributeType=S \ --key-schema AttributeName=ISBN,KeyType=HASH \ --provisioned-throughput ReadCapacityUnits=5,WriteCapacityUnits=5 { "TableDescription": { "AttributeDefinitions": [ { "AttributeName": "ISBN", "AttributeType": "S" } ], "TableName": "Books", "KeySchema": [ { "AttributeName": "ISBN", "KeyType": "HASH" } ], "TableStatus": "CREATING", "CreationDateTime": 1522924177.507, "ProvisionedThroughput": { "NumberOfDecreasesToday": 0, "ReadCapacityUnits": 5, "WriteCapacityUnits": 5 }, "TableSizeBytes": 0, "ItemCount": 0, "TableArn": "arn:aws:dynamodb:us-east-1:account-id:table/Books" } } Then lets add a couple of items using the put-item command, which we'll use in the next steps. $ aws dynamodb put-item --table-name Books --item '{"ISBN": {"S": "978-1420931693"}, "Title": {"S": "The Republic"}, "Author": {"S": "Plato"}}' $ aws dynamodb put-item --table-name Books --item '{"ISBN": {"S": "978-0486298238"}, "Title": {"S": "Meditations"}, "Author": {"S": "Marcus Aurelius"}}' The next thing to do is update our Go code so that our lambda handler can connect to and use the DynamoDB layer. For this you'll need to install the github.com/aws/aws-sdk-go package which provides libraries for working with DynamoDB (and other AWS services). $ go get github.com/aws/aws-sdk-go Now for the code. To keep a bit of separation create a new db.go file in your books repository: $ touch ~/go/src/books/db.go And add the following code: File: books/db.gopackage main import ( "github.com/aws/aws-sdk-go/aws" "github.com/aws/aws-sdk-go/aws/session" "github.com/aws/aws-sdk-go/service/dynamodb" "github.com/aws/aws-sdk-go/service/dynamodb/dynamodbattribute" ) // Declare a new DynamoDB instance. Note that this is safe for concurrent // use. var db = dynamodb.New(session.New(), aws.NewConfig().WithRegion("us-east-1")) func getItem(isbn string) (*book, error) { // Prepare the input for the query. input := &dynamodb.GetItemInput{ TableName: aws.String("Books"), Key: map[string]*dynamodb.AttributeValue{ "ISBN": { S: aws.String(isbn), }, }, } // Retrieve the item from DynamoDB. If no matching item is found // return nil. result, err := db.GetItem(input) if err != nil { return nil, err } if result.Item == nil { return nil, nil } // The result.Item object returned has the underlying type // map[string]*AttributeValue. We can use the UnmarshalMap helper // to parse this straight into the fields of a struct. Note: // UnmarshalListOfMaps also exists if you are working with multiple // items. bk := new(book) err = dynamodbattribute.UnmarshalMap(result.Item, bk) if err != nil { return nil, err } return bk, nil } And then update the main.go to use this new code: File: books/main.gopackage main import ( "github.com/aws/aws-lambda-go/lambda" ) type book struct { ISBN string `json:"isbn"` Title string `json:"title"` Author string `json:"author"` } func show() (*book, error) { // Fetch a specific book record from the DynamoDB database. We'll // make this more dynamic in the next section. bk, err := getItem("978-0486298238") if err != nil { return nil, err } return bk, nil } func main() { lambda.Start(show) } Save the files, then rebuild and zip up the lambda function so it's ready to deploy: $ env GOOS=linux GOARCH=amd64 go build -o /tmp/main books $ zip -j /tmp/main.zip /tmp/main Re-deploying a lambda function is easier than creating it for the first time — we can use the aws lambda update-function-code command like so: $ aws lambda update-function-code --function-name books \ --zip-file fileb:///tmp/main.zip Let's try executing the lambda function now: $ aws lambda invoke --function-name books /tmp/output.json { "StatusCode": 200, "FunctionError": "Unhandled" } $ cat /tmp/output.json {"errorMessage":"AccessDeniedException: User: arn:aws:sts::account-id:assumed-role/lambda-books-executor/books is not authorized to perform: dynamodb:GetItem on resource: arn:aws:dynamodb:us-east-1:account-id:table/Books\n\tstatus code: 400, request id: 2QSB5UUST6F0R3UDSVVVODTES3VV4KQNSO5AEMVJF66Q9ASUAAJG","errorType":"requestError"} Ah. There's a slight problem. We can see from the output message that our lambda function (specifically, the lambda-books-executor role) doesn't have the necessary permissions to run GetItem on a DynamoDB instance. Let's fix that now. Create a privilege policy file that gives GetItem and PutItem privileges on DynamoDB like so: File: /tmp/privilege-policy.json{ "Version": "2012-10-17", "Statement": [ { "Effect": "Allow", "Action": [ "dynamodb:PutItem", "dynamodb:GetItem", ], "Resource": "*" } ] } And then attach it to the lambda-books-executor role using the aws iam put-role-policy command: $ aws iam put-role-policy --role-name lambda-books-executor \ --policy-name dynamodb-item-crud-role \ --policy-document file:///tmp/privilege-policy.json As a side note, AWS has some managed policies called AWSLambdaDynamoDBExecutionRole and AWSLambdaInvocation-DynamoDB which sound like they would do the trick. But neither of them actually provide GetItem or PutItem privileges. Hence the need to roll our own policy. Let's try executing the lambda function again. It should work smoothly this time and return information about the book with ISBN 978-0486298238. $ aws lambda invoke --function-name books /tmp/output.json { "StatusCode": 200 } $ cat /tmp/output.json {"isbn":"978-0486298238","title":"Meditations","author":"Marcus Aurelius"} Setting up the HTTPS API So our lambda function is now working nicely and communicating with DynamoDB. The next thing to do is set up a way to access the lamdba function over HTTPS, which we can do using the AWS API Gateway service. But before we go any further, it's worth taking a moment to think about the structure of our project. Let's say we have grand plans for our lamdba function to be part of a bigger bookstore API which deals with information about books, customers, recommendations and other things. There's three basic options for structuring this using AWS Lambda: Microservice style — Each lambda function is responsible for one action only. For example, there are 3 separate lambda functions for showing, creating and deleting a book. Service style — Each lambda function is responsible for a group of related actions. For example, one lambda function handles all book-related actions, but customer-related actions are kept in a separate lambda function. Monolith style — One lambda function manages all the bookstore actions. Each of these options is valid, and theres some good discussion of the pros and cons here. For this tutorial we'll opt for a service style, and have one books lambda function handle the different book-related actions. This means that we'll need to implement some form of routing within our lambda function, which I'll cover later in the post. But for now… Go ahead and create a bookstore API using the aws apigateway create-rest-api command like so: $ aws apigateway create-rest-api --name bookstore { "id": "rest-api-id", "name": "bookstore", "createdDate": 1522926250 } Note down the rest-api-id value that this returns, we'll be using it a lot in the next few steps. Next we need to get the id of the root API resource ("/"). We can retrieve this using the aws apigateway get-resources command like so: $ aws apigateway get-resources --rest-api-id rest-api-id { "items": [ { "id": "root-path-id", "path": "/" } ] } Again, keep a note of the root-path-id value this returns. Now we need to create a new resource under the root path — specifically a resource for the URL path /books. We can do this by using the aws apigateway create-resource command with the --path-part parameter like so: $ aws apigateway create-resource --rest-api-id rest-api-id \ --parent-id root-path-id --path-part books { "id": "resource-id", "parentId": "root-path-id", "pathPart": "books", "path": "/books" } Again, note the resource-id this returns, we'll need it in the next step. Note that it's possible to include placeholders within your path by wrapping part of the path in curly braces. For example, a --path-part parameter of books/{id} would match requests to /books/foo and /books/bar, and the value of id would be made available to your lambda function via an events object (which we'll cover later in the post). You can also make a placeholder greedy by postfixing it with a +. A common idiom is to use the parameter --path-part {proxy+} if you want to match all requests regardless of their path. But we're not doing either of those things. Let's get back to our /books resource and use the aws apigateway put-method command to register the HTTP method of ANY. This will mean that our /books resource will respond to all requests regardless of their HTTP method. $ aws apigateway put-method --rest-api-id rest-api-id \ --resource-id resource-id --http-method ANY \ --authorization-type NONE { "httpMethod": "ANY", "authorizationType": "NONE", "apiKeyRequired": false } Now we're all set to integrate the resource with our lambda function, which we can do using the aws apigateway put-integration command. This command has a few parameters that need a quick explanation: The --type parameter should be AWS_PROXY. When this is used the AWS API Gateway will send information about the HTTP request as an 'event' to the lambda function. It will also automatically transform the output from the lambda function to a HTTP response. The --integration-http-method parameter must be POST. Don't confuse this with what HTTP methods your API resource responds to. The --uri parameter needs to take the format: arn:aws:apigateway:us-east-1:lambda:path/2015-03-31/functions/your-lambda-function-arn/invocations With those things in mind, your command should look a bit like this: $ aws apigateway put-integration --rest-api-id rest-api-id \ --resource-id resource-id --http-method ANY --type AWS_PROXY \ --integration-http-method POST \ --uri arn:aws:apigateway:us-east-1:lambda:path/2015-03-31/functions/arn:aws:lambda:us-east-1:account-id:function:books/invocations { "type": "AWS_PROXY", "httpMethod": "POST", "uri": "arn:aws:apigateway:us-east-1:lambda:path/2015-03-31/functions/arn:aws:lambda:us-east-1:account-id:function:books/invocations", "passthroughBehavior": "WHEN_NO_MATCH", "cacheNamespace": "qtdn5h", "cacheKeyParameters": [] } Alright, let's give this a whirl. We can send a test request to the resource we just made using the aws apigateway test-invoke-method command like so: $ aws apigateway test-invoke-method --rest-api-id rest-api-id --resource-id resource-id --http-method "GET" { "status": 500, "body": "{\"message\": \"Internal server error\"}", "headers": {}, "log": "Execution log for request test-request\nThu Apr 05 11:07:54 UTC 2018 : Starting execution for request: test-invoke-request\nThu Apr 05 11:07:54 UTC 2018 : HTTP Method: GET, Resource Path: /books\nThu Apr 05 11:07:54 UTC 2018 : Method request path: {}[TRUNCATED]Thu Apr 05 11:07:54 UTC 2018 : Sending request to https://lambda.us-east-1.amazonaws.com/2015-03-31/functions/arn:aws:lambda:us-east-1:account-id:function:books/invocations\nThu Apr 05 11:07:54 UTC 2018 : Execution failed due to configuration error: Invalid permissions on Lambda function\nThu Apr 05 11:07:54 UTC 2018 : Method completed with status: 500\n", "latency": 39 } Ah. So that hasn't quite worked. If you take a look through the outputted log information you should see that the problem appears to be: Execution failed due to configuration error: Invalid permissions on Lambda function This is happening because our bookstore API gateway doesn't have permissions to execute our lambda function. The easiest way to fix that is to use the aws lambda add-permission command to give our API permissions to invoke it, like so: $ aws lambda add-permission --function-name books --statement-id a-GUID \ --action lambda:InvokeFunction --principal apigateway.amazonaws.com \ --source-arn arn:aws:execute-api:us-east-1:account-id:rest-api-id/*/*/* { "Statement": "{\"Sid\":\"6d658ce7-3899-4de2-bfd4-fefb939f731\",\"Effect\":\"Allow\",\"Principal\":{\"Service\":\"apigateway.amazonaws.com\"},\"Action\":\"lambda:InvokeFunction\",\"Resource\":\"arn:aws:lambda:us-east-1:account-id:function:books\",\"Condition\":{\"ArnLike\":{\"AWS:SourceArn\":\"arn:aws:execute-api:us-east-1:account-id:rest-api-id/*/*/*\"}}}" } Note that the --statement-id parameter needs to be a globally unique identifier. This could be a random ID or something more descriptive. Alright, let's try again: $ aws apigateway test-invoke-method --rest-api-id rest-api-id --resource-id resource-id --http-method "GET" { "status": 502, "body": "{\"message\": \"Internal server error\"}", "headers": {}, "log": "Execution log for request test-request\nThu Apr 05 11:12:53 UTC 2018 : Starting execution for request: test-invoke-request\nThu Apr 05 11:12:53 UTC 2018 : HTTP Method: GET, Resource Path: /books\nThu Apr 05 11:12:53 UTC 2018 : Method request path: {}\nThu Apr 05 11:12:53 UTC 2018 : Method request query string: {}\nThu Apr 05 11:12:53 UTC 2018 : Method request headers: {}\nThu Apr 05 11:12:53 UTC 2018 : Endpoint response body before transformations: {\"isbn\":\"978-0486298238\",\"title\":\"Meditations\",\"author\":\"Marcus Aurelius\"}\nThu Apr 05 11:12:53 UTC 2018 : Endpoint response headers: {X-Amz-Executed-Version=$LATEST, x-amzn-Remapped-Content-Length=0, Connection=keep-alive, x-amzn-RequestId=48d29098-38c2-11e8-ae15-f13b670c5483, Content-Length=74, Date=Thu, 05 Apr 2018 11:12:53 GMT, X-Amzn-Trace-Id=root=1-5ac604b5-cf29dd70cd08358f89853b96;sampled=0, Content-Type=application/json}\nThu Apr 05 11:12:53 UTC 2018 : Execution failed due to configuration error: Malformed Lambda proxy response\nThu Apr 05 11:12:53 UTC 2018 : Method completed with status: 502\n", "latency": 211 } So unfortunately there's still an error, but the message has now changed: Execution failed due to configuration error: Malformed Lambda proxy response And if you look closely at the output you'll see the information: Endpoint response body before transformations: {\"isbn\":\"978-0486298238\",\"title\":\"Meditations\",\"author\":\"Marcus Aurelius\"} So there's some definite progress here. Our API is talking to our lambda function and is receiving the correct response (a book object marshalled to JSON). It's just that the AWS API Gateway considers the response to be in the wrong format. This is because, when you're using the API Gateway's lambda proxy integration, the return value from the lambda function must be in the following JSON format: { "isBase64Encoded": true|false, "statusCode": httpStatusCode, "headers": { "headerName": "headerValue", ... }, "body": "..." } So to fix this it's time to head back to our Go code and make some alterations. Working with events The easiest way to provide the responses that the AWS API Gateway needs is to install the github.com/aws/aws-lambda-go/events package: go get github.com/aws/aws-lambda-go/events This provides a couple of useful types (APIGatewayProxyRequest and APIGatewayProxyResponse) which contain information about incoming HTTP requests and allow us to construct responses that the API Gateway understands. type APIGatewayProxyRequest struct { Resource string `json:"resource"` // The resource path defined in API Gateway Path string `json:"path"` // The url path for the caller HTTPMethod string `json:"httpMethod"` Headers map[string]string `json:"headers"` QueryStringParameters map[string]string `json:"queryStringParameters"` PathParameters map[string]string `json:"pathParameters"` StageVariables map[string]string `json:"stageVariables"` RequestContext APIGatewayProxyRequestContext `json:"requestContext"` Body string `json:"body"` IsBase64Encoded bool `json:"isBase64Encoded,omitempty"` } type APIGatewayProxyResponse struct { StatusCode int `json:"statusCode"` Headers map[string]string `json:"headers"` Body string `json:"body"` IsBase64Encoded bool `json:"isBase64Encoded,omitempty"` } Let's go back to our main.go file and update our lambda handler so that it uses the signature: func(events.APIGatewayProxyRequest) (events.APIGatewayProxyResponse, error) Essentially, the handler will accept a APIGatewayProxyRequest object which contains a bunch of information about the HTTP request, and return a APIGatewayProxyResponse object (which is marshalable into a JSON response suitable for the AWS API Gateway). File: books/main.gopackage main import ( "encoding/json" "fmt" "log" "net/http" "os" "regexp" "github.com/aws/aws-lambda-go/events" "github.com/aws/aws-lambda-go/lambda" ) var isbnRegexp = regexp.MustCompile(`[0-9]{3}\-[0-9]{10}`) var errorLogger = log.New(os.Stderr, "ERROR ", log.Llongfile) type book struct { ISBN string `json:"isbn"` Title string `json:"title"` Author string `json:"author"` } func show(req events.APIGatewayProxyRequest) (events.APIGatewayProxyResponse, error) { // Get the `isbn` query string parameter from the request and // validate it. isbn := req.QueryStringParameters["isbn"] if !isbnRegexp.MatchString(isbn) { return clientError(http.StatusBadRequest) } // Fetch the book record from the database based on the isbn value. bk, err := getItem(isbn) if err != nil { return serverError(err) } if bk == nil { return clientError(http.StatusNotFound) } // The APIGatewayProxyResponse.Body field needs to be a string, so // we marshal the book record into JSON. js, err := json.Marshal(bk) if err != nil { return serverError(err) } // Return a response with a 200 OK status and the JSON book record // as the body. return events.APIGatewayProxyResponse{ StatusCode: http.StatusOK, Body: string(js), }, nil } // Add a helper for handling errors. This logs any error to os.Stderr // and returns a 500 Internal Server Error response that the AWS API // Gateway understands. func serverError(err error) (events.APIGatewayProxyResponse, error) { errorLogger.Println(err.Error()) return events.APIGatewayProxyResponse{ StatusCode: http.StatusInternalServerError, Body: http.StatusText(http.StatusInternalServerError), }, nil } // Similarly add a helper for send responses relating to client errors. func clientError(status int) (events.APIGatewayProxyResponse, error) { return events.APIGatewayProxyResponse{ StatusCode: status, Body: http.StatusText(status), }, nil } func main() { lambda.Start(show) } Notice how in all cases the error value returned from our lambda handler is now nil? We have to do this because the API Gateway doesn't accept error objects when you're using it in conjunction with a lambda proxy integration (they would result in a 'malformed response' errors again). So we need to manage errors fully within our lambda function and return the appropriate HTTP response. In essence, this means that the return parameter of error is superfluous, but we still need to include it to have a valid signature for the lambda function. Anyway, save the file and rebuild and redeploy the lambda function: $ env GOOS=linux GOARCH=amd64 go build -o /tmp/main books $ zip -j /tmp/main.zip /tmp/main $ aws lambda update-function-code --function-name books \ --zip-file fileb:///tmp/main.zip And if you test it again now it should work as expected. Give it a try with different isbn values in the query string: $ aws apigateway test-invoke-method --rest-api-id rest-api-id \ --resource-id resource-id --http-method "GET" \ --path-with-query-string "/books?isbn=978-1420931693" { "status": 200, "body": "{\"isbn\":\"978-1420931693\",\"title\":\"The Republic\",\"author\":\"Plato\"}", "headers": { "X-Amzn-Trace-Id": "sampled=0;root=1-5ac60df0-0ea7a560337129d1fde588cd" }, "log": [TRUNCATED], "latency": 1232 } $ aws apigateway test-invoke-method --rest-api-id rest-api-id \ --resource-id resource-id --http-method "GET" \ --path-with-query-string "/books?isbn=foobar" { "status": 400, "body": "Bad Request", "headers": { "X-Amzn-Trace-Id": "sampled=0;root=1-5ac60e1c-72fad7cfa302fd32b0a6c702" }, "log": [TRUNCATED], "latency": 25 } As a side note, anything sent to os.Stderr will be logged to the AWS Cloudwatch service. So if you've set up an error logger like we have in the code above, you can query Cloudwatch for errors like so: $ aws logs filter-log-events --log-group-name /aws/lambda/books \ --filter-pattern "ERROR" Deploying the API Now that the API Gateway is working properly it's time to make it live. We can do this with the aws apigateway create-deployment command like so: $ aws apigateway create-deployment --rest-api-id rest-api-id \ --stage-name staging { "id": "4pdblq", "createdDate": 1522929303 } In the code above I've given the deployed API using the name staging, but you can call it anything that you wish. Once deployed your API should be accessible at the URL: https://rest-api-id.execute-api.us-east-1.amazonaws.com/staging Go ahead and give it a try using curl. It should work as you expect: $ curl https://rest-api-id.execute-api.us-east-1.amazonaws.com/staging/books?isbn=978-1420931693 {"isbn":"978-1420931693","title":"The Republic","author":"Plato"} $ curl https://rest-api-id.execute-api.us-east-1.amazonaws.com/staging/books?isbn=foobar Bad Request Supporting multiple actions Let's add support for a POST /books action. We want this to read and validate a new book record (from a JSON HTTP request body) and then add it to the DynamoDB table. Now that the different AWS services are hooked up, extending our lambda function to support additional actions is perhaps the most straightforward part of this tutorial, as it can be managed purely within our Go code. First update the db.go file to include a new putItem function like so: File: books/db.gopackage main import ( "github.com/aws/aws-sdk-go/aws" "github.com/aws/aws-sdk-go/aws/session" "github.com/aws/aws-sdk-go/service/dynamodb" "github.com/aws/aws-sdk-go/service/dynamodb/dynamodbattribute" ) var db = dynamodb.New(session.New(), aws.NewConfig().WithRegion("us-east-1")) func getItem(isbn string) (*book, error) { input := &dynamodb.GetItemInput{ TableName: aws.String("Books"), Key: map[string]*dynamodb.AttributeValue{ "ISBN": { S: aws.String(isbn), }, }, } result, err := db.GetItem(input) if err != nil { return nil, err } if result.Item == nil { return nil, nil } bk := new(book) err = dynamodbattribute.UnmarshalMap(result.Item, bk) if err != nil { return nil, err } return bk, nil } // Add a book record to DynamoDB. func putItem(bk *book) error { input := &dynamodb.PutItemInput{ TableName: aws.String("Books"), Item: map[string]*dynamodb.AttributeValue{ "ISBN": { S: aws.String(bk.ISBN), }, "Title": { S: aws.String(bk.Title), }, "Author": { S: aws.String(bk.Author), }, }, } _, err := db.PutItem(input) return err } And then update the main.go function so that the lambda.Start() method calls a new router function, which does a switch on the HTTP request method to determine which action to take. Like so: File: books/main.gopackage main import ( "encoding/json" "fmt" "log" "net/http" "os" "regexp" "github.com/aws/aws-lambda-go/events" "github.com/aws/aws-lambda-go/lambda" ) var isbnRegexp = regexp.MustCompile(`[0-9]{3}\-[0-9]{10}`) var errorLogger = log.New(os.Stderr, "ERROR ", log.Llongfile) type book struct { ISBN string `json:"isbn"` Title string `json:"title"` Author string `json:"author"` } func router(req events.APIGatewayProxyRequest) (events.APIGatewayProxyResponse, error) { switch req.HTTPMethod { case "GET": return show(req) case "POST": return create(req) default: return clientError(http.StatusMethodNotAllowed) } } func show(req events.APIGatewayProxyRequest) (events.APIGatewayProxyResponse, error) { isbn := req.QueryStringParameters["isbn"] if !isbnRegexp.MatchString(isbn) { return clientError(http.StatusBadRequest) } bk, err := getItem(isbn) if err != nil { return serverError(err) } if bk == nil { return clientError(http.StatusNotFound) } js, err := json.Marshal(bk) if err != nil { return serverError(err) } return events.APIGatewayProxyResponse{ StatusCode: http.StatusOK, Body: string(js), }, nil } func create(req events.APIGatewayProxyRequest) (events.APIGatewayProxyResponse, error) { if req.Headers["Content-Type"] != "application/json" { return clientError(http.StatusNotAcceptable) } bk := new(book) err := json.Unmarshal([]byte(req.Body), bk) if err != nil { return clientError(http.StatusUnprocessableEntity) } if !isbnRegexp.MatchString(bk.ISBN) { return clientError(http.StatusBadRequest) } if bk.Title == "" || bk.Author == "" { return clientError(http.StatusBadRequest) } err = putItem(bk) if err != nil { return serverError(err) } return events.APIGatewayProxyResponse{ StatusCode: 201, Headers: map[string]string{"Location": fmt.Sprintf("/books?isbn=%s", bk.ISBN)}, }, nil } func serverError(err error) (events.APIGatewayProxyResponse, error) { errorLogger.Println(err.Error()) return events.APIGatewayProxyResponse{ StatusCode: http.StatusInternalServerError, Body: http.StatusText(http.StatusInternalServerError), }, nil } func clientError(status int) (events.APIGatewayProxyResponse, error) { return events.APIGatewayProxyResponse{ StatusCode: status, Body: http.StatusText(status), }, nil } func main() { lambda.Start(router) } Rebuild and zip up the lambda function, then deploy it as normal: $ env GOOS=linux GOARCH=amd64 go build -o /tmp/main books $ zip -j /tmp/main.zip /tmp/main $ aws lambda update-function-code --function-name books \ --zip-file fileb:///tmp/main.zip And now when you hit the API using different HTTP methods it should call the appropriate action: $ curl -i -H "Content-Type: application/json" -X POST \ -d '{"isbn":"978-0141439587", "title":"Emma", "author": "Jane Austen"}' \ https://rest-api-id.execeast-1.amazonaws.com/staging/books HTTP/1.1 201 Created Content-Type: application/json Content-Length: 7 Connection: keep-alive Date: Thu, 05 Apr 2018 14:55:34 GMT x-amzn-RequestId: 64262aa3-38e1-11e8-825c-d7cfe4d1e7d0 x-amz-apigw-id: E33T1E3eIAMF9dw= Location: /books?isbn=978-0141439587 X-Amzn-Trace-Id: sampled=0;root=1-5ac638e5-e806a84761839bc24e234c37 X-Cache: Miss from cloudfront Via: 1.1 a22ee9ab15c998bce94f1f4d2a7792ee.cloudfront.net (CloudFront) X-Amz-Cf-Id: wSef_GJ70YB2-0VSwhUTS9x-ATB1Yq8anWuzV_PRN98k9-DkD7FOAA== $ curl https://rest-api-id.execute-api.us-east-1.amazonaws.com/staging/books?isbn=978-0141439587 {"isbn":"978-0141439587","title":"Emma","author":"Jane Austen"}
Alex Edwards Apr 10, 2018 -

A nice feature of Go's http.FileServer is that it automatically generates navigable directory listings, which look a bit like this: But for certain applications you might want to prevent this behavior and disable directory listings altogether. In this post I’m going to run through three different options for doing exactly that: Using index.html files Using middleware Using a custom filesystem Using index.html files Before http.FileServer generates a directory listing it checks for the existence of an index.html file in the directory root. If an index.html file exists, then it will respond with the contents of the file instead. So it follows that a simple way to disable directory listings is to add a blank index.html file to your root static file directory and all sub-directories, like so: . ├── main.go └── static ├── css │ ├── index.html │ └── main.css ├── img │ ├── index.html │ └── logo.png ├── index.html └── robots.txt If you've got a lot of sub-directories an easy way to do that is with a one-line command like this: $ find ./static/ -type d -exec touch {}/index.html \; Any requests for a directory should now result in an empty 200 OK response for the user, instead of a directory listing. For example: $ curl -i http://localhost:4000/static/img/ HTTP/1.1 200 OK Accept-Ranges: bytes Content-Length: 0 Content-Type: text/html; charset=utf-8 Last-Modified: Tue, 13 Mar 2018 12:41:10 GMT Date: Tue, 13 Mar 2018 12:42:35 GMT Or without the trailing slash, the user should get a 301 Redirect like so: $ curl -i http://localhost:4000/static/img HTTP/1.1 301 Moved Permanently Location: /static/img/ Date: Tue, 13 Mar 2018 12:43:13 GMT Content-Length: 43 Content-Type: text/html; charset=utf-8 <a href="/static/img/">Moved Permanently</a>. This is a good-enough solution if you can't (or don't want to) make any changes to your Go application itself. But it's not perfect. You'll need to remember to add a blank index.html file for any new sub-directories in the future, and many people — myself included — would argue that a 403 Forbidden or 404 Not Found status would be more appropriate than sending the user an empty 200 OK response. Using middleware Both of these imperfections can be addressed if we take a different approach and implement some custom middleware to intercept requests before they reach the http.FileServer. Essentially, we want the middleware to check if the request URL ends with a / character, and if it does, return a 404 Not Found response instead of passing on the request to the http.FileServer. Here's a basic implementation: package main import ( "log" "net/http" "strings" ) func main() { mux := http.NewServeMux() fileServer := http.FileServer(http.Dir("./static")) mux.Handle("/static/", http.StripPrefix("/static", neuter(fileServer))) err := http.ListenAndServe(":4000", mux) log.Fatal(err) } func neuter(next http.Handler) http.Handler { return http.HandlerFunc(func(w http.ResponseWriter, r *http.Request) { if strings.HasSuffix(r.URL.Path, "/") { http.NotFound(w, r) return } next.ServeHTTP(w, r) }) } This approach would result in a user getting responses like these: $ curl -i http://localhost:4000/static/img/ HTTP/1.1 404 Not Found Content-Type: text/plain; charset=utf-8 X-Content-Type-Options: nosniff Date: Tue, 13 Mar 2018 12:46:20 GMT Content-Length: 19 404 page not found $ curl -i http://localhost:4000/static/img HTTP/1.1 301 Moved Permanently Location: /static/img/ Date: Tue, 13 Mar 2018 12:46:55 GMT Content-Length: 43 Content-Type: text/html; charset=utf-8 <a href="/static/img/">Moved Permanently</a>. To me, this feels like a cleaner and easier-to-maintain way to disable directory listings than using blank index.html files. But again, it's still not perfect. Firstly, requests for any directories without the trailing slash will be 301 redirected only to receive a 404 Not Found response. It's extra, unnecessary, requests for both the client and server to deal with. Secondly, if one of your directories does contain an index.html file then it won't ever be used. For example, if you have the directory structure... . ├── main.go └── static ├── css │ ├── index.html │ └── main.css ├── img │ └── logo.png └── robots.txt ... any request to http://localhost:4000/static/css/ will result in a 404 Not Found response instead of returning the contents of the /static/css/index.html file. $ curl -i http://localhost:4000/static/css/ HTTP/1.1 404 Not Found Content-Type: text/plain; charset=utf-8 X-Content-Type-Options: nosniff Date: Tue, 13 Mar 2018 12:51:09 GMT Content-Length: 19 404 page not found Using a custom filesystem The final option we're going to look at is creating a custom filesystem and passing that to your http.FileServer. There are a couple of approaches described by Brad Fitzpatrick and George Armhold you might want to consider, but I would personally suggest doing something like this: package main import ( "log" "net/http" "path/filepath" ) func main() { mux := http.NewServeMux() fileServer := http.FileServer(neuteredFileSystem{http.Dir("./static")}) mux.Handle("/static", http.NotFoundHandler()) mux.Handle("/static/", http.StripPrefix("/static", fileServer)) err := http.ListenAndServe(":4000", mux) log.Fatal(err) } type neuteredFileSystem struct { fs http.FileSystem } func (nfs neuteredFileSystem) Open(path string) (http.File, error) { f, err := nfs.fs.Open(path) if err != nil { return nil, err } s, err := f.Stat() if s.IsDir() { index := filepath.Join(path, "index.html") if _, err := nfs.fs.Open(index); err != nil { closeErr := f.Close() if closeErr != nil { return nil, closeErr } return nil, err } } return f, nil } In this code we're creating a custom neuteredFileSystem type which embeds the standard http.FileSystem. We then implement an Open() method on it — which gets called each time our http.FileServer receives a request. In our Open() method we Stat() the requested file path and use the IsDir() method to check whether it's a directory or not. If it is a directory we then try to Open() any index.html file in it. If no index.html file exists, then this will return a os.ErrNotExist error (which in turn we return and it will be transformed into a 404 Not Found response by http.Fileserver). We also call Close() on the original file to avoid a file descriptor leak. Otherwise, we just return the file and let http.FileServer do its thing. Putting this to use with the directory structure... . ├── main.go └── static ├── css │ ├── index.html │ └── main.css ├── img │ └── logo.png └── robots.txt ...would result in responses like: $ curl -i http://localhost:4000/static/img/ HTTP/1.1 404 Not Found Content-Type: text/plain; charset=utf-8 X-Content-Type-Options: nosniff Date: Tue, 13 Mar 2018 16:53:21 GMT Content-Length: 19 404 page not found $ curl -i http://localhost:4000/static/img HTTP/1.1 404 Not Found Content-Type: text/plain; charset=utf-8 X-Content-Type-Options: nosniff Date: Tue, 13 Mar 2018 16:53:22 GMT Content-Length: 19 404 page not found $ curl -i http://localhost:4000/static/css/ HTTP/1.1 200 OK Accept-Ranges: bytes Content-Length: 37 Content-Type: text/html; charset=utf-8 Last-Modified: Tue, 13 Mar 2018 12:49:00 GMT Date: Tue, 13 Mar 2018 16:53:27 GMT <h1>This is my custom index page</h1> This is now working pretty nicely: All requests for directories (with no index.html file) return a 404 Not Found response, instead of a directory listing or a redirect. This works for requests both with and without a trailing slash. The default behavior of http.FileServer isn't changed any other way, and index.html files work as per the standard library documentation.
Alex Edwards Mar 14, 2018 -
There are a lot of good tutorials which talk about Go's sql.DB type and how to use it to execute SQL database queries and statements. But most of them gloss over the SetMaxOpenConns(), SetMaxIdleConns() and SetConnMaxLifetime() methods — which you can use to configure the behavior of sql.DB and alter its performance. In this post I'd like to explain exactly what these settings do and demonstrate the (positive and negative) impact that they can have. Open and idle connections I'll begin with a little background. A sql.DB object is a pool of many database connections which contains both 'in-use' and 'idle' connections. A connection is marked as in-use when you are using it to perform a database task, such as executing a SQL statement or querying rows. When the task is complete the connection is marked as idle. When you instruct sql.DB to perform a database task, it will first check if any idle connections are already available in the pool. If one is available then Go will reuse this existing connection and mark it as in-use for the duration of the task. If there are no idle connections in the pool when you need one, then Go will create an additional new additional connection. The SetMaxOpenConns method By default there's no limit on the number of open connections (in-use + idle) at the same time. But you can implement your own limit via the SetMaxOpenConns() method like so: // Initialise a new connection pool db, err := sql.Open("postgres", "postgres://user:pass@localhost/db") if err != nil { log.Fatal(err) } // Set the maximum number of concurrently open connections (in-use + idle) // to 5. Setting this to less than or equal to 0 will mean there is no // maximum limit (which is also the default setting). db.SetMaxOpenConns(5) In this example code the pool now has a maximum limit of 5 concurrently open connections. If all 5 connections are already marked as in-use and another new connection is needed, then the application will be forced to wait until one of the 5 connections is freed up and becomes idle. To illustrate the impact of changing MaxOpenConns I ran a benchmark test with the maximum open connections set to 1, 2, 5, 10 and unlimited. The benchmark executes parallel INSERT statements on a PostgreSQL database and you can find the code in this gist. Here's the results: BenchmarkMaxOpenConns1-8 500 3129633 ns/op 478 B/op 10 allocs/op BenchmarkMaxOpenConns2-8 1000 2181641 ns/op 470 B/op 10 allocs/op BenchmarkMaxOpenConns5-8 2000 859654 ns/op 493 B/op 10 allocs/op BenchmarkMaxOpenConns10-8 2000 545394 ns/op 510 B/op 10 allocs/op BenchmarkMaxOpenConnsUnlimited-8 2000 531030 ns/op 479 B/op 9 allocs/op PASS Edit: To make clear, the purpose of this benchmark is not to simulate 'real-life' behaviour of an application. It's solely to help illustrate how sql.DB behaves behind the scenes and the impact of changing MaxOpenConns on that behaviour. For this benchmark we can see that the more open connections that are allowed, the less time is taken to perform the INSERT on the database (3129633 ns/op with 1 open connection compared to 531030 ns/op for unlimited connections — about 6 times quicker). This is because the more open connections that are permitted, the more database queries can be performed concurrently. The SetMaxIdleConns method By default sql.DB allows a maximum of 2 idle connections to be retained in the connection pool. You can change this via the SetMaxIdleConns() method like so: // Initialise a new connection pool db, err := sql.Open("postgres", "postgres://user:pass@localhost/db") if err != nil { log.Fatal(err) } // Set the maximum number of concurrently idle connections to 5. Setting this // to less than or equal to 0 will mean that no idle connections are retained. db.SetMaxIdleConns(5) In theory, allowing a higher number of idle connections in the pool will improve performance because it makes it less likely that a new connection will need to be established from scratch — therefore helping to save resources. Lets take a look at the same benchmark with the maximum idle connections is set to none, 1, 2, 5 and 10 (and the number of open connections is unlimited): BenchmarkMaxIdleConnsNone-8 300 4567245 ns/op 58174 B/op 625 allocs/op BenchmarkMaxIdleConns1-8 2000 568765 ns/op 2596 B/op 32 allocs/op BenchmarkMaxIdleConns2-8 2000 529359 ns/op 596 B/op 11 allocs/op BenchmarkMaxIdleConns5-8 2000 506207 ns/op 451 B/op 9 allocs/op BenchmarkMaxIdleConns10-8 2000 501639 ns/op 450 B/op 9 allocs/op PASS When MaxIdleConns is set to none, a new connection has to be created from scratch for each INSERT and we can see from the benchmarks that the average runtime and memory usage is comparatively high. Allowing just 1 idle connection to be retained and reused makes a massive difference to this particular benchmark — it cuts the average runtime by about 8 times and reduces memory usage by about 20 times. Going on to increase the size of the idle connection pool makes the performance even better, although the improvements are less pronounced. So should you maintain a large idle connection pool? The answer is it depends on the application. It's important to realise that keeping an idle connection alive comes at a cost — it takes up memory which can otherwise be used for both your application and the database. It's also possible that if a connection is idle for too long then it may become unusable. For example, MySQL's wait_timeout setting will automatically close any connections that haven't been used for 8 hours (by default). When this happens sql.DB handles it gracefully. Bad connections will automatically be retried twice before giving up, at which point Go will remove the connection from the pool and create a new one. So setting MaxIdleConns too high may actually result in connections becoming unusable and more resources being used than if you had a smaller idle connection pool (with fewer connections that are used more frequently). So really you only want to keep a connection idle if you're likely to be using it again soon. One last thing to point out is that MaxIdleConns should always be less than or equal to MaxOpenConns. Go enforces this and will automatically reduce MaxIdleConns if necessary. The SetConnMaxLifetime method Let's now take a look at the SetConnMaxLifetime() method which sets the maximum length of time that a connection can be reused for. This can be useful if your SQL database also implements a maximum connection lifetime or if — for example — you want to facilitate gracefully swapping databases behind a load balancer. You use it like this: // Initialise a new connection pool db, err := sql.Open("postgres", "postgres://user:pass@localhost/db") if err != nil { log.Fatal(err) } // Set the maximum lifetime of a connection to 1 hour. Setting it to 0 // means that there is no maximum lifetime and the connection is reused // forever (which is the default behavior). db.SetConnMaxLifetime(time.Hour) In this example all our connections will 'expire' 1 hour after they were first created, and cannot be reused after they've expired. But note: This doesn't guarantee that a connection will exist in the pool for a whole hour; it's quite possible that the connection will have become unusable for some reason and been automatically closed before then. A connection can still be in use more than one hour after being created — it just cannot start to be reused after that time. This isn't an idle timeout. The connection will expire 1 hour after it was first created — not 1 hour after it last became idle. Once every second a cleanup operation is automatically run to remove 'expired' connections from the pool. In theory, the shorter ConnMaxLifetime is the more often connections will expire — and consequently — the more often they will need to be created from scratch. To illustrate this I ran the benchmarks with ConnMaxLifetime set to 100ms, 200ms, 500ms, 1000ms and unlimited (reused forever), with the default settings of unlimited open connections and 2 idle connections. These time periods are obviously much, much shorter than you'd use in most applications but they help illustrate the behaviour well. BenchmarkConnMaxLifetime100-8 2000 637902 ns/op 2770 B/op 34 allocs/op BenchmarkConnMaxLifetime200-8 2000 576053 ns/op 1612 B/op 21 allocs/op BenchmarkConnMaxLifetime500-8 2000 558297 ns/op 913 B/op 14 allocs/op BenchmarkConnMaxLifetime1000-8 2000 543601 ns/op 740 B/op 12 allocs/op BenchmarkConnMaxLifetimeUnlimited-8 3000 532789 ns/op 412 B/op 9 allocs/op PASS In these particular benchmarks we can see that memory usage was more than 3 times greater with a 100ms lifetime compared to an unlimited lifetime, and the average runtime for each INSERT was also slightly longer. If you do set ConnMaxLifetime in your code, it is important to bear in mind the frequency at which connections will expire (and subsequently be recreated). For example, if you have 100 total connections and a ConnMaxLifetime of 1 minute, then your application can potentially kill and recreate up to 1.67 connections (on average) every second. You don't want this frequency to be so great that it ultimately hinders performance, rather than helping it. Exceeding connection limits Lastly, this article wouldn't be complete without mentioning what happens if you exceed a hard limit on the number of database connections. As an illustration, I'll change my postgresql.conf file so only a total of 5 connections are permitted (the default is 100)... max_connections = 5 And then rerun the benchmark test with unlimited open connections... BenchmarkMaxOpenConnsUnlimited-8 --- FAIL: BenchmarkMaxOpenConnsUnlimited-8 main_test.go:14: pq: sorry, too many clients already main_test.go:14: pq: sorry, too many clients already main_test.go:14: pq: sorry, too many clients already FAIL As soon as the hard limit of 5 connections is hit my database driver (pq) immediately returns a sorry, too many clients already error message instead of completing the INSERT. To prevent this error we need to set the total maximum of open connections (in-use + idle) in sql.DB to comfortably below 5. Like so: // Initialise a new connection pool db, err := sql.Open("postgres", "postgres://user:pass@localhost/db") if err != nil { log.Fatal(err) } // Set the number of open connections (in-use + idle) to a maximum total of 3. db.SetMaxOpenConns(3) Now there will only ever be a maximum of 3 connections created by sql.DB at any moment in time, and the benchmark should run without any errors. But doing this comes with a big caveat: when the open connection limit is reached, any new database tasks that your application needs to execute will be forced to wait until a connection becomes free. In the context of a web application, for example, the user's HTTP request would appear to 'hang' and could potentially even timeout while waiting for the database task to be run. To mitigate this you should always pass in a context.Context object with a fixed, fast, timeout when making database calls, using the context-enabled methods like ExecContext(). An example can be seen in the gist here. Summary As a rule of thumb, you should explicitly set a MaxOpenConns value. This should be comfortably below any hard limits on the number of connections imposed by your database and infrastructure. In general, higher MaxOpenConns and MaxIdleConns values will lead to better performance. But the returns are diminishing, and you should be aware that having a too-large idle connection pool (with connections that are not re-used and eventually go bad) can actually lead to reduced performance. To mitigate the risk from point 2 above, you may want to set a relatively short ConnMaxLifetime. But you don't want this to be so short that leads to connections being killed and recreated unnecessarily often. MaxIdleConns should always be less than or equal to MaxOpenConns. For small-to-medium web applications I typically use the following settings as a starting point, and then optimize from there depending on the results of load-testing with real-life levels of throughput. db.SetMaxOpenConns(25) db.SetMaxIdleConns(25) db.SetConnMaxLifetime(5*time.Minute)
Alex Edwards Feb 5, 2018 -
If you're running a HTTP server and want to rate limit user requests, the go-to package to use is probably Tollbooth by Didip Kerabat. It's well maintained, has a good range of features and a clean and clear API. But if you want something simple and lightweight – or just want to learn – it's not too difficult to roll your own middleware to handle rate limiting. In this post I'll run through the essentials of how to do that by using the x/time/rate package, which provides a token bucket rate-limiter algorithm (note: this is also used by Tollbooth behind the scenes). If you would like to follow along, create a demo directory containing two files, limit.go and main.go, and initialize a new Go module. Like so: $ mkdir ratelimit-demo $ cd ratelimit-demo $ touch limit.go main.go $ go mod init example.com/ratelimit-demo Let's start by making a global rate limiter which acts on all the requests that a HTTP server receives. Open up the limit.go file and add the following code: File: ratelimit-demo/limit.go package main import ( "net/http" "golang.org/x/time/rate" ) var limiter = rate.NewLimiter(1, 3) func limit(next http.Handler) http.Handler { return http.HandlerFunc(func(w http.ResponseWriter, r *http.Request) { if limiter.Allow() == false { http.Error(w, http.StatusText(429), http.StatusTooManyRequests) return } next.ServeHTTP(w, r) }) } In this code we've used the rate.NewLimiter() function to initialize and return a new rate limiter. Its signature looks like this: func NewLimiter(r Limit, b int) *Limiter From the documentation: A Limiter controls how frequently events are allowed to happen. It implements a "token bucket" of size b, initially full and refilled at rate r tokens per second. Or to describe it another way – the limiter permits you to consume an average of r tokens per second, with a maximum of b tokens in any single 'burst'. So in the code above our limiter allows 1 token to be consumed per second, with a maximum burst size of 3. In the limit middleware function we call the global limiter's Allow() method each time the middleware receives a HTTP request. If there are no tokens left in the bucket Allow() will return false and we send the user a 429 Too Many Requests response. Otherwise, calling Allow() will consume exactly one token from the bucket and we pass on control to the next handler in the chain. It's important to note that the code behind the Allow() method is protected by a mutex and is safe for concurrent use. Let's put this to use. Open up the main.go file and setup a simple web server which uses the limit middleware like so: File: ratelimit-demo/main.go package main import ( "log" "net/http" ) func main() { mux := http.NewServeMux() mux.HandleFunc("/", okHandler) // Wrap the servemux with the limit middleware. log.Print("Listening on :4000...") http.ListenAndServe(":4000", limit(mux)) } func okHandler(w http.ResponseWriter, r *http.Request) { w.Write([]byte("OK")) } Go ahead and run the application… $ go run . And if you make enough requests in quick succession, you should eventually get a response which looks like this: $ curl -i localhost:4000 HTTP/1.1 429 Too Many Requests Content-Type: text/plain; charset=utf-8 X-Content-Type-Options: nosniff Date: Thu, 21 Dec 2017 19:25:52 GMT Content-Length: 18 Too Many Requests Rate limiting per user While having a single, global, rate limiter is useful in some cases, another common scenario is implement a rate limiter per user, based on an identifier like IP address or API key. In this post we'll use IP address as the identifier. A conceptually straightforward way to do this is to create a map of rate limiters, using the identifier for each user as the map key. At this point you might think to reach for the sync.Map type that was introduced in Go 1.9. This essentially provides a concurrency-safe map, designed to be accessed from multiple goroutines without the risk of race conditions. But it comes with a note of caution: It is optimized for use in concurrent loops with keys that are stable over time, and either few steady-state stores, or stores localized to one goroutine per key.For use cases that do not share these attributes, it will likely have comparable or worse performance and worse type safety than an ordinary map paired with a read-write mutex. In our particular use-case the map keys will be the IP address of users, and so new keys will be added to the map each time a new user visits our application. We'll also want to prevent undue memory consumption by removing old entries from the map when a user hasn't been seen for a long period of time. So in our case the map keys won't be stable and it's likely that an ordinary map protected by a mutex will perform better. (If you're not familiar with the idea of mutexes or how to use them in Go, then this post has an explanation which you might want to read before continuing). Let's update the limit.go file to contain a basic implementation. I'll keep the code structure deliberately simple. File: ratelimit-demo/limit.go package main import ( "log" "net" "net/http" "sync" "golang.org/x/time/rate" ) // Create a map to hold the rate limiters for each visitor and a mutex. var visitors = make(map[string]*rate.Limiter) var mu sync.Mutex // Retrieve and return the rate limiter for the current visitor if it // already exists. Otherwise create a new rate limiter and add it to // the visitors map, using the IP address as the key. func getVisitor(ip string) *rate.Limiter { mu.Lock() defer mu.Unlock() limiter, exists := visitors[ip] if !exists { limiter = rate.NewLimiter(1, 3) visitors[ip] = limiter } return limiter } func limit(next http.Handler) http.Handler { return http.HandlerFunc(func(w http.ResponseWriter, r *http.Request) { // Get the IP address for the current user. ip, _, err := net.SplitHostPort(r.RemoteAddr) if err != nil { log.Print(err.Error()) http.Error(w, "Internal Server Error", http.StatusInternalServerError) return } // Call the getVisitor function to retreive the rate limiter for // the current user. limiter := getVisitor(ip) if limiter.Allow() == false { http.Error(w, http.StatusText(429), http.StatusTooManyRequests) return } next.ServeHTTP(w, r) }) } Removing old entries from the map There's one problem with this: as long as the application is running the visitors map will continue to grow unbounded. We can fix this fairly simply by recording the last seen time for each visitor and running a background goroutine to delete old entries from the map (and therefore free up memory as we go). File: ratelimit-demo/limit.go package main import ( "log" "net" "net/http" "sync" "time" "golang.org/x/time/rate" ) // Create a custom visitor struct which holds the rate limiter for each // visitor and the last time that the visitor was seen. type visitor struct { limiter *rate.Limiter lastSeen time.Time } // Change the the map to hold values of the type visitor. var visitors = make(map[string]*visitor) var mu sync.Mutex // Run a background goroutine to remove old entries from the visitors map. func init() { go cleanupVisitors() } func getVisitor(ip string) *rate.Limiter { mu.Lock() defer mu.Unlock() v, exists := visitors[ip] if !exists { limiter := rate.NewLimiter(1, 3) // Include the current time when creating a new visitor. visitors[ip] = &visitor{limiter, time.Now()} return limiter } // Update the last seen time for the visitor. v.lastSeen = time.Now() return v.limiter } // Every minute check the map for visitors that haven't been seen for // more than 3 minutes and delete the entries. func cleanupVisitors() { for { time.Sleep(time.Minute) mu.Lock() defer mu.Unlock() for ip, v := range visitors { if time.Now().Sub(v.lastSeen) > 3*time.Minute { delete(visitors, ip) } } } } func limit(next http.Handler) http.Handler { return http.HandlerFunc(func(w http.ResponseWriter, r *http.Request) { ip, _, err := net.SplitHostPort(r.RemoteAddr) if err != nil { log.Print(err.Error()) http.Error(w, "Internal Server Error", http.StatusInternalServerError) return } limiter := getVisitor(ip) if limiter.Allow() == false { http.Error(w, http.StatusText(429), http.StatusTooManyRequests) return } next.ServeHTTP(w, r) }) } Some more improvements… For simple applications this code will work fine as-is, but you may want to adapt it further depending on your needs. For example, it might make sense to: Check the X-Forwarded-For or X-Real-IP headers for the IP address, if you are running your server behind a reverse proxy. Port the code to a standalone package. Make the rate limiter and cleanup settings configurable at runtime. Remove the reliance on global variables, so that different rate limiters can be created with different settings. Switch to a sync.RWMutex to help reduce contention on the map.
Alex Edwards Dec 28, 2017 -
Over the past few years I've built up a collection of snippets for validating inputs in Go. There's nothing new or groundbreaking here, but hopefully they might save you some time. The snippets assume that the data to validate is stored as strings in r.Form, but the principles are the same no matter where the data has come from. Required inputs Blank text Min and max length (bytes) Min and max length (number of characters) Starts with, ends with and contains Matches regular expression pattern Unicode character range Email validation URL validation Integers Floats Date Datetime-local Radio, Select and Datalist (one-in-set) Checkboxes (many-in-set) Single checkbox Required inputs If you have the HTML form: <input type="text" name="foo"> You can verify that a value for the "foo" field has been submitted with: if r.Form.Get("foo") == "" { fmt.Println("error: foo is required") } For checkbox and select inputs this will ensure that at least one item has been checked. Blank text If you have the HTML form: <input type="text" name="foo"> You can verify that a value for the "foo" field isn't blank (i.e. contains whitespace only) with the strings.TrimSpace function: import "strings" ··· if strings.TrimSpace(r.Form.Get("foo")) == "" { fmt.Println("error: foo must not be blank") } Min and max length (bytes) If you have the HTML form: <input type="text" name="foo"> You can verify that the "foo" field contains a certain number of bytes with the builtin len function: l := len(r.Form.Get("foo")) if l < 5 || l > 10 { fmt.Println("error: foo must be between 5 and 10 bytes long") } Min and max length (number of characters) If you have the HTML form: <input type="text" name="foo"> You can verify that the "foo" field contains a certain number of characters with the utf8.RuneCountInString function. This is subtly different to checking the number of bytes. For example, the string "Zoë" contains 3 characters but is 4 bytes long because of the accented character. import "unicode/utf8" ··· l := utf8.RuneCountInString(r.Form.Get("foo")) if l < 5 || l > 10 { fmt.Println("error: foo must be between 5 and 10 characters long") } Starts with, ends with and contains If you have the HTML form: <input type="text" name="foo"> You can verify that the "foo" field starts with, ends with, or contains a particular string using the functions in the strings package: import "strings" ··· // Check that the field value starts with 'abc'. if !strings.HasPrefix(r.Form.Get("foo"), "abc") { fmt.Println("error: foo does not start with 'abc'") } // Check that the field value ends with 'abc'. if !strings.HasSuffix(r.Form.Get("foo"), "abc") { fmt.Println("error: foo does not end with 'abc'") } // Check that the field value contains 'abc' anywhere in it. if !strings.Contains(r.Form.Get("foo"), "abc") { fmt.Println("error: foo does not contain 'abc'") } Matches regular expression pattern If you have the HTML form: <input type="text" name="foo"> You can verify that the "foo" field matches a particular regular expression using the regexp package. For example, to check that it matches the pattern ^[a-z]{4}\.[0-9]{2}$ (four lowercase letters followed by a period and two digits): import "regexp" ··· // Pre-compiling the regular expression and storing it in a variable is more efficient // if you're going to use it multiple times. The regexp.MustCompile function will // panic on failure. var rxPat = regexp.MustCompile(`^[a-z]{4}.[0-9]{2}$`) if !rxPat.MatchString(r.Form.Get("foo")) { fmt.Println("error: foo does not match the required pattern") } Note that because the dot character has a special meaning in regular expressions, we escaped it using the \ character so it is interpreted as a literal period character instead. In the example above we also used a raw string for the regular expression. If you use an interpreted string (i.e. a string surrounded by double quotes), you need to escape the backslash too because that's the escape character for interpreted strings. So you would need to write: var rxPat = regexp.MustCompile("^[a-z]{4}\.[0-9]{2}$") If you're not familiar with regular expressions then this guide from Mozilla is a good explanation. Unicode character range If you have the HTML form: <input type="text" name="foo"> You can verify that the "foo" field only contains characters in a certain unicode range using the regexp package. For example, to check that it contains only Cyrillic characters in the two unicode blocks 0400 - 04FF (Cyrillic) and 0500 - 052F (Cyrillic Supplementary): import "regexp" ··· // Use an interpreted string and the \u escape notation to create a regular // expression matching the range of characters in the two unicode code blocks. var rxCyrillic = regexp.MustCompile("^[\u0400-\u04FF\u0500-\u052F]+$") if !rxCyrillic.MatchString(r.Form.Get("foo")) { fmt.Println("error: foo must only contain Cyrillic characters") } Email validation If you have the HTML form: <input type="email" name="foo"> You can sanity check that the "foo" field contains an email address using the regexp package. Choosing a regular expression to use for email validation is a contentious topic, but as a starting point I would suggest the pattern recommended by the W3C and Web Hypertext Application Technology Working Group. In addition, the email addresses have a practical limit of 254 bytes. Putting those together, a decent sanity check is: import "regexp" ··· var rxEmail = regexp.MustCompile("^[a-zA-Z0-9.!#$%&'*+\\/=?^_`{|}~-]+@[a-zA-Z0-9](?:[a-zA-Z0-9-]{0,61}[a-zA-Z0-9])?(?:\\.[a-zA-Z0-9](?:[a-zA-Z0-9-]{0,61}[a-zA-Z0-9])?)*$") e := r.Form.Get("foo") if len(e) > 254 || !rxEmail.MatchString(e) { fmt.Println("error: foo is not a valid email address") } Note that we have to use an interpreted string for the regular expression because it contains a backtick character (which means we can't use a raw string). URL validation If you have the HTML form: <input type="url" name="foo"> You can verify that the "foo" field contains a valid URL by first parsing it with the url.Parse function. This will take a URL string, break it into it's component pieces, and store it as a url.URL struct. You can then sanity check the component pieces as necessary. For instance, to check that a URL is absolute (i.e has both a scheme and host) and that the scheme is either http or https: import "net/url" ··· // If there are any major problems with the format of the URL, url.Parse() will // return an error. u, err := url.Parse(r.Form.Get("foo")) if err != nil { fmt.Println("error: foo is not a valid URL") } else if u.Scheme == "" || u.Host == "" { fmt.Println("error: foo must be an absolute URL") } else if u.Scheme != "http" && u.Scheme != "https" { fmt.Println("error: foo must begin with http or https") } Integers If you have the HTML form: <input type="number" name="foo" min="0" max="100" step="5"> You can verify that the "foo" field contains an integer by parsing it with the strconv.Atoi function. You can then sanity check the integer as necessary. For instance, to check that an integer is a multiple of 5 between 0 and 100: import "strconv" ··· n, err := strconv.Atoi(r.Form.Get("foo")) if err != nil { fmt.Println("error: foo must be an integer") } else if n < 0 || n > 10 { fmt.Printf("error: foo must be between 0 and 100") } else if n%5 != 0 { fmt.Println("error: foo must be an multiple of 5") } Floats If you have the HTML form: <input type="number" name="foo" min="0" max="1" step="0.01"> You can verify that the "foo" field contains an integer by parsing it with the strconv.ParseFloat function. You can then sanity check the float as necessary. For instance, to check that an float is a between 0 and 1: import "strconv" n, err := strconv.ParseFloat(r.Form.Get("foo"), 64) if err != nil { fmt.Println("error: foo must be a float") } else if n < 0 || n > 1 { fmt.Printf("error: foo must be between 0 and 1") } Date If you have the HTML form: <input type="date" name="foo" min="2017-01-01" max="2017-12-31"> You can verify that the "foo" field contains a valid date by parsing it with the time.Parse function. It will return an error if the date is not real: any day of month larger than 31 is rejected, as is February 29 in non-leap years, February 30, February 31, April 31, June 31, September 31, and November 31. If you're not familiar with time.Parse, it converts strings with a given format into a time.Time object. You specify what the format is by passing the reference time (Mon Jan 2 15:04:05 -0700 MST 2006) as the first parameter, laid-out in the format you want. If you are expecting a date in the format YYYY-MM-DD then the reference time is 2006-01-02. You can then use the various functions in the time package to sanity check the date as necessary. For instance, to check that an date is valid and between 2017-01-01 and 2017-12-31: import "time" ··· d, err := time.Parse("2006-01-02", r.Form.Get("foo")) if err != nil { fmt.Printf("error: foo is not a valid date") } else if d.Year() != 2017 { fmt.Printf("error: foo is not between 2017-01-01 and 2017-12-31") } Datetime-local If you have the HTML form: <input type="datetime-local" name="foo" min="2017-01-01" max="2017-12-31"> You can verify that the "foo" field contains a valid datetime for a specific location by parsing it with the time.ParseInLocation function. This will return an error if the date is not real: any day of month larger than 31 is rejected, as is February 29 in non-leap years, February 30, February 31, April 31, June 31, September 31, and November 31. For instance, to check that an datetime for the "Europe/Vienna" timezone is valid and between 2017-01-01 00:00 and 2017-12-31 23:59: import "time" ··· // Load the users local time zone. This accepts a location name corresponding // to a file in your IANA Time Zone database. loc, err := time.LoadLocation("Europe/Vienna") if err != nil { ··· } d, err := time.ParseInLocation("2006-01-02T15:04:05", r.Form.Get("foo"), loc) if err != nil { fmt.Printf("error: foo is not a valid datetime") } else if d.Year() != 2017 { fmt.Printf("error: foo is not between 2017-01-01 00:00:00 and 2017-12-31 23:59:00") } The time zone database needed by LoadLocation may not be present on all systems, especially non-Unix systems. LoadLocation looks in the directory or uncompressed zip file named by the ZONEINFO environment variable, if any, then looks in known installation locations on Unix systems, and finally looks in $GOROOT/lib/time/zoneinfo.zip. Radio, Select and Datalist (one-in-a-set) validation If you have the HTML form: <input type="radio" name="foo" value="wibble"> Wibble <input type="radio" name="foo" value="wobble"> Wobble <input type="radio" name="foo" value="wubble"> Wubble You can check that the submitted value for the "foo" field is one of a known set like this: set := map[string]bool{"wibble": true, "wobble": true, "wubble": true} if !set[r.Form.Get("foo")] { fmt.Printf("error: foo not match 'wibble', 'wobble' or 'wubble'") } Checkboxes (many-in-a-set) validation If you have the HTML form: <input type="checkbox" name="foo" value="wibble"> Wibble <input type="checkbox" name="foo" value="wobble"> Wobble <input type="checkbox" name="foo" value="wubble"> Wubble To validate these, and make sure that all values sent by the form are either wibble, wobble or wubble, we need to access the underlying form data directly and range over each value: You can check that the submitted values for the "foo" field are part of a known set like this: set := map[string]bool{"wibble": true, "wobble": true, "wubble": true} for _, f := range r.Form["foo"] { if !set[f] { fmt.Printf("error: foo does not match 'wibble', 'wobble' or 'wubble'") break } } Single checkboxes Sometimes you might have a single checkbox, and you want to verify that it has been checked. A common example is an "I accept the terms" checkbox on a form. If you have the HTML form: <input type="checkbox" name="foo" value="checked"> I accept the terms You can verify that it has been checked like this: if r.Form.Get("foo") != "checked" { fmt.Println("foo must be checked") }
Alex Edwards Aug 5, 2017 -
I’ve just released SCS, a session management package for Go 1.7+. Its design leverages Go’s new context package to automatically load and save session data via middleware. Importantly, it also provides the security features that you need when using server-side session stores (like straightforward session token regeneration) and supports both absolute and inactivity timeouts. The session data is safe for concurrent use. A simple example SCS is broken up into small single-purpose packages for ease of use. You should install the session package and your choice of session storage engine from the following table: Package session Provides session management middleware and helpers for manipulating session data engine/memstore In-memory storage engine engine/cookiestore Encrypted-cookie based storage engine engine/pgstore PostgreSQL based storage eninge engine/mysqlstore MySQL based storage engine engine/redisstore Redis based storage engine For example: $ go get github.com/alexedwards/scs/session $ go get github.com/alexedwards/scs/engine/memstore Usage is then simple: File: main.go package main import ( "io" "net/http" "github.com/alexedwards/scs/engine/memstore" "github.com/alexedwards/scs/session" ) func main() { // Create the session manager middleware, passing in a new storage // engine instance as the first parameter. sessionManager := session.Manage(memstore.New(0)) // Set up your HTTP handlers in the normal way. mux := http.NewServeMux() mux.HandleFunc("/put", putHandler) mux.HandleFunc("/get", getHandler) // Wrap your handlers with the session manager middleware. http.ListenAndServe(":4000", sessionManager(mux)) } func putHandler(w http.ResponseWriter, r *http.Request) { // Use the PutString helper to add a new key and associated string value // to the session data. Helpers for other types are included. err := session.PutString(r, "message", "Hello from a session!") if err != nil { http.Error(w, err.Error(), 500) } } func getHandler(w http.ResponseWriter, r *http.Request) { // Use the GetString helper to retrieve the value associated with the // "message" key. msg, err := session.GetString(r, "message") if err != nil { http.Error(w, err.Error(), 500) return } io.WriteString(w, msg) } You should be able to verify that the session data is being across requests with curl: $ curl -i -c cookies localhost:4000/put HTTP/1.1 200 OK Set-Cookie: scs.session.token=uts3FRcCMOIXpyx5uZx28Y54uUFRHxgtYhbgD4epeI4; Path=/; HttpOnly Date: Tue, 30 Aug 2016 17:37:12 GMT Content-Length: 0 Content-Type: text/plain; charset=utf-8 $ curl -i -b cookies localhost:4000/get HTTP/1.1 200 OK Date: Tue, 30 Aug 2016 17:37:21 GMT Content-Length: 21 Content-Type: text/plain; charset=utf-8 Hello from a session! The complete godocs are here. I’d love to hear any feedback – either drop me an email or open an issue on Github.
Alex Edwards Aug 30, 2016 -
In this post I'm going to be looking at using Redis as a data persistence layer for a Go application. We'll start by explaining a few of the essential concepts, and then build a working web application which highlights some techniques for using Redis in a concurrency-safe way. This post assumes a basic knowledge of Redis itself (and a working installation, if you want to follow along). If you haven't used Redis before, I highly recommend reading the Little Book of Redis by Karl Seguin or running through the Try Redis interactive tutorial. Installing a driver First up we need to install a Go driver (or client) for Redis. A list of available drivers is located at http://redis.io/clients#go. The two drivers that I would recommend are gomodule/redigo and mediocregopher/radix. They are both well designed and actively maintained. The key differences are that Redigo is completely self-contained (with no external dependencies) and it has a smaller, simpler API than Radix. Radix, on the other hand, provides support for Redis sentinel and cluster implementations. Throughout this post we'll be using the Redigo driver. Getting started with Redis and Go As an example, let's say that we have an online record shop and want to store information about the albums for sale in Redis. There's many different ways we could model this data in Redis, but we'll keep things simple and store each album as a hash – with fields for title, artist, price and the number of 'likes' that it has. As the key for each album hash we'll use the pattern album:{id}, where id is a unique integer value. So if we wanted to store a new album using the Redis CLI, we could execute a HMSET command along the lines of: 127.0.0.1:6379> HMSET album:1 title "Electric Ladyland" artist "Jimi Hendrix" price 4.95 likes 8 OK To do the same thing from a Go application, we need to combine a couple of functions from the gomodule/redigo/redis package. The first is the Dial() function, which returns a new connection to our Redis server. The second is the Do() method, which sends a command to our Redis server across the connection. This returns the reply from Redis as an interface{} type, along with any error if applicable. Using them is quite straightforward in practice: File: main.go package main import ( "fmt" "log" // Import the redigo/redis package. "github.com/gomodule/redigo/redis" ) func main() { // Establish a connection to the Redis server listening on port // 6379 of the local machine. 6379 is the default port, so unless // you've already changed the Redis configuration file this should // work. conn, err := redis.Dial("tcp", "localhost:6379") if err != nil { log.Fatal(err) } // Importantly, use defer to ensure the connection is always // properly closed before exiting the main() function. defer conn.Close() // Send our command across the connection. The first parameter to // Do() is always the name of the Redis command (in this example // HMSET), optionally followed by any necessary arguments (in this // example the key, followed by the various hash fields and values). _, err = conn.Do("HMSET", "album:2", "title", "Electric Ladyland", "artist", "Jimi Hendrix", "price", 4.95, "likes", 8) if err != nil { log.Fatal(err) } fmt.Println("Electric Ladyland added!") } In this example we're not really interested in the reply from Redis (all successful HMSET commands just reply with the string "OK") so we don't do anything except check the return value from Do() for any errors. Working with replies When we are interested in the reply from Redis, the gomodule/redigo/redis package contains some useful helper functions for converting the reply (which has the type interface{}) into a Go type we can easily work with. These are: redis.Bool() – converts a single reply to a bool redis.Bytes() – converts a single reply to a byte slice ([]byte) redis.Float64() – converts a single reply to a float64 redis.Int() – converts a single reply to a int redis.String() – converts a single reply to a string redis.Values() – converts an array reply to an slice of individual replies redis.Strings() – converts an array reply to an slice of strings ([]string) redis.ByteSlices() – converts an array reply to an slice of byte slices ([][]byte) redis.StringMap() – converts an array of strings (alternating key, value) into a map[string]string. Useful for HGETALL etc Let's use some of these in conjunction with the HGET command to retrieve information from one of the album hashes: File: main.go package main import ( "fmt" "log" "github.com/gomodule/redigo/redis" ) func main() { conn, err := redis.Dial("tcp", "localhost:6379") if err != nil { log.Fatal(err) } defer conn.Close() // Issue a HGET command to retrieve the title for a specific album, // and use the Str() helper method to convert the reply to a string. title, err := redis.String(conn.Do("HGET", "album:1", "title")) if err != nil { log.Fatal(err) } // Similarly, get the artist and convert it to a string. artist, err := redis.String(conn.Do("HGET", "album:1", "artist")) if err != nil { log.Fatal(err) } // And the price as a float64... price, err := redis.Float64(conn.Do("HGET", "album:1", "price")) if err != nil { log.Fatal(err) } // And the number of likes as an integer. likes, err := redis.Int(conn.Do("HGET", "album:1", "likes")) if err != nil { log.Fatal(err) } fmt.Printf("%s by %s: £%.2f [%d likes]\n", title, artist, price, likes) } It's worth pointing out that, when we use these helper methods, the error they return could relate to one of two things: either the failed execution of the command, or the conversion of the reply data to the desired type (for example, we'd get an error if we tried to convert the reply "Jimi Hendrix" to a float64). There's no way of knowing which kind of error it is unless we examine the error message. If you run the code above you should get output which looks like: $ go run main.go Electric Ladyland by Jimi Hendrix: £4.95 [8 likes] Let's now look at a more complete example, where we use the HGETALL command to retrieve all fields from an album hash in one go and store the information in a custom Album struct. File: main.go package main import ( "fmt" "log" "strconv" "github.com/gomodule/redigo/redis" ) // Define a custom struct to hold Album data. type Album struct { Title string Artist string Price float64 Likes int } func main() { conn, err := redis.Dial("tcp", "localhost:6379") if err != nil { log.Fatal(err) } defer conn.Close() // Fetch all album fields with the HGETALL command. Because HGETALL // returns an array reply, and because the underlying data structure // in Redis is a hash, it makes sense to use the Map() helper // function to convert the reply to a map[string]string. reply, err := redis.StringMap(conn.Do("HGETALL", "album:1")) if err != nil { log.Fatal(err) } // Use the populateAlbum helper function to create a new Album // object from the map[string]string. album, err := populateAlbum(reply) if err != nil { log.Fatal(err) } fmt.Printf("%+v", album) } // Create, populate and return a pointer to a new Album struct, based // on data from a map[string]string. func populateAlbum(reply map[string]string) (*Album, error) { var err error album := new(Album) album.Title = reply["title"] album.Artist = reply["artist"] // We need to use the strconv package to convert the 'price' value // from a string to a float64 before assigning it. album.Price, err = strconv.ParseFloat(reply["price"], 64) if err != nil { return nil, err } // Similarly, we need to convert the 'likes' value from a string to // an integer. album.Likes, err = strconv.Atoi(reply["likes"]) if err != nil { return nil, err } return album, nil } Running this code should give an output like: $ go run main.go &{Title:Electric Ladyland Artist:Jimi Hendrix Price:4.95 Likes:8} Or an alternative, and arguably neater, approach is to use the redis.Values() and redis.ScanStruct() functions to automatically unpack the data to the Album struct, like so: File: main.go package main import ( "fmt" "log" "github.com/gomodule/redigo/redis" ) // Define a custom struct to hold Album data. Notice the struct tags? // These indicate to redigo how to assign the data from the reply into // the struct. type Album struct { Title string `redis:"title"` Artist string `redis:"artist"` Price float64 `redis:"price"` Likes int `redis:"likes"` } func main() { conn, err := redis.Dial("tcp", "localhost:6379") if err != nil { log.Fatal(err) } defer conn.Close() // Fetch all album fields with the HGETALL command. Wrapping this // in the redis.Values() function transforms the response into type // []interface{}, which is the format we need to pass to // redis.ScanStruct() in the next step. values, err := redis.Values(conn.Do("HGETALL", "album:1")) if err != nil { log.Fatal(err) } // Create an instance of an Album struct and use redis.ScanStruct() // to automatically unpack the data to the struct fields. This uses // the struct tags to determine which data is mapped to which // struct fields. var album Album err = redis.ScanStruct(values, &album) if err != nil { log.Fatal(err) } fmt.Printf("%+v", album) } Note: Behind the scenes the redis.ScanStruct() function uses Go's strconv package to convert the values returned from Redis in to the appropriate Go type for the struct field — similar in principle to what we did in the previous example. By default this supports integer, float, boolean, string and []byte fields. If you need to automatically scan into a custom type, you can do so by implemeting the redis.Scanner() interface on your custom type. Using in a web application One important thing to know about gomodule/redigo/redis is that the Conn object (which is returned by the Dial() function we've been using so far) is not safe for concurrent use. If we want to access a single Redis server from multiple goroutines, as we would in a web application, we must use establish a pool of Redis connections, and each time we want to use a connection we fetch it from the pool, execute our command on it, and return it too the pool. We'll illustrate this in a simple web application, building on the online record store example we've already used. Our finished app will support 3 functions: MethodPathFunction GET/album?id=1Show details of a specific album (using the id provided in the query string) POST/likeAdd a new like for a specific album (using the id provided in the request body) GET/popularList the top 3 most liked albums in order To avoid detracting from the main purpose of this blog post (which is talking about Redis) we'll use a deliberately over-simplified pattern for our web application. If you'd like to follow along, create a basic application scaffold like so… $ mkdir recordstore && cd recordstore $ go mod init example.com/recordstore go: creating new go.mod: module example.com/recordstore $ touch main.go albums.go $ tree . ├── albums.go ├── go.mod └── main.go …And use the Redis CLI to add a few additional albums, along with a new likes sorted set. This sorted set will be used within the GET /popular route to help us quickly and efficiently retrieve the ids of albums with the most likes. Here's the commands to run: HMSET album:1 title "Electric Ladyland" artist "Jimi Hendrix" price 4.95 likes 8 HMSET album:2 title "Back in Black" artist "AC/DC" price 5.95 likes 3 HMSET album:3 title "Rumours" artist "Fleetwood Mac" price 7.95 likes 12 HMSET album:4 title "Nevermind" artist "Nirvana" price 5.95 likes 8 ZADD likes 8 1 3 2 12 3 8 4 In the albums.go file we'll define a global variable to hold a Redis connection pool, and we'll re-purpose the code we wrote earlier into a FindAlbum() function that we can use from our HTTP handlers. File: albums.go package main import ( "errors" "github.com/gomodule/redigo/redis" ) // Declare a pool variable to hold the pool of Redis connections. var pool *redis.Pool var ErrNoAlbum = errors.New("no album found") // Define a custom struct to hold Album data. type Album struct { Title string `redis:"title"` Artist string `redis:"artist"` Price float64 `redis:"price"` Likes int `redis:"likes"` } func FindAlbum(id string) (*Album, error) { // Use the connection pool's Get() method to fetch a single Redis // connection from the pool. conn := pool.Get() // Importantly, use defer and the connection's Close() method to // ensure that the connection is always returned to the pool before // FindAlbum() exits. defer conn.Close() // Fetch the details of a specific album. If no album is found // the given id, the []interface{} slice returned by redis.Values // will have a length of zero. So check for this and return an // ErrNoAlbum error as necessary. values, err := redis.Values(conn.Do("HGETALL", "album:"+id)) if err != nil { return nil, err } else if len(values) == 0 { return nil, ErrNoAlbum } var album Album err = redis.ScanStruct(values, &album) if err != nil { return nil, err } return &album, nil } Alright, let's head over to the main.go file. In this we will initialize the connection pool and set up a simple web server and HTTP handler for the GET /album route. File: main.go package main import ( "fmt" "log" "net/http" "strconv" "time" "github.com/gomodule/redigo/redis" ) func main() { // Initialize a connection pool and assign it to the pool global // variable. pool = &redis.Pool{ MaxIdle: 10, IdleTimeout: 240 * time.Second, Dial: func() (redis.Conn, error) { return redis.Dial("tcp", "localhost:6379") }, } mux := http.NewServeMux() mux.HandleFunc("/album", showAlbum) log.Print("Listening on :4000...") http.ListenAndServe(":4000", mux) } func showAlbum(w http.ResponseWriter, r *http.Request) { // Unless the request is using the GET method, return a 405 'Method // Not Allowed' response. if r.Method != http.MethodGet { w.Header().Set("Allow", http.MethodGet) http.Error(w, http.StatusText(405), 405) return } // Retrieve the id from the request URL query string. If there is // no id key in the query string then Get() will return an empty // string. We check for this, returning a 400 Bad Request response // if it's missing. id := r.URL.Query().Get("id") if id == "" { http.Error(w, http.StatusText(400), 400) return } // Validate that the id is a valid integer by trying to convert it, // returning a 400 Bad Request response if the conversion fails. if _, err := strconv.Atoi(id); err != nil { http.Error(w, http.StatusText(400), 400) return } // Call the FindAlbum() function passing in the user-provided id. // If there's no matching album found, return a 404 Not Found // response. In the event of any other errors, return a 500 // Internal Server Error response. bk, err := FindAlbum(id) if err == ErrNoAlbum { http.NotFound(w, r) return } else if err != nil { http.Error(w, http.StatusText(500), 500) return } // Write the album details as plain text to the client. fmt.Fprintf(w, "%s by %s: £%.2f [%d likes] \n", bk.Title, bk.Artist, bk.Price, bk.Likes) } It's worth elaborating on the redis.Pool settings. In the above code we specify a MaxIdle size of 10, which simply limits the number of idle connections waiting in the pool to 10 at any one time. If all 10 connections are in use when an additional pool.Get() call is made a new connection will be created on the fly. The IdleTimeout setting is set to 240 seconds, which means that any connections that are idle for longer than that will be removed from the pool. If you run the application: $ go run . 2019/08/17 11:01:41 Listening on :4000... And make a request for one of the albums using cURL you should get a response like this: $ curl -i localhost:4000/album?id=2 HTTP/1.1 200 OK Content-Length: 42 Content-Type: text/plain; charset=utf-8 Back in Black by AC/DC: £5.95 [3 likes] Using transactions The second route, POST /likes, is quite interesting. When a user likes an album we need to issue two distinct commands: a HINCRBY to increment the likes field in the album hash, and a ZINCRBY to increment the relevant score in our likes sorted set. This creates a problem. Ideally we would want both keys to be incremented at exactly the same time as a single atomic action. Having one key updated after the other opens up the potential for race conditions to occur. The solution to this is to use Redis transactions, which let us run multiple commands together as an atomic group. To do this we use the MULTI command to start a transaction, followed by the commands (in our case a HINCRBY and ZINCRBY), and finally the EXEC command (which then executes our both our commands together as an atomic group). Let's create a new IncrementLikes() function in the albums.go file which uses this technique. File: albums.go ... func IncrementLikes(id string) error { conn := pool.Get() defer conn.Close() // Before we do anything else, check that an album with the given // id exists. The EXISTS command returns 1 if a specific key exists // in the database, and 0 if it doesn't. exists, err := redis.Int(conn.Do("EXISTS", "album:"+id)) if err != nil { return err } else if exists == 0 { return ErrNoAlbum } // Use the MULTI command to inform Redis that we are starting a new // transaction. The conn.Send() method writes the command to the // connection's output buffer -- it doesn't actually send it to the // Redis server... despite it's name! err = conn.Send("MULTI") if err != nil { return err } // Increment the number of likes in the album hash by 1. Because it // follows a MULTI command, this HINCRBY command is NOT executed but // it is QUEUED as part of the transaction. We still need to check // the reply's Err field at this point in case there was a problem // queueing the command. err = conn.Send("HINCRBY", "album:"+id, "likes", 1) if err != nil { return err } // And we do the same with the increment on our sorted set. err = conn.Send("ZINCRBY", "likes", 1, id) if err != nil { return err } // Execute both commands in our transaction together as an atomic // group. EXEC returns the replies from both commands but, because // we're not interested in either reply in this example, it // suffices to simply check for any errors. Note that calling the // conn.Do() method flushes the previous commands from the // connection output buffer and sends them to the Redis server. _, err = conn.Do("EXEC") if err != nil { return err } return nil } We'll also update the main.go file to add an addLike() handler for the route: File: main.go package main import ( "fmt" "log" "net/http" "strconv" "time" "github.com/gomodule/redigo/redis" ) func main() { pool = &redis.Pool{ MaxIdle: 10, IdleTimeout: 240 * time.Second, Dial: func() (redis.Conn, error) { return redis.Dial("tcp", "localhost:6379") }, } mux := http.NewServeMux() mux.HandleFunc("/album", showAlbum) mux.HandleFunc("/like", addLike) log.Print("Listening on :4000...") http.ListenAndServe(":4000", mux) } ... func addLike(w http.ResponseWriter, r *http.Request) { // Unless the request is using the POST method, return a 405 // Method Not Allowed response. if r.Method != http.MethodPost { w.Header().Set("Allow", http.MethodPost) http.Error(w, http.StatusText(405), 405) return } // Retrieve the id from the POST request body. If there is no // parameter named "id" in the request body then PostFormValue() // will return an empty string. We check for this, returning a 400 // Bad Request response if it's missing. id := r.PostFormValue("id") if id == "" { http.Error(w, http.StatusText(400), 400) return } // Validate that the id is a valid integer by trying to convert it, // returning a 400 Bad Request response if the conversion fails. if _, err := strconv.Atoi(id); err != nil { http.Error(w, http.StatusText(400), 400) return } // Call the IncrementLikes() function passing in the user-provided // id. If there's no album found with that id, return a 404 Not // Found response. In the event of any other errors, return a 500 // Internal Server Error response. err := IncrementLikes(id) if err == ErrNoAlbum { http.NotFound(w, r) return } else if err != nil { http.Error(w, http.StatusText(500), 500) return } // Redirect the client to the GET /album route, so they can see the // impact their like has had. http.Redirect(w, r, "/album?id="+id, 303) } If you make a POST request to like one of the albums you should now get a response like: $ curl -i -L -d "id=2" localhost:4000/like HTTP/1.1 303 See Other Location: /album?id=2 Date: Sat, 17 Aug 2019 16:50:49 GMT Content-Length: 0 HTTP/1.1 200 OK Date: Sat, 17 Aug 2019 16:50:49 GMT Content-Length: 42 Content-Type: text/plain; charset=utf-8 Back in Black by AC/DC: £5.95 [4 likes] Using the Watch command OK, on to our final route: GET /popular. This route will display the details of the top 3 albums with the most likes, so to facilitate this we'll create a FindTopThree() function in the albums.go file. In this function we need to: Use the ZREVRANGE command to fetch the 3 album ids with the highest score (i.e. most likes) from our likes sorted set. Loop through the returned ids, using the HGETALL command to retrieve the details of each album and add them to a []*Album slice. Again, it's possible to imagine a race condition occurring here. If a second client happens to like an album at the exact moment between our ZREVRANGE command and the HGETALLs for all 3 albums being completed, our user could end up being sent wrong or mis-ordered data. The solution here is to use the Redis WATCH command in conjunction with a transaction. WATCH instructs Redis to monitor a specific key for any changes. If another client or connection modifies our watched key between our WATCH instruction and our subsequent transaction's EXEC, the transaction will fail and return a nil reply. If no client changes the value before our EXEC, the transaction will complete as normal. We can execute our code in a loop until the transaction is successful. File: albums.go package main ... func FindTopThree() ([]*Album, error) { conn := pool.Get() defer conn.Close() // Begin an infinite loop. In a real application, you might want to // limit this to a set number of attempts, and return an error if // the transaction doesn't successfully complete within those // attempts. for { // Instruct Redis to watch the likes sorted set for any changes. _, err := conn.Do("WATCH", "likes") if err != nil { return nil, err } // Use the ZREVRANGE command to fetch the album ids with the // highest score (i.e. most likes) from our 'likes' sorted set. // The ZREVRANGE start and stop values are zero-based indexes, // so we use 0 and 2 respectively to limit the reply to the top // three. Because ZREVRANGE returns an array response, we use // the Strings() helper function to convert the reply into a // []string. ids, err := redis.Strings(conn.Do("ZREVRANGE", "likes", 0, 2)) if err != nil { return nil, err } // Use the MULTI command to inform Redis that we are starting // a new transaction. err = conn.Send("MULTI") if err != nil { return nil, err } // Loop through the ids returned by ZREVRANGE, queuing HGETALL // commands to fetch the individual album details. for _, id := range ids { err := conn.Send("HGETALL", "album:"+id) if err != nil { return nil, err } } // Execute the transaction. Importantly, use the redis.ErrNil // type to check whether the reply from EXEC was nil or not. If // it is nil it means that another client changed the WATCHed // likes sorted set, so we use the continue command to re-run // the loop. replies, err := redis.Values(conn.Do("EXEC")) if err == redis.ErrNil { log.Print("trying again") continue } else if err != nil { return nil, err } // Create a new slice to store the album details. albums := make([]*Album, 3) // Iterate through the array of response objects, using the // ScanStruct() function to assign the data to Album structs. for i, reply := range replies { var album Album err = redis.ScanStruct(reply.([]interface{}), &album) if err != nil { return nil, err } albums[i] = &album } return albums, nil } } Using this from our web application is nice and straightforward: File: main.go package main import ( "fmt" "log" "net/http" "strconv" "time" "github.com/gomodule/redigo/redis" ) func main() { pool = &redis.Pool{ MaxIdle: 10, IdleTimeout: 240 * time.Second, Dial: func() (redis.Conn, error) { return redis.Dial("tcp", "localhost:6379") }, } mux := http.NewServeMux() mux.HandleFunc("/album", showAlbum) mux.HandleFunc("/like", addLike) mux.HandleFunc("/popular", listPopular) log.Print("Listening on :4000...") http.ListenAndServe(":4000", mux) } ... func listPopular(w http.ResponseWriter, r *http.Request) { // Unless the request is using the GET method, return a 405 'Method Not // Allowed' response. if r.Method != http.MethodGet { w.Header().Set("Allow", http.MethodGet) http.Error(w, http.StatusText(405), 405) return } // Call the FindTopThree() function, returning a return a 500 Internal // Server Error response if there's any error. albums, err := FindTopThree() if err != nil { http.Error(w, http.StatusText(500), 500) return } // Loop through the 3 albums, writing the details as a plain text list // to the client. for i, ab := range albums { fmt.Fprintf(w, "%d) %s by %s: £%.2f [%d likes] \n", i+1, ab.Title, ab.Artist, ab.Price, ab.Likes) } } One note about WATCH: a key will remain WATCHed until either we either EXEC (or DISCARD) our transaction, or we manually call UNWATCH on the key. So calling EXEC, as we do in the above example, is sufficient and the likes sorted set will be automatically UNWATCHed. Making a request to the GET /popular route should now yield a response similar to: $ curl -i localhost:4000/popular HTTP/1.1 200 OK Content-Length: 147 Content-Type: text/plain; charset=utf-8 Date: Sat, 17 Aug 2019 17:10:13 GMT 1) Rumours by Fleetwood Mac: £7.95 [12 likes] 2) Nevermind by Nirvana: £5.95 [8 likes] 3) Electric Ladyland by Jimi Hendrix: £4.95 [8 likes]
Alex Edwards Feb 26, 2016 -
A few weeks ago someone created a thread on Reddit asking: In the context of a web application what would you consider a Go best practice for accessing the database in (HTTP or other) handlers? The replies it got were a genuinely interesting mix. Some people advised using dependency injection, a few favoured the simplicity of using global variables, others suggested putting the connection pool pointer into the request context. Me? I think the right answer depends on the project. What's the overall structure and size of the project? What's your approach to testing? How is it likely to grow in the future? All these things and more should play a part when you pick an approach to take. So in this post we're going to take a look at four different methods for organizing your code and structuring access to your database connection pool, and explain when they may — or may not — be a good fit for your project. Application setup I like concrete examples, so let's set up a simple book store application to help illustrate the four different approaches. If you'd like to follow along, you need to create a new bookstore database and then execute the following SQL to create a books table and add some sample records. CREATE TABLE books ( isbn char(14) NOT NULL, title varchar(255) NOT NULL, author varchar(255) NOT NULL, price decimal(5,2) NOT NULL ); INSERT INTO books (isbn, title, author, price) VALUES ('978-1503261969', 'Emma', 'Jayne Austen', 9.44), ('978-1505255607', 'The Time Machine', 'H. G. Wells', 5.99), ('978-1503379640', 'The Prince', 'Niccolò Machiavelli', 6.99); ALTER TABLE books ADD PRIMARY KEY (isbn); Note: In this tutorial I'll be using PostgreSQL, but the principles are the same no matter what database you're using. You'll also need to run the following commands to scaffold a basic application structure and initialize a Go module: $ mkdir bookstore && cd bookstore $ mkdir models $ touch main.go models/models.go $ go mod init bookstore.alexedwards.net go: creating new go.mod: module bookstore.alexedwards.net At this point, you should have a bookstore directory on your machine with a structure exactly like this: bookstore/ ├── go.mod ├── main.go └── models └── models.go 1. Using a global variable OK, let's start by looking at storing the database connection pool in a global variable. This approach is arguably the simplest thing that works. You initialise the sql.DB connection pool in your main() function, assign it to a global variable, and then access the global from anywhere that you need to execute a database query. In the context of our book store application, the code would look something like this: File: models/models.go package models import ( "database/sql" ) // Create an exported global variable to hold the database connection pool. var DB *sql.DB type Book struct { Isbn string Title string Author string Price float32 } // AllBooks returns a slice of all books in the books table. func AllBooks() ([]Book, error) { // Note that we are calling Query() on the global variable. rows, err := DB.Query("SELECT * FROM books") if err != nil { return nil, err } defer rows.Close() var bks []Book for rows.Next() { var bk Book err := rows.Scan(&bk.Isbn, &bk.Title, &bk.Author, &bk.Price) if err != nil { return nil, err } bks = append(bks, bk) } if err = rows.Err(); err != nil { return nil, err } return bks, nil } File: main.go package main import ( "database/sql" "fmt" "log" "net/http" "bookstore.alexedwards.net/models" _ "github.com/lib/pq" ) func main() { var err error // Initalize the sql.DB connection pool and assign it to the models.DB // global variable. models.DB, err = sql.Open("postgres", "postgres://user:pass@localhost/bookstore") if err != nil { log.Fatal(err) } http.HandleFunc("/books", booksIndex) http.ListenAndServe(":3000", nil) } // booksIndex sends a HTTP response listing all books. func booksIndex(w http.ResponseWriter, r *http.Request) { bks, err := models.AllBooks() if err != nil { log.Print(err) http.Error(w, http.StatusText(500), 500) return } for _, bk := range bks { fmt.Fprintf(w, "%s, %s, %s, £%.2f\n", bk.Isbn, bk.Title, bk.Author, bk.Price) } } At this point, if you run this application and make a request to the /books endpoint you should get the following response: $ curl localhost:3000/books 978-1503261969, Emma, Jayne Austen, £9.44 978-1505255607, The Time Machine, H. G. Wells, £5.99 978-1503379640, The Prince, Niccolò Machiavelli, £6.99 Using a global variable to store the database connection pool like this is potentially a good fit when: Your application is small and simple, and keeping track of globals in your head isn't a problem. Your HTTP handlers are spread across multiple packages, but all your database-related code lives in one package. You don't need to mock the database for testing purposes. The drawbacks of using global variables are well-documented, but in practice I've found that for small and simple projects using a global variable like this works just fine, and it's (arguably) clearer and easier to understand than some of the other approaches we'll look at in this post. For more complex applications — where your handlers have more dependencies beyond just the database connection pool — it's generally better to use dependency injection instead of storing everything in global variables. The approach we've taken here also doesn't work if your database logic is spread over multiple packages, although — if you really want to — you could a separate config package containing an exported DB global variable and import "yourproject/config" into every file that needs it. I've provided a basic example in this gist. 1b. Global variable with an InitDB function A variation on the 'global variable' approach that I sometimes see uses an initialisation function to set up the connection pool, like so: File: models/models.go package models import ( "database/sql" _ "github.com/lib/pq" ) // This time the global variable is unexported. var db *sql.DB // InitDB sets up setting up the connection pool global variable. func InitDB(dataSourceName string) error { var err error db, err = sql.Open("postgres", dataSourceName) if err != nil { return err } return db.Ping() } type Book struct { Isbn string Title string Author string Price float32 } func AllBooks() ([]Book, error) { // This now uses the unexported global variable. rows, err := db.Query("SELECT * FROM books") if err != nil { return nil, err } defer rows.Close() var bks []Book for rows.Next() { var bk Book err := rows.Scan(&bk.Isbn, &bk.Title, &bk.Author, &bk.Price) if err != nil { return nil, err } bks = append(bks, bk) } if err = rows.Err(); err != nil { return nil, err } return bks, nil } File: main.go package main import ( "fmt" "log" "net/http" "bookstore.alexedwards.net/models" ) func main() { // Use the InitDB function to initialise the global variable. err := models.InitDB("postgres://user:pass@localhost/bookstore") if err != nil { log.Fatal(err) } http.HandleFunc("/books", booksIndex) http.ListenAndServe(":3000", nil) } ... This is a small tweak to the global variable pattern, but it gives us a few nice benefits: All the database-related code now lives a single package, including the code to set up the connection pool. The global db variable is not exported, which removes the possibility of it being accidentally mutated by other packages at runtime. During testing, you can reuse the InitDB() function to initialise a connection pool to your test database (by calling it from TestMain() before your tests run). 2. Dependency injection In a more complex web application there are probably additional application-level objects that you want your handlers to have access to. For example, you might want your handlers to also have access to a shared logger, or a template cache, as well your database connection pool. Rather than storing all these dependencies in global variables, a neat approach is to store them in a single custom Env struct like so: type Env struct { db *sql.DB logger *log.Logger templates *template.Template } The nice thing about this is that you can then define your handlers as methods against Env. This gives you a easy and idiomatic way of making the connection pool (and any other dependencies) available to your handlers. Here's a full example: File: models/models.go package models import ( "database/sql" ) type Book struct { Isbn string Title string Author string Price float32 } // Update the AllBooks function so it accepts the connection pool as a // parameter. func AllBooks(db *sql.DB) ([]Book, error) { rows, err := db.Query("SELECT * FROM books") if err != nil { return nil, err } defer rows.Close() var bks []Book for rows.Next() { var bk Book err := rows.Scan(&bk.Isbn, &bk.Title, &bk.Author, &bk.Price) if err != nil { return nil, err } bks = append(bks, bk) } if err = rows.Err(); err != nil { return nil, err } return bks, nil } File: main.go package main import ( "database/sql" "fmt" "log" "net/http" "bookstore.alexedwards.net/models" _ "github.com/lib/pq" ) // Create a custom Env struct which holds a connection pool. type Env struct { db *sql.DB } func main() { // Initialise the connection pool. db, err := sql.Open("postgres", "postgres://user:pass@localhost/bookstore") if err != nil { log.Fatal(err) } // Create an instance of Env containing the connection pool. env := &Env{db: db} // Use env.booksIndex as the handler function for the /books route. http.HandleFunc("/books", env.booksIndex) http.ListenAndServe(":3000", nil) } // Define booksIndex as a method on Env. func (env *Env) booksIndex(w http.ResponseWriter, r *http.Request) { // We can now access the connection pool directly in our handlers. bks, err := models.AllBooks(env.db) if err != nil { log.Print(err) http.Error(w, http.StatusText(500), 500) return } for _, bk := range bks { fmt.Fprintf(w, "%s, %s, %s, £%.2f\n", bk.Isbn, bk.Title, bk.Author, bk.Price) } } One of the advantages of this pattern is how clear it is to see what dependencies our handlers have and what values they take at runtime. All the dependencies for our handlers are explicitly defined in one place (the Env struct), and we can see what values they have at runtime by simply looking at how it is initialised in the main() function. Another benefit is that any unit tests for our handlers can be completely self-contained. For example, a unit-test for booksIndex() could create an Env struct containing a connection pool to a test database, then call it's booksIndex() method in order to test the handler behaviour. There's no need to rely any global variables outside of the test. In general, dependency injection in this way is quite a nice approach when: There is a common set of dependencies that your handlers need access to. All your HTTP handlers live in one package, but your database-related code may be spread across multiple packages. You don't need to mock the database for testing purposes. 2b. Dependency injection via a closure If you don't want to define your handlers as methods on Env, an alternative approach is to put your handler logic into a closure and close over the Env variable like so: File: main.go package main import ( "database/sql" "fmt" "log" "net/http" "bookstore.alexedwards.net/models" _ "github.com/lib/pq" ) type Env struct { db *sql.DB } func main() { db, err := sql.Open("postgres", "postgres://user:pass@localhost/bookstore") if err != nil { log.Fatal(err) } env := &Env{db: db} // Pass the Env struct as a parameter to booksIndex(). http.Handle("/books", booksIndex(env)) http.ListenAndServe(":3000", nil) } // Use a closure to make Env available to the handler logic. func booksIndex(env *Env) http.HandlerFunc { return func(w http.ResponseWriter, r *http.Request) { bks, err := models.AllBooks(env.db) if err != nil { log.Print(err) http.Error(w, http.StatusText(500), 500) return } for _, bk := range bks { fmt.Fprintf(w, "%s, %s, %s, £%.2f\n", bk.Isbn, bk.Title, bk.Author, bk.Price) } } } This pattern makes our handler functions a bit more verbose, but it can be a useful technique if you want to use dependency injection when your handlers are spread across multiple packages. Here's a gist demonstrating how that can work. 3. Wrapping the connection pool The third pattern we'll look at uses dependency injection again, but this time we're going to wrap the sql.DB connection pool in our own custom type. Let's jump straight in to the code: File: models/models.go package models import ( "database/sql" ) type Book struct { Isbn string Title string Author string Price float32 } // Create a custom BookModel type which wraps the sql.DB connection pool. type BookModel struct { DB *sql.DB } // Use a method on the custom BookModel type to run the SQL query. func (m BookModel) All() ([]Book, error) { rows, err := m.DB.Query("SELECT * FROM books") if err != nil { return nil, err } defer rows.Close() var bks []Book for rows.Next() { var bk Book err := rows.Scan(&bk.Isbn, &bk.Title, &bk.Author, &bk.Price) if err != nil { return nil, err } bks = append(bks, bk) } if err = rows.Err(); err != nil { return nil, err } return bks, nil } File: main.go package main import ( "database/sql" "fmt" "log" "net/http" "bookstore.alexedwards.net/models" _ "github.com/lib/pq" ) // This time make models.BookModel the dependency in Env. type Env struct { books models.BookModel } func main() { // Initialise the connection pool as normal. db, err := sql.Open("postgres", "postgres://user:pass@localhost/bookstore") if err != nil { log.Fatal(err) } // Initalise Env with a models.BookModel instance (which in turn wraps // the connection pool). env := &Env{ books: models.BookModel{DB: db}, } http.HandleFunc("/books", env.booksIndex) http.ListenAndServe(":3000", nil) } func (env *Env) booksIndex(w http.ResponseWriter, r *http.Request) { // Execute the SQL query by calling the All() method. bks, err := env.books.All() if err != nil { log.Print(err) http.Error(w, http.StatusText(500), 500) return } for _, bk := range bks { fmt.Fprintf(w, "%s, %s, %s, £%.2f\n", bk.Isbn, bk.Title, bk.Author, bk.Price) } } At first glance this pattern might feel more confusing than the other options we've looked at — especially if you're not very familiar with Go. But it has some distinct advantages over our previous examples: The database calls are succinct and read very nicely from the perspective of our handlers: env.books.All() versus the previous models.AllBooks(env.db). In a complex application, your database access layer might have more dependencies than just the connection pool. This pattern allows us to store all those dependencies in the custom BookModel type, rather than having to pass them as parameters with every call. Because the database actions are now defined as methods on our custom BookModel type, it opens up the opportunity to replace any references to BookModel in our application code with an interface. And in turn, that means that we can create a mock implementation of our BookModel which can be used during testing. The final point here is probably the most important, so let's take a look at what it could look like in practice: File: main.go package main import ( "database/sql" "fmt" "log" "net/http" "bookstore.alexedwards.net/models" _ "github.com/lib/pq" ) type Env struct { // Replace the reference to models.BookModel with an interface // describing its methods instead. All the other code remains exactly // the same. books interface { All() ([]models.Book, error) } } func main() { db, err := sql.Open("postgres", "postgres://user:pass@localhost/bookstore") if err != nil { log.Fatal(err) } env := &Env{ books: models.BookModel{DB: db}, } http.HandleFunc("/books", env.booksIndex) http.ListenAndServe(":3000", nil) } func (env *Env) booksIndex(w http.ResponseWriter, r *http.Request) { bks, err := env.books.All() if err != nil { log.Print(err) http.Error(w, http.StatusText(500), 500) return } for _, bk := range bks { fmt.Fprintf(w, "%s, %s, %s, £%.2f\n", bk.Isbn, bk.Title, bk.Author, bk.Price) } } Note: If you're not familiar with the concept of interfaces or how they work in Go, I've written a detailed tutorial explaining them here. Once you've made that change, you should be able to create and run a unit test for the booksIndex() handler using a mockBookModel like so: $ touch main_test.go File: main_test.go package main import ( "net/http" "net/http/httptest" "testing" "bookstore.alexedwards.net/models" ) type mockBookModel struct{} func (m *mockBookModel) All() ([]models.Book, error) { var bks []models.Book bks = append(bks, models.Book{"978-1503261969", "Emma", "Jayne Austen", 9.44}) bks = append(bks, models.Book{"978-1505255607", "The Time Machine", "H. G. Wells", 5.99}) return bks, nil } func TestBooksIndex(t *testing.T) { rec := httptest.NewRecorder() req, _ := http.NewRequest("GET", "/books", nil) env := Env{books: &mockBookModel{}} http.HandlerFunc(env.booksIndex).ServeHTTP(rec, req) expected := "978-1503261969, Emma, Jayne Austen, £9.44\n978-1505255607, The Time Machine, H. G. Wells, £5.99\n" if expected != rec.Body.String() { t.Errorf("\n...expected = %v\n...obtained = %v", expected, rec.Body.String()) } } $ go test -v === RUN TestBooksIndex --- PASS: TestBooksIndex (0.00s) PASS ok bookstore.alexedwards.net 0.003s Wrapping the connection pool with a custom type and combining it with dependency injection via an Env struct is quite a nice approach when: There is a common set of dependencies that your handlers need access to. Your database layer has more dependencies than just the connection pool. You want to mock the database during unit tests. 4. Request context Finally let's look at using request context to store and pass around the database connection pool. Just to be clear upfront, I don't recommend using this approach, and the official documentation advises against it too: Use context Values only for request-scoped data that transits processes and APIs, not for passing optional parameters to functions. In other words, that means request context should only be used to store values which are created during an individual request cycle and are no longer needed after the request has completed. It's not really intended to store long-lived handler dependencies like connection pools, loggers or template caches. That said, some people do use request context in this way, and it's worth being aware of in case you ever come across it. The pattern works like this: File: main.go package main import ( "context" "database/sql" "fmt" "log" "net/http" "bookstore.alexedwards.net/models" _ "github.com/lib/pq" ) // Create some middleware which swaps out the existing request context // with new context.Context value containing the connection pool. func injectDB(db *sql.DB, next http.HandlerFunc) http.HandlerFunc { return func(w http.ResponseWriter, r *http.Request) { ctx := context.WithValue(r.Context(), "db", db) next.ServeHTTP(w, r.WithContext(ctx)) } } func main() { db, err := sql.Open("postgres", "postgres://user:pass@localhost/bookstore") if err != nil { log.Fatal(err) } // Wrap the booksIndex handler with the injectDB middleware, // passing in the new context.Context with the connection pool. http.Handle("/books", injectDB(db, booksIndex)) http.ListenAndServe(":3000", nil) } func booksIndex(w http.ResponseWriter, r *http.Request) { // Pass the request context onto the database layer. bks, err := models.AllBooks(r.Context()) if err != nil { log.Print(err) http.Error(w, http.StatusText(500), 500) return } for _, bk := range bks { fmt.Fprintf(w, "%s, %s, %s, £%.2f\n", bk.Isbn, bk.Title, bk.Author, bk.Price) } } Essentially, what's happening here is that the injectDB middleware replaces the request context for every request with one that contains the connection pool. Then, in our handlers, we pass the request context on to our database layer. Then in the database layer we can retrieve the connection pool from the context and use it like this: File: models/models.go package models import ( "context" "database/sql" "errors" ) type Book struct { Isbn string Title string Author string Price float32 } func AllBooks(ctx context.Context) ([]Book, error) { // Retrieve the connection pool from the context. Because the // r.Context().Value() method always returns an interface{} type, we // need to type assert it into a *sql.DB before using it. db, ok := ctx.Value("db").(*sql.DB) if !ok { return nil, errors.New("could not get database connection pool from context") } rows, err := db.Query("SELECT * FROM books") if err != nil { return nil, err } defer rows.Close() var bks []Book for rows.Next() { var bk Book err := rows.Scan(&bk.Isbn, &bk.Title, &bk.Author, &bk.Price) if err != nil { return nil, err } bks = append(bks, bk) } if err = rows.Err(); err != nil { return nil, err } return bks, nil } If you go ahead and run this code it'll work just fine. But this pattern has some big downsides: Each time we retrieve the connection pool from the context we need to type assert it and check for any errors. This makes our code more verbose, and we lose the compile-time type safety that we have with the other approaches. Unlike the dependency injection patterns, it's not clear to see what dependencies a function has just by looking at its signature. Instead, you have to read through the code to see what it is retrieving from the request context. In a small application this isn't a problem — but if you're trying to get to grips with a large, unfamiliar, codebase then it's not ideal. It's not idiomatic Go. Using the request context in this way goes against the advice in the official documentation, and that means the pattern might be surprising or unfamiliar to other Go developers. So, is there ever a scenario where this pattern is a good fit? It's tempting to be glib here and say "no", but the truth is that it can be an easy-ish way to pass around the connection pool if you have a sprawling codebase with handlers and database logic spread across many different packages. But if you're considering using it for that reason, then it's probably a sign that you should refactor your codebase to have a simpler, flatter, package structure. Or, alternatively, I would suggest taking a closer look at the closure pattern we talked about earlier instead.
Alex Edwards Jul 16, 2015 -
This is the first in a series of tutorials about persisting data in Go web applications. In this post we'll be looking at SQL databases. I'll explain the basics of the database/sql package, walk through building a working application, and explore a couple of options for cleanly structuring your code. Before we get started you'll need to go get one of the drivers for the database/sql package. In this post I'll be using Postgres and the excellent pq driver. But all the code in this tutorial is (nearly) exactly the same for any other driver or database – including MySQL and SQLite. I'll point out the very few Postgres-specific bits as we go. $ go get github.com/lib/pq Basic usage Let's build a simple Bookstore application, which carries out CRUD operations on a books table. If you'd like to follow along, you'll need to create a new bookstore database and scaffold it with the following: CREATE TABLE books ( isbn char(14) NOT NULL, title varchar(255) NOT NULL, author varchar(255) NOT NULL, price decimal(5,2) NOT NULL ); INSERT INTO books (isbn, title, author, price) VALUES ('978-1503261969', 'Emma', 'Jayne Austen', 9.44), ('978-1505255607', 'The Time Machine', 'H. G. Wells', 5.99), ('978-1503379640', 'The Prince', 'Niccolò Machiavelli', 6.99); ALTER TABLE books ADD PRIMARY KEY (isbn); Once that's done, head over to your Go workspace and create a new bookstore package directory and a main.go file: $ cd $GOPATH/src $ mkdir bookstore && cd bookstore $ touch main.go Let's start with some code that executes a SELECT * FROM books query and then prints the results to stdout. File: main.go package main import ( _ "github.com/lib/pq" "database/sql" "fmt" "log" ) type Book struct { isbn string title string author string price float32 } func main() { db, err := sql.Open("postgres", "postgres://user:pass@localhost/bookstore") if err != nil { log.Fatal(err) } rows, err := db.Query("SELECT * FROM books") if err != nil { log.Fatal(err) } defer rows.Close() bks := make([]*Book, 0) for rows.Next() { bk := new(Book) err := rows.Scan(&bk.isbn, &bk.title, &bk.author, &bk.price) if err != nil { log.Fatal(err) } bks = append(bks, bk) } if err = rows.Err(); err != nil { log.Fatal(err) } for _, bk := range bks { fmt.Printf("%s, %s, %s, £%.2f\n", bk.isbn, bk.title, bk.author, bk.price) } } There's a lot going on here. We'll step through this bit-by-bit. The first interesting thing is the way that we import the driver. We don't use anything in the pq package directly, which means that the Go compiler will raise an error if we try to import it normally. But we need the pq package's init() function to run so that our driver can register itself with database/sql. We get around this by aliasing the package name to the blank identifier. This means pq.init() still gets executed, but the alias is harmlessly discarded (and our code runs error-free). This approach is standard for most of Go's SQL drivers. Next we define a Book type – with the struct fields and their types aligning to our books table. For completeness I should point out that we've only been able to use the string and float32 types safely because we set NOT NULL constraints on the columns in our table. If the table contained nullable fields we would need to use the sql.NullString and sql.NullFloat64 types instead – see this Gist for a working example. Generally it's easiest to avoid nullable fields altogether if you can, which is what we've done here. In the main() function we initialise a new sql.DB object by calling sql.Open(). We pass in the name of our driver (in this case "postgres") and the connection string (you'll need to check your driver documentation for the correct format). It's worth emphasising that the sql.DB object it returns is not a database connection – it's an abstraction representing a pool of underlying connections. You can change the maximum number of open and idle connections in the pool with the db.SetMaxOpenConns() and db.SetMaxIdleConns() methods respectively. A final thing to note is that sql.DB is safe for concurrent access, which is very convenient if you're using it in a web application (like we will shortly). From there we follow a standard pattern that you'll see often: We fetch a resultset from the books table using the DB.Query() method and assign it to a rows variable. Then we defer rows.Close() to ensure the resultset is properly closed before the parent function returns. Closing a resultset properly is really important. As long as a resultset is open it will keep the underlying database connection open – which in turn means the connection is not available to the pool. So if something goes wrong and the resultset isn't closed it can rapidly lead to all the connections in your pool being used up. Another gotcha (which caught me out when I first began) is that the defer statement should come after you check for an error from DB.Query. Otherwise, if DB.Query() returns an error, you'll get a panic trying to close a nil resultset. We then use rows.Next() to iterate through the rows in the resultset. This preps the first (and then each subsequent) row to be acted on by the rows.Scan() method. Note that if iteration over all of the rows completes then the resultset automatically closes itself and frees-up the connection. We use the rows.Scan() method to copy the values from each field in the row to a new Book object that we created. We then check for any errors that occurred during Scan, and add the new Book to the bks slice we created earlier. When our rows.Next() loop has finished we call rows.Err(). This returns any error that was encountered during the interation. It's important to call this – don't just assume that we completed a successful iteration over the whole resultset. If our bks slice has been filled successfully, we loop through it and print the information about each book to stdout. If you run the code you should get the following output: $ go run main.go 978-1503261969, Emma, Jayne Austen, £9.44 978-1505255607, The Time Machine, H. G. Wells, £5.99 978-1503379640, The Prince, Niccolò Machiavelli, £6.99 Using in a web application Let's start to morph our code into a RESTful-ish web application with 3 routes: GET /books – List all books in the store GET /books/show – Show a specific book by its ISBN POST /books/create – Add a new book to the store We've just written all the core logic we need for the GET /books route. Let's adapt it into a booksIndex() HTTP handler for our web application. File: main.go package main import ( _ "github.com/lib/pq" "database/sql" "fmt" "log" "net/http" ) type Book struct { isbn string title string author string price float32 } var db *sql.DB func init() { var err error db, err = sql.Open("postgres", "postgres://user:pass@localhost/bookstore") if err != nil { log.Fatal(err) } if err = db.Ping(); err != nil { log.Fatal(err) } } func main() { http.HandleFunc("/books", booksIndex) http.ListenAndServe(":3000", nil) } func booksIndex(w http.ResponseWriter, r *http.Request) { if r.Method != "GET" { http.Error(w, http.StatusText(405), 405) return } rows, err := db.Query("SELECT * FROM books") if err != nil { http.Error(w, err.Error(), 500) return } defer rows.Close() bks := make([]*Book, 0) for rows.Next() { bk := new(Book) err := rows.Scan(&bk.isbn, &bk.title, &bk.author, &bk.price) if err != nil { http.Error(w, err.Error(), 500) return } bks = append(bks, bk) } if err = rows.Err(); err != nil { http.Error(w, err.Error(), 500) return } for _, bk := range bks { fmt.Fprintf(w, "%s, %s, %s, £%.2f\n", bk.isbn, bk.title, bk.author, bk.price) } } So how is this different? We use the init() function to set up our connection pool and assign it to the global variable db. We're using a global variable to store the connection pool because it's an easy way of making it available to our HTTP handlers – but it's by no means the only way. Because sql.Open() doesn't actually check a connection, we also call DB.Ping() to make sure that everything works OK on startup. In the booksIndex hander we return a 405 Method Not Allowed response for any non-GET request. Then we have our data access logic. This is exactly the same as the earlier example, except that we're now returning proper HTTP errors instead of exiting the program. Lastly we write the books' details as plain text to the http.ResponseWriter. Run the application and then make a request: $ curl -i localhost:3000/books HTTP/1.1 200 OK Content-Length: 205 Content-Type: text/plain; charset=utf-8 978-1503261969, Emma, Jayne Austen, £9.44 978-1505255607, The Time Machine, H. G. Wells, £5.99 978-1503379640, The Prince, Niccolò Machiavelli, £6.99 Querying a single row For the GET /books/show route we want to retrieve single book based on its ISBN, with the ISBN being passed in the query string like: /books/show?isbn=978-1505255607 We'll create a new bookShow() handler for this: File: main.go ... func main() { http.HandleFunc("/books", booksIndex) http.HandleFunc("/books/show", booksShow) http.ListenAndServe(":3000", nil) } ... func booksShow(w http.ResponseWriter, r *http.Request) { if r.Method != "GET" { http.Error(w, http.StatusText(405), 405) return } isbn := r.FormValue("isbn") if isbn == "" { http.Error(w, http.StatusText(400), 400) return } row := db.QueryRow("SELECT * FROM books WHERE isbn = $1", isbn) bk := new(Book) err := row.Scan(&bk.isbn, &bk.title, &bk.author, &bk.price) if err == sql.ErrNoRows { http.NotFound(w, r) return } else if err != nil { http.Error(w, err.Error(), 500) return } fmt.Fprintf(w, "%s, %s, %s, £%.2f\n", bk.isbn, bk.title, bk.author, bk.price) } Once again the handler starts again by checking that it's dealing with a GET request. We then use the Request.FormValue() method to fetch the ISBN value from the request query string. This returns an empty string if there's no parameter found, so we check for that and issue a 400 Bad Request response if it's missing. Now we get to the interesting bit: DB.QueryRow(). This method is similar to DB.Query, except that it fetches a single row instead of multiple rows. Because we need to include untrusted input (the isbn variable) in our query we take advantage of placeholder parameters, passing in the value of our placeholder as the second argument to DB.QueryRow() like so: db.QueryRow("SELECT * FROM books WHERE isbn = $1", isbn) Behind the scenes, db.QueryRow (and also db.Query() and db.Exec()) work by creating a new prepared statement on the database, and subsequently execute that prepared statement using the placeholder parameters provided. This means that all three methods are safe from SQL injection when used correctly . From Wikipedia: Prepared statements are resilient against SQL injection, because parameter values, which are transmitted later using a different protocol, need not be correctly escaped. If the original statement template is not derived from external input, injection cannot occur. The placeholder parameter syntax differs depending on your database. Postgres uses the $N notation, but MySQL, SQL Server and others use the ? character as a placeholder. OK, let's get back to our code. After we've got a row from DB.QueryRow() we use row.Scan() to copy the values into a new Book object. Note how any errors from DB.QueryRow() are deferred and not surfaced until we call row.Scan(). If our query returned no rows, our call to row.Scan() will return an error of the type sql.ErrNoRows. We check for that error type specifically and return a 404 Not Found response if that's the case. We then handle all other errors by returning a 500 Internal Server Error. If everything went OK, we write the book details to the http.ResponseWriter. Give it a try: $ curl -i localhost:3000/books/show?isbn=978-1505255607 HTTP/1.1 200 OK Content-Length: 54 Content-Type: text/plain; charset=utf-8 978-1505255607, The Time Machine, H. G. Wells, £5.99 If you play around with the ISBN value, or issue a malformed request you should see that you get the appropriate error responses. Executing a statement For our final POST /books/create route we'll make a new booksCreate() handler and use DB.Exec() to execute a INSERT statement. You can take the same approach for an UPDATE, DELETE, or any other action that doesn't return rows. Here's the code: File: main.go ... import ( _ "github.com/lib/pq" "database/sql" "fmt" "log" "net/http" "strconv" ) ... func main() { http.HandleFunc("/books", booksIndex) http.HandleFunc("/books/show", booksShow) http.HandleFunc("/books/create", booksCreate) http.ListenAndServe(":3000", nil) } ... func booksCreate(w http.ResponseWriter, r *http.Request) { if r.Method != "POST" { http.Error(w, http.StatusText(405), 405) return } isbn := r.FormValue("isbn") title := r.FormValue("title") author := r.FormValue("author") if isbn == "" || title == "" || author == "" { http.Error(w, http.StatusText(400), 400) return } price, err := strconv.ParseFloat(r.FormValue("price"), 32) if err != nil { http.Error(w, http.StatusText(400), 400) return } result, err := db.Exec("INSERT INTO books VALUES($1, $2, $3, $4)", isbn, title, author, price) if err != nil { http.Error(w, err.Error(), 500) return } rowsAffected, err := result.RowsAffected() if err != nil { http.Error(w, err.Error(), 500) return } fmt.Fprintf(w, "Book %s created successfully (%d row affected)\n", isbn, rowsAffected) } Hopefully this is starting to feel familiar now. In the booksCreate() handler we check we're dealing with a POST request, and then fetch the request parameters using request.FormValue(). We verify that all the necessary parameters exist, and in the case of price use the strconv.ParseFloat() to convert the parameter from a string into a float. We then carry out the insert using db.Exec(), passing our new book details as parameters just like we did in the previous example. Note that DB.Exec(), like DB.Query() and DB.QueryRow(), is a variadic function, which means you can pass in as many parameters as you need. The db.Exec() method returns an object satisfying the sql.Result interface, which you can either use (like we are here) or discard with the blank identifier. The sql.Result() interface guarantees two methods: LastInsertId() – which is often used to return the value of an new auto increment id, and RowsAffected() – which contains the number of rows that the statement affected. In this code we're picking up the latter, and then using it in our plain text confirmation message. It's worth noting that not all drivers support the LastInsertId() and RowsAffected() methods, and calling them may return an error. For example, pq doesn't support LastInsertId() – if you need that functionality you'll have to take an approach like this one. Let's try out the /books/create route, passing our parameters in the POST body: $ curl -i -X POST -d "isbn=978-1470184841&title=Metamorphosis&author=Franz Kafka&price=5.90" localhost:3000/books/create HTTP/1.1 200 OK Content-Length: 58 Content-Type: text/plain; charset=utf-8 Book 978-1470184841 created successfully (1 row affected) Using DB.Prepare() Something you might be wondering is: Why aren't we using DB.Prepare()? As I explained a bit earlier, we kinda are behind the scenes. All of DB.Query(), DB.Exec() and DB.QueryRow() set up a prepared statement on the database, run it with the parameters provided, and then close (or deallocate) the prepared statement. But the downside of this is obvious: we have 3 round trips to the database with each HTTP request, whereas if we set up prepared statements with DB.Prepare() – possibly in the init() function – we could have only one round trip each time. But the trade-off isn't that simple. Prepared statements only last for the duration of the current database session. If the session ends, then the prepared statements must be recreated before being used again. So if there's database downtime or a restart you'll need to recreate the prepared statements. For a web application where latency is critical it might be worth the effort to setup monitoring for your database, and reinitialise the prepared statements after an outage. But for an application like this where latency isn't that important, using DB.Query() et al is clear and effective enough. There's a Google groups thread which discusses this in more detail. Refactoring At the moment all our database access logic is mixed in with our HTTP handlers. It's probably a good idea to refactor this for easier maintainability and DRYness as our application grows. But this tutorial is already pretty long, so I'll explore some of the options for refactoring our code in the next post – Practical Persistence in Go: Organising Database Access (coming soon!) Additional tools The Sqlx package by Jason Moiron provides some additions to the standard database/sql functionality, including support for named placeholder parameters and automatic marshalling of rows into structs. If you're looking for something more ORM-ish, you might like to consider Modl by the same author, or gorp by James Cooper. The null package by can help make managing nullable values easier, if that's something you need to do a lot of. Lastly, I found the tutorials at go-database-sql.org to be clear and helpful. Especially worth reading is the surprises and limitations section. If you found this post useful, you might like to subscribe to my RSS feed.
Alex Edwards Jun 13, 2015 -
I've written a package for chaining context-aware handlers in Go, called Stack. It was heavily inspired by Alice. What do you mean by 'context-aware'? If you're using a middleware pattern to process HTTP requests in Go, you may want to share some data or context between middleware handlers and your application handlers. For example you might want to: Use some middleware to create a CRSF token, and later render the token to a template in your application handler. Or perhaps... Authenticate a user in one middleware handler, and then pass the user details to a second middleware handler which checks if the user is authorised to access the resource. There are a few packages that can help with this. Matt Silverlock has written a good article about some of the different approaches and tools – I won't rehash it here, instead I recommend giving it a read. Why make another package? Because none of the existing tools seemed ideal – at least to me. Gorilla Context is simple and very flexible, but relies on a global context map and you remembering to clear the context after each request. (It's still my favourite though). Goji provides request-scoped context, which is good, but it's part of a larger package and ties you into using the Goji router. The same is true of Gocraft/web, which also relies on reflection tricks under the hood that I struggle to wrap my head around. I realised that the only time you need to worry about context is when you're chaining handlers together. So I looked at my favorite tool for chaining handlers, Alice, and began adapting that to create Stack. I wanted the package to: Do a simple job, and then get out of the way. Provide a request-scoped context map. Let you create stackable, reusable, handler chains in the Alice style. Be as type-safe at compile time as it possibly could be. Be simple to understand and non-magic. Operate nicely with existing standards. In particular: The handler chain must satisfy the http.Handler interface, so it can be used with the http.DefaultServeMux. It should be compatible with the func(http.Handler) http.Handler pattern commonly used by third-party middleware packages. The full documentation for Stack is here, but here's a quick example of how to use it: File: main.go package main import ( "fmt" "github.com/alexedwards/stack" "github.com/goji/httpauth" "net/http" ) func main() { // Setup goji/httpauth, some third-party middleware authenticate := stack.Middleware(httpauth.SimpleBasicAuth("user", "pass")) // Create a handler chain and register it with the DefaultServeMux http.Handle("/", stack.New(authenticate, tokenMiddleware).Then(tokenHandler)) http.ListenAndServe(":3000", nil) } func tokenMiddleware(ctx stack.Context, next http.Handler) http.Handler { return http.HandlerFunc(func(w http.ResponseWriter, r *http.Request) { // Add a value to Context with the key 'token' ctx["token"] = "c9e452805dee5044ba520198628abcaa" next.ServeHTTP(w, r) }) } func tokenHandler(ctx stack.Context) http.Handler { return http.HandlerFunc(func(w http.ResponseWriter, r *http.Request) { // Retrieve the token from Context and print it fmt.Fprintf(w, "Token is: %s", ctx["token"]) }) } $ curl -i user:pass@localhost:3000 HTTP/1.1 200 OK Content-Length: 41 Content-Type: text/plain; charset=utf-8 Token is: c9e452805dee5044ba520198628abcaa $ curl -i user:wrongpass@localhost:3000 HTTP/1.1 401 Unauthorized Content-Length: 13 Content-Type: text/plain; charset=utf-8 Www-Authenticate: Basic realm="Restricted" Unauthorized If you found this post useful, you might like to subscribe to my RSS feed.
Alex Edwards Dec 3, 2014 -
When you're building a web application, there's probably some shared functionality that you want to run for many (or even all) HTTP requests. You might want to log every request, gzip every response, or check that a user is authenticated before sending them any content. One way of organizing this shared functionality is to set it up as middleware — essentially a self-contained block of code that independently acts on a request, before or after your normal application handlers. In this post I'll explain how to create and use your own middleware, how to chain multiple middlewares together, and finish up with some practical real-world examples and tips. The standard pattern Before we talk about middleware, take a moment to consider the structure of the messageHandler function in the following code: func messageHandler(message string) http.Handler { return http.HandlerFunc(func(w http.ResponseWriter, r *http.Request) { w.Write([]byte(message)) }) } func main() { mux := http.NewServeMux() mux.Handle("GET /", messageHandler("Hello world!")) log.Print("listening on :3000...") err := http.ListenAndServe(":3000", mux) log.Fatal(err) } In this code we put our messageHandler logic — which is just a call to w.Write() — in an anonymous function which 'closes over' the message variable to form a closure. We then convert the closure to an http.Handler with the http.HandlerFunc() adapter, and then return it. Note: If this pattern is confusing or unfamiliar to you, before you go any further I recommend reading this primer which explains it in more detail. We can use this same general pattern to help us create a middleware function. Instead of passing a string into the closure (like above), you can pass another http.Handler as a parameter, and then transfer control to this handler by calling its ServeHTTP() method. Like so: func exampleMiddleware(next http.Handler) http.Handler { return http.HandlerFunc(func(w http.ResponseWriter, r *http.Request) { // Your middleware logic goes here... next.ServeHTTP(w, r) }) } Essentially, the exampleMiddleware function accepts a next handler as a parameter, and it returns a closure which is also a handler. When this closure is executed, any code in the closure will be run and then the next handler will be called. Using middleware on specific routes If any of that sounds confusing, don't worry! In practice you can copy and paste that code pattern if you need to, and beyond that, making and using middleware is actually fairly straightforward. Let's start by looking at an example of how to use middleware on specific routes in your application. main.go package main import ( "log" "net/http" ) func middlewareOne(next http.Handler) http.Handler { return http.HandlerFunc(func(w http.ResponseWriter, r *http.Request) { log.Println(r.URL.Path, "executing middlewareOne") next.ServeHTTP(w, r) log.Println(r.URL.Path, "executing middlewareOne again") }) } func fooHandler(w http.ResponseWriter, r *http.Request) { log.Println(r.URL.Path, "executing fooHandler") w.Write([]byte("OK")) } func barHandler(w http.ResponseWriter, r *http.Request) { log.Println(r.URL.Path, "executing barHandler") w.Write([]byte("OK")) } func main() { mux := http.NewServeMux() mux.Handle("GET /foo", http.HandlerFunc(fooHandler)) mux.Handle("GET /bar", middlewareOne(http.HandlerFunc(barHandler))) log.Print("listening on :3000...") err := http.ListenAndServe(":3000", mux) log.Fatal(err) } There is quite a lot going on in this code, so let's take a moment to unpack some of it: We've created a middleware function called middlewareOne, which uses the standard pattern that we talked about above. The middleware logs a message, calls the next handler, and then logs another message. We've made two normal handler functions, fooHandler and barHandler, which both log a message and send a 200 OK response. In the route mux.Handle("GET /foo", http.HandlerFunc(fooHandler)), we use the http.HandlerFunc() function to convert fooHandler to a http.Handler, and use it as normal with no middleware. In the route mux.Handle("GET /bar", middlewareOne(http.HandlerFunc(barHandler))), we use the http.HandlerFunc() function to convert barHandler to a http.Handler, and then pass it to the middlewareOne function as the next argument. Or in simpler terms — we wrap barHandler with the middlewareOne middleware function. If you run this application and make a request to http://localhost:3000/foo, you should see some log output containing only the message from fooHandler: $ go run main.go 2025/07/05 19:00:56 listening on :3000... 2025/07/05 19:01:09 /foo executing fooHandler In contrast, if you make a request to http://localhost:3000/bar, you should also see the log messages from middlewareOne, demonstrating that the middleware is successfully being used on that route. ... 2025/07/05 19:02:43 /bar executing middlewareOne 2025/07/05 19:02:43 /bar executing barHandler 2025/07/05 19:02:43 /bar executing middlewareOne again This log output also nicely illustrates the flow of control through the application code. We can see that any code in middlewareOne which comes before next.ServeHTTP(w, r) runs before barHandler is executed — and any code which comes after next.ServeHTTP(w, r) runs after barHandler has returned. So the flow of control through the application for the GET /bar route looks like this: http.ServeMux → middlewareOne → barHandler → middlewareOne → http.ServeMux Using middleware on all routes In the previous example, we used our middleware to wrap a specific handler in a specific route. But if you want your middleware to act on all routes, you can wrap http.ServeMux itself so that the flow of control looks like this: middlewareOne → http.ServeMux → fooHandler/barHandler → http.ServeMux → middlewareOne This works because Go's http.ServeMux implements the http.Handler interface — it has the necessary ServeHTTP() method. And as a result, we can directly pass an http.ServeMux into a middleware function as the next parameter. Let's update our example code to do this: main.go package main ... func main() { mux := http.NewServeMux() // We don't use any middleware on the individual routes. mux.Handle("GET /foo", http.HandlerFunc(fooHandler)) mux.Handle("GET /bar", http.HandlerFunc(fooHandler)) log.Println("listening on :3000...") // Wrap the http.ServeMux with the middlewareOne function. err := http.ListenAndServe(":3000", middlewareOne(mux)) log.Fatal(err) } And if you run the application and make the same requests to /foo and /bar again, you should see from the log output that middlewareOne is now being used on all routes. $ go run main.go 2025/07/05 19:04:48 listening on :3000... 2025/07/05 19:04:54 /foo executing middlewareOne 2025/07/05 19:04:54 /foo executing fooHandler 2025/07/05 19:04:54 /foo executing middlewareOne again 2025/07/05 19:04:58 /bar executing middlewareOne 2025/07/05 19:04:58 /bar executing fooHandler 2025/07/05 19:04:58 /bar executing middlewareOne again Chaining middleware Because the standard middleware function pattern accepts a http.Handler as a parameter, and it returns a http.Handler, that makes it possible to easily create arbitrarily long chains of middleware. Put simply, one middleware function can wrap another middleware function. To illustrate this, let's add some more middleware functions to our example and chain them together. main.go package main import ( "log" "net/http" ) func middlewareOne(next http.Handler) http.Handler { return http.HandlerFunc(func(w http.ResponseWriter, r *http.Request) { log.Println(r.URL.Path, "executing middlewareOne") next.ServeHTTP(w, r) log.Println(r.URL.Path, "executing middlewareOne again") }) } func middlewareTwo(next http.Handler) http.Handler { return http.HandlerFunc(func(w http.ResponseWriter, r *http.Request) { log.Println(r.URL.Path, "executing middlewareTwo") next.ServeHTTP(w, r) log.Println(r.URL.Path, "executing middlewareTwo again") }) } func middlewareThree(next http.Handler) http.Handler { return http.HandlerFunc(func(w http.ResponseWriter, r *http.Request) { log.Println(r.URL.Path, "executing middlewareThree") next.ServeHTTP(w, r) log.Println(r.URL.Path, "executing middlewareThree again") }) } func middlewareFour(next http.Handler) http.Handler { return http.HandlerFunc(func(w http.ResponseWriter, r *http.Request) { log.Println(r.URL.Path, "executing middlewareFour") next.ServeHTTP(w, r) log.Println(r.URL.Path, "executing middlewareFour again") }) } func middlewareFive(next http.Handler) http.Handler { return http.HandlerFunc(func(w http.ResponseWriter, r *http.Request) { log.Println(r.URL.Path, "executing middlewareFive") next.ServeHTTP(w, r) log.Println(r.URL.Path, "executing middlewareFive again") }) } func fooHandler(w http.ResponseWriter, r *http.Request) { log.Println(r.URL.Path, "executing fooHandler") w.Write([]byte("OK")) } func barHandler(w http.ResponseWriter, r *http.Request) { log.Println(r.URL.Path, "executing barHandler") w.Write([]byte("OK")) } func main() { mux := http.NewServeMux() // Apply middlewareThree and middlewareFour to GET /foo mux.Handle("GET /foo", middlewareThree(middlewareFour(http.HandlerFunc(fooHandler)))) // Apply middlewareFour and middlewareFive to GET /bar mux.Handle("GET /bar", middlewareFour(middlewareFive(http.HandlerFunc(barHandler)))) log.Println("listening on :3000...") // Apply middlewareOne and middlewareTwo to the entire http.ServeMux err := http.ListenAndServe(":3000", middlewareOne(middlewareTwo(mux))) log.Fatal(err) } In this code we are now wrapping the http.ServeMux with middlewares One and Two, on the GET /foo route we're using middlewares Three and Four, and on the GET /bar route we're using middlewares Four and Five. Again, if you run the application and make the same requests to /foo and /bar you should now see log output that demonstrates the middleware functions being chained together and the flow of control through them. Like so: 2025/07/05 19:06:25 /foo executing middlewareOne 2025/07/05 19:06:25 /foo executing middlewareTwo 2025/07/05 19:06:25 /foo executing middlewareThree 2025/07/05 19:06:25 /foo executing middlewareFour 2025/07/05 19:06:25 /foo executing fooHandler 2025/07/05 19:06:25 /foo executing middlewareFour again 2025/07/05 19:06:25 /foo executing middlewareThree again 2025/07/05 19:06:25 /foo executing middlewareTwo again 2025/07/05 19:06:25 /foo executing middlewareOne again 2025/07/05 19:06:43 /bar executing middlewareOne 2025/07/05 19:06:43 /bar executing middlewareTwo 2025/07/05 19:06:43 /bar executing middlewareFour 2025/07/05 19:06:43 /bar executing middlewareFive 2025/07/05 19:06:43 /bar executing barHandler 2025/07/05 19:06:43 /bar executing middlewareFive again 2025/07/05 19:06:43 /bar executing middlewareFour again 2025/07/05 19:06:43 /bar executing middlewareTwo again 2025/07/05 19:06:43 /bar executing middlewareOne again Early returns One of the useful things about middleware is that you can use it as a 'guard' to prevent downstream middleware and handlers in the chain from being executed unless certain conditions are met. For example, you can use middleware to check if a user is authenticated, or that a request contains the correct Content-Type header, or that the client hasn't hit a rate-limiter ceiling before doing any further processing. For example, you could create a middleware function to ensure that the request Content-Type header exactly matches application/json by returning early from the middleware, before calling next.ServeHTTP(w, r). Like this: func requireJSON(next http.Handler) http.Handler { return http.HandlerFunc(func(w http.ResponseWriter, r *http.Request) { contentType := r.Header.Get("Content-Type") // If the content type is not application/json, send an error message and // return from the middleware. By returning before next.ServeHTTP(w, r) // is called, it means that the next handler in the chain is never executed. if contentType != "application/json" { http.Error(w, "Content-Type header must be application/json", http.StatusUnsupportedMediaType) return } // Otherwise, if the content type is application/json, call the next handler // in the chain as normal. next.ServeHTTP(w, r) }) } A more realistic example Now that we've covered the theory, let's look at a more practical example to give you a taste for using middleware in a real application. In this code, we'll create two middleware functions that we want to use on all routes: A serverHeader middleware that adds the Server: Go header to HTTP responses. A logRequest middleware that uses the log/slog package to log the details of the current request. And we'll also create a GET /admin route that is guarded by a requireBasicAuthentication middleware function, which requires the client to authenticate via HTTP basic authentication. This is another example where we will use the 'early return' pattern that we just talked about. main.go package main import ( "log/slog" "net/http" "os" ) func serverHeader(next http.Handler) http.Handler { return http.HandlerFunc(func(w http.ResponseWriter, r *http.Request) { w.Header().Set("Server", "Go") next.ServeHTTP(w, r) }) } func logRequest(next http.Handler) http.Handler { return http.HandlerFunc(func(w http.ResponseWriter, r *http.Request) { var ( ip = r.RemoteAddr method = r.Method url = r.URL.String() proto = r.Proto ) userAttrs := slog.Group("user", "ip", ip) requestAttrs := slog.Group("request", "method", method, "url", url, "proto", proto) slog.Info("request received", userAttrs, requestAttrs) next.ServeHTTP(w, r) }) } func requireBasicAuthentication(next http.Handler) http.Handler { return http.HandlerFunc(func(w http.ResponseWriter, r *http.Request) { validUsername := "admin" validPassword := "secret" username, password, ok := r.BasicAuth() if !ok || username != validUsername || password != validPassword { w.Header().Set("WWW-Authenticate", `Basic realm="protected"`) http.Error(w, "401 Unauthorized", http.StatusUnauthorized) return } next.ServeHTTP(w, r) }) } func home(w http.ResponseWriter, r *http.Request) { w.Write([]byte("Welcome to the home page!")) } func admin(w http.ResponseWriter, r *http.Request) { w.Write([]byte("Admin dashboard - you are authenticated!")) } func main() { mux := http.NewServeMux() mux.HandleFunc("GET /{$}", home) // Use the requireBasicAuthentication middleware on the GET /admin route only. mux.Handle("GET /admin", requireBasicAuthentication(http.HandlerFunc(admin))) slog.Info("listening on :3000...") // Use the serverHeader and logRequest middleware on all routes. err := http.ListenAndServe(":3000", serverHeader(logRequest(mux))) if err != nil { slog.Error(err.Error()) os.Exit(1) } } Please note: I've made the requireBasicAuthentication code deliberately simple for this example, and while it works correctly, there is the tiny but theoretical risk of it being vulnerable to a timing attack. If this is something you're concerned about, I've written about how to mitigate that risk in this blog post. Go ahead and run this application, then open a second terminal window and use curl to make a request to GET /, and unauthenticated and authenticated requests to GET /admin. The responses should look similar to this: $ curl -i localhost:3000 HTTP/1.1 200 OK Server: Go Date: Sat, 05 Jul 2025 12:19:24 GMT Content-Length: 25 Content-Type: text/plain; charset=utf-8 Welcome to the home page! $ curl -i localhost:3000/admin HTTP/1.1 401 Unauthorized Content-Type: text/plain; charset=utf-8 Server: Go Www-Authenticate: Basic realm="protected" X-Content-Type-Options: nosniff Date: Sat, 05 Jul 2025 12:19:32 GMT Content-Length: 17 401 Unauthorized $ curl -i -u admin:secret localhost:3000/admin HTTP/1.1 200 OK Server: Go Date: Sat, 05 Jul 2025 12:26:53 GMT Content-Length: 40 Content-Type: text/plain; charset=utf-8 Admin dashboard - you are authenticated! We can see from these responses that our serverHeader middleware is setting the Server: Go header on all responses, and that the requireBasicAuthentication middleware is correctly protecting our GET /admin route. And if you head back to your original terminal window, you should see the corresponding log entries courtesy of the logRequest middleware. Similar to this: $ go run main.go 2025/07/05 14:18:44 INFO listening on :3000... 2025/07/05 14:19:24 INFO request received user.ip=127.0.0.1:41966 request.method=GET request.url=/ request.proto=HTTP/1.1 2025/07/05 14:19:32 INFO request received user.ip=127.0.0.1:59244 request.method=GET request.url=/admin request.proto=HTTP/1.1 2025/07/05 14:26:53 INFO request received user.ip=127.0.0.1:57670 request.method=GET request.url=/admin request.proto=HTTP/1.1 Managing and organizing middleware Lastly, a couple of tips. If you have an application with lots of routes and lots of middleware, you can potentially end up with very long route declarations and a lot of duplication in those declarations, which isn't ideal for easy-reading or maintainability. One of the tools that I've used for a long time to help manage this is justinas/alice, which is a small package that makes it easy to create reusable chains of handlers. At it's most basic, it let's you rewrite code that looks like this: mux.Handle("GET /foo", middlewareOne(middlewareTwo(middlewareThree(http.HandlerFunc(fooHandler))))) mux.Handle("GET /bar", middlewareOne(middlewareTwo(middlewareThree(http.HandlerFunc(barHandler))))) As this: stdChain := alice.New(middlewareOne, middlewareTwo, middlewareThree) mux.Handle("/foo", stdChain.Then(fooHandler)) mux.Handle("/bar", stdChain.Then(barHandler)) More recently, I've been rolling my own custom chain type instead of using justinas/alice, or wrapping http.ServeMux so that it supports 'groups' of routes which use specific middleware. If you're interested in this, I've written a more about it in the post "Organize your Go middleware without dependencies", and it's probably a good follow-on read from this post.
Alex Edwards Oct 21, 2014 -
Often in web applications you need to temporarily store data in-between requests, such as an error or success message during the Post-Redirect-Get process for a form submission. Frameworks such as Rails and Django have the concept of transient single-use flash messages to help with this. In this post I'm going to look at a way to create your own cookie-based flash messages in Go. We'll start by creating a directory for the project, along with a flash.go file for our code and a main.go file for an example application. $ mkdir flash-example $ cd flash-example $ touch flash.go main.go In order to keep our request handlers nice and clean, we'll create our primary SetFlash() and GetFlash() helper functions in the flash.go file. File: flash.go package main import ( "encoding/base64" "net/http" "time" ) func SetFlash(w http.ResponseWriter, name string, value []byte) { c := &http.Cookie{Name: name, Value: encode(value)} http.SetCookie(w, c) } func GetFlash(w http.ResponseWriter, r *http.Request, name string) ([]byte, error) { c, err := r.Cookie(name) if err != nil { switch err { case http.ErrNoCookie: return nil, nil default: return nil, err } } value, err := decode(c.Value) if err != nil { return nil, err } dc := &http.Cookie{Name: name, MaxAge: -1, Expires: time.Unix(1, 0)} http.SetCookie(w, dc) return value, nil } // ------------------------- func encode(src []byte) string { return base64.URLEncoding.EncodeToString(src) } func decode(src string) ([]byte, error) { return base64.URLEncoding.DecodeString(src) } Our SetFlash() function is pretty succinct. It creates a new Cookie, containing the name of the flash message and the content. You'll notice that we're encoding the content – this is because RFC 6265 is quite strict about the characters cookie values can contain, and encoding to base64 ensures our value satisfies the permitted character set. We then use the SetCookie function to write the cookie to the response. In the GetFlash() helper we use the request.Cookie method to load up the cookie containing the flash message – returning nil if it doesn't exist – and then decode the value from base64 back into a byte array. Because we want a flash message to only be available once, we need to instruct clients to not resend the cookie with future requests. We can do this by setting a new cookie with exactly the same name, with MaxAge set to a negative number and Expiry set to a historical time (to cater for old versions of IE). You should note that Go will only set an expiry time on a cookie if it is after the Unix epoch, so we've set ours for 1 second after that. Let's use these helper functions in a short example: File: main.go package main import ( "fmt" "net/http" ) func main() { http.HandleFunc("/set", set) http.HandleFunc("/get", get) fmt.Println("Listening...") http.ListenAndServe(":3000", nil) } func set(w http.ResponseWriter, r *http.Request) { fm := []byte("This is a flashed message!") SetFlash(w, "message", fm) } func get(w http.ResponseWriter, r *http.Request) { fm, err := GetFlash(w, r, "message") if err != nil { http.Error(w, err.Error(), http.StatusInternalServerError) return } if fm == nil { fmt.Fprint(w, "No flash messages") return } fmt.Fprintf(w, "%s", fm) } Run the application: $ go run main.go flash.go Listening... And make some requests against it using cURL: $ curl -i --cookie-jar cj localhost:3000/set HTTP/1.1 200 OK Set-Cookie: message=VGhpcyBpcyBhIGZsYXNoZWQgbWVzc2FnZSE= Content-Type: text/plain; charset=utf-8 Content-Length: 0 $ curl -i --cookie-jar cj --cookie cj localhost:3000/get HTTP/1.1 200 OK Set-Cookie: message=; Expires=Thu, 01 Jan 1970 00:00:01 UTC; Max-Age=0 Content-Type: text/plain; charset=utf-8 Content-Length: 26 This is a flashed message! $ curl -i --cookie-jar cj --cookie cj localhost:3000/get HTTP/1.1 200 OK Content-Type: text/plain; charset=utf-8 Content-Length: 17 No flash messages You can see our flash message being set, retrieved, and then not passed with subsequent requests as expected. Additional Tools If you don't want to roll your own helpers for flash messages, or need them to be 'signed' to prevent tampering, then the Gorilla Sessions package is a good option. Here's the previous example implemented with Gorilla instead: package main import ( "fmt" "github.com/gorilla/sessions" "net/http" ) func main() { http.HandleFunc("/set", set) http.HandleFunc("/get", get) fmt.Println("Listening...") http.ListenAndServe(":3000", nil) } var store = sessions.NewCookieStore([]byte("a-secret-string")) func set(w http.ResponseWriter, r *http.Request) { session, err := store.Get(r, "flash-session") if err != nil { http.Error(w, err.Error(), http.StatusInternalServerError) } session.AddFlash("This is a flashed message!", "message") session.Save(r, w) } func get(w http.ResponseWriter, r *http.Request) { session, err := store.Get(r, "flash-session") if err != nil { http.Error(w, err.Error(), http.StatusInternalServerError) } fm := session.Flashes("message") if fm == nil { fmt.Fprint(w, "No flash messages") return } session.Save(r, w) fmt.Fprintf(w, "%v", fm[0]) } If you found this post useful, you might like to subscribe to my RSS feed.
Alex Edwards Nov 19, 2013 -

In this post I want to outline a sensible pattern that you can use for validating and processing HTML forms in Go web applications. Over the years I've tried out a number of different approaches, but this is the basic pattern that I always keep coming back to. It's clear and uncomplicated, but also flexible and extensible enough to work well in a wide variety of projects and scenarios. To illustrate the pattern, I'll run through the start-to-finish build of a simple online contact form. So let's begin by creating a new directory for the application, along with a main.go file for our code and a couple of vanilla HTML templates: $ mkdir -p contact-form/templates $ cd contact-form $ touch main.go templates/home.html templates/confirmation.html File: templates/home.html <h1>Contact</h1> <form action="/" method="POST" novalidate> <div> <p><label>Your email:</label></p> <p><input type="email" name="email"></p> </div> <div> <p><label>Your message:</label></p> <p><textarea name="content"></textarea></p> </div> <div> <input type="submit" value="Send message"> </div> </form> File: templates/confirmation.html <h1>Confirmation</h1> <p>Your message has been sent!</p> If you're following along you'll also need to enable modules in the application root by running the go mod init command like so: $ go mod init contact-form.example.com go: creating new go.mod: module contact-form.example.com Once that's done, your directory structure should look like this: . ├── templates │ ├── confirmation.html │ └── home.html ├── go.mod └── main.go Displaying the Form Our application is going to provide three routes: Method URL Path Handler Description GET / home Display the contact form POST / send Submit the contact form GET /confirmation confirmation Display a confirmation message after successful submission To handle the routing of requests we're going to use bmizerany/pat – but if you want to use an alternative Go router please feel free. Let's go ahead and create a skeleton for the application: File: main.go package main import ( "html/template" "log" "net/http" "github.com/bmizerany/pat" ) func main() { mux := pat.New() mux.Get("/", http.HandlerFunc(home)) mux.Post("/", http.HandlerFunc(send)) mux.Get("/confirmation", http.HandlerFunc(confirmation)) log.Print("Listening...") err := http.ListenAndServe(":3000", mux) if err != nil { log.Fatal(err) } } func home(w http.ResponseWriter, r *http.Request) { render(w, "templates/home.html", nil) } func send(w http.ResponseWriter, r *http.Request) { // Step 1: Validate form // Step 2: Send message in an email // Step 3: Redirect to confirmation page } func confirmation(w http.ResponseWriter, r *http.Request) { render(w, "templates/confirmation.html", nil) } func render(w http.ResponseWriter, filename string, data interface{}) { tmpl, err := template.ParseFiles(filename) if err != nil { log.Print(err) http.Error(w, "Sorry, something went wrong", http.StatusInternalServerError) } if err := tmpl.Execute(w, data); err != nil { log.Print(err) http.Error(w, "Sorry, something went wrong", http.StatusInternalServerError) } } This is fairly straightforward stuff so far. The only real point of note is that we've put the template handling into a render function to cut down on boilerplate code. If you run the application: $ go run . 2020/03/30 06:41:42 Listening... And then visit localhost:3000 in your browser you should see the contact form being displayed (although it doesn't do anything yet!). Validating the Form Now for the interesting part. Let's add some validation rules to this contact form, display the validation errors if there are any, and make sure that the form values get presented back if there's an error so the user doesn't need to retype them. We could add the code for this inline in our send handler, but personally I find it cleaner and neater to break out the logic into a separate message.go file: $ touch message.go File: message.go package main import ( "regexp" "strings" ) var rxEmail = regexp.MustCompile(".+@.+\\..+") type Message struct { Email string Content string Errors map[string]string } func (msg *Message) Validate() bool { msg.Errors = make(map[string]string) match := rxEmail.Match([]byte(msg.Email)) if match == false { msg.Errors["Email"] = "Please enter a valid email address" } if strings.TrimSpace(msg.Content) == "" { msg.Errors["Content"] = "Please enter a message" } return len(msg.Errors) == 0 } So what's going on here? We've started by defining a rxEmail variable, containing a simple regular expression for validating the format of the email address in the form. Then we define a Message struct, consisting of Email and Content fields (which will hold the data from the submitted form), along with an Errors map to hold any validation error messages. We then created a Validate() method that acts on a given Message, which checks the format of the email address and makes sure that the content isn't blank. In the event of any errors we add them to the Errors map, and finally return a true or false value to indicate whether validation passed successful or not. In a large project you might want to break the validation checks into helper functions to reduce duplication. This approach means that we can keep the code in our send handler fantastically light. All we need it to do is retrieve the form values from the POST request, create a new Message instance containing them, and call Validate(). If the validation fails we can re-render the contact form, passing back the relevant Message struct. Like so: File: main.go ... func send(w http.ResponseWriter, r *http.Request) { // Step 1: Validate form msg := &Message{ Email: r.PostFormValue("email"), Content: r.PostFormValue("content"), } if msg.Validate() == false { render(w, "templates/home.html", msg) return } // Step 2: Send message in an email // Step 3: Redirect to confirmation page } ... As a side note, in the code above we're using the PostFormValue() method on the request to access the POST data. This is a helper method which parses the form data in the request body (using ParseForm()) and returns the value for a specific field. If no matching field exists in the request body, it will return the empty string "". For large request bodies, you might also want to consider using the Gorilla Schema package to automatically decode the form values in to a struct, instead of assigning them manually like we have done in the code above. Anyway, let's now update our home.html template so it displays the validation errors (if they exist) above the relevant fields, and repopulate the form inputs with any information that the user previously typed in: File: templates/home.html <style type="text/css">.error {color: red;}</style> <h1>Contact</h1> <form action="/" method="POST" novalidate> <div> {{ with .Errors.Email }} <p class="error">{{ . }}</p> {{ end }} <p><label>Your email:</label></p> <p><input type="email" name="email" value="{{ .Email }}"></p> </div> <div> {{ with .Errors.Content }} <p class="error" >{{ . }}</p> {{ end }} <p><label>Your message:</label></p> <p><textarea name="content">{{ .Content }}</textarea></p> </div> <div> <input type="submit" value="Send message"> </div> </form> Let's try this out. Go ahead and run the application: $ go run . 2020/03/30 08:41:42 Listening... And try submitting an invalid form. You should find that the form is redisplayed along with the relevant data and validation errors like so: Sending the Contact Form Message Great! That's now working nicely, but our contact form isn't very useful unless we actually do something with it. Let's add a Deliver() method to our Message which sends the contact form message to a particular email address. In the code below I'm using the go-mail/mail package and a mailtrap.io account for email sending, but the same thing should work with any other SMTP server. File: message.go package main import ( "regexp" "strings" "github.com/go-mail/mail" ) ... func (msg *Message) Deliver() error { email := mail.NewMessage() email.SetHeader("To", "admin@example.com") email.SetHeader("From", "server@example.com") email.SetHeader("Reply-To", msg.Email) email.SetHeader("Subject", "New message via Contact Form") email.SetBody("text/plain", msg.Content) username := "your_username" password := "your_password" return mail.NewDialer("smtp.mailtrap.io", 25, username, password).DialAndSend(email) } The final step is to head back to our main.go file, add some code to call Deliver(), and issue a 303 See Other redirect to the confirmation page that we made earlier: File: main.go ... func send(w http.ResponseWriter, r *http.Request) { // Step 1: Validate form msg := &Message{ Email: r.PostFormValue("email"), Content: r.PostFormValue("content"), } if msg.Validate() == false { render(w, "templates/home.html", msg) return } // Step 2: Send contact form message in an email if err := msg.Deliver(); err != nil { log.Print(err) http.Error(w, "Sorry, something went wrong", http.StatusInternalServerError) return } // Step 3: Redirect to confirmation page http.Redirect(w, r, "/confirmation", http.StatusSeeOther) } ... So long as your SMTP server account credentials are set up correctly, you should now be able to successfully submit the contact form and you should see the confirmation message below in your browser.
Alex Edwards Nov 1, 2013 -
Taking inspiration from the Rails layouts and rendering guide, I thought it'd be a nice idea to build a snippet collection illustrating some common HTTP responses for Go web applications. Sending Headers Only Rendering Plain Text Rendering JSON Rendering XML Serving a File Rendering a HTML Template Rendering a HTML Template to a String Using Layouts and Nested Templates Sending Headers Only File: main.go package main import ( "net/http" ) func main() { http.HandleFunc("/", foo) http.ListenAndServe(":3000", nil) } func foo(w http.ResponseWriter, r *http.Request) { w.Header().Set("Server", "A Go Web Server") w.WriteHeader(200) } $ curl -i localhost:3000 HTTP/1.1 200 OK Server: A Go Web Server Content-Type: text/plain; charset=utf-8 Content-Length: 0 Rendering Plain Text File: main.go package main import ( "net/http" ) func main() { http.HandleFunc("/", foo) http.ListenAndServe(":3000", nil) } func foo(w http.ResponseWriter, r *http.Request) { w.Write([]byte("OK")) } $ curl -i localhost:3000 HTTP/1.1 200 OK Content-Type: text/plain; charset=utf-8 Content-Length: 2 OK Rendering JSON File: main.go package main import ( "encoding/json" "net/http" ) type Profile struct { Name string Hobbies []string } func main() { http.HandleFunc("/", foo) http.ListenAndServe(":3000", nil) } func foo(w http.ResponseWriter, r *http.Request) { profile := Profile{"Alex", []string{"snowboarding", "programming"}} js, err := json.Marshal(profile) if err != nil { http.Error(w, err.Error(), http.StatusInternalServerError) return } w.Header().Set("Content-Type", "application/json") w.Write(js) } $ curl -i localhost:3000 HTTP/1.1 200 OK Content-Type: application/json Content-Length: 56 {"Name":"Alex",Hobbies":["snowboarding","programming"]} Rendering XML File: main.go package main import ( "encoding/xml" "net/http" ) type Profile struct { Name string Hobbies []string `xml:"Hobbies>Hobby"` } func main() { http.HandleFunc("/", foo) http.ListenAndServe(":3000", nil) } func foo(w http.ResponseWriter, r *http.Request) { profile := Profile{"Alex", []string{"snowboarding", "programming"}} x, err := xml.MarshalIndent(profile, "", " ") if err != nil { http.Error(w, err.Error(), http.StatusInternalServerError) return } w.Header().Set("Content-Type", "application/xml") w.Write(x) } $ curl -i localhost:3000 HTTP/1.1 200 OK Content-Type: application/xml Content-Length: 128 <Profile> <Name>Alex</Name> <Hobbies> <Hobby>snowboarding</Hobby> <Hobby>programming</Hobby> </Hobbies> </Profile> Serving a File File: main.go package main import ( "net/http" "path" ) func main() { http.HandleFunc("/", foo) http.ListenAndServe(":3000", nil) } func foo(w http.ResponseWriter, r *http.Request) { // Assuming you want to serve a photo at 'images/foo.png' fp := path.Join("images", "foo.png") http.ServeFile(w, r, fp) } $ curl -I localhost:3000 HTTP/1.1 200 OK Accept-Ranges: bytes Content-Length: 236717 Content-Type: image/png Last-Modified: Thu, 10 Oct 2013 22:23:26 GMT Rendering a HTML Template File: templates/index.html <h1>Hello {{ .Name }}</h1> <p>Lorem ipsum dolor sit amet, consectetur adipisicing elit.</p> File: main.go package main import ( "html/template" "net/http" "path" ) type Profile struct { Name string Hobbies []string } func main() { http.HandleFunc("/", foo) http.ListenAndServe(":3000", nil) } func foo(w http.ResponseWriter, r *http.Request) { profile := Profile{"Alex", []string{"snowboarding", "programming"}} fp := path.Join("templates", "index.html") tmpl, err := template.ParseFiles(fp) if err != nil { http.Error(w, err.Error(), http.StatusInternalServerError) return } if err := tmpl.Execute(w, profile); err != nil { http.Error(w, err.Error(), http.StatusInternalServerError) } } $ curl -i localhost:3000 HTTP/1.1 200 OK Content-Type: text/html; charset=utf-8 Content-Length: 84 <h1>Hello Alex</h1> <p>Lorem ipsum dolor sit amet, consectetur adipisicing elit.</p> Rendering a HTML Template to a String Instead of passing in the http.ResponseWriter when executing your template (like in the above snippet) use a buffer instead: File: main.go ... buf := new(bytes.Buffer) if err := tmpl.Execute(buf, profile); err != nil { http.Error(w, err.Error(), http.StatusInternalServerError) } templateString := buf.String() ... Using Layouts and Nested Templates File: templates/layout.html <html> <head> <title>{{ template "title" . }}</title> </head> <body> {{ template "content" . }} </body> </html> File: templates/index.html {{ define "title" }}An example layout{{ end }} {{ define "content" }} <h1>Hello {{ .Name }}</h1> <p>Lorem ipsum dolor sit amet, consectetur adipisicing elit.</p> {{ end }} File: main.go package main import ( "html/template" "net/http" "path" ) type Profile struct { Name string Hobbies []string } func main() { http.HandleFunc("/", foo) http.ListenAndServe(":3000", nil) } func foo(w http.ResponseWriter, r *http.Request) { profile := Profile{"Alex", []string{"snowboarding", "programming"}} lp := path.Join("templates", "layout.html") fp := path.Join("templates", "index.html") // Note that the layout file must be the first parameter in ParseFiles tmpl, err := template.ParseFiles(lp, fp) if err != nil { http.Error(w, err.Error(), http.StatusInternalServerError) return } if err := tmpl.Execute(w, profile); err != nil { http.Error(w, err.Error(), http.StatusInternalServerError) } } $ curl -i localhost:3000 HTTP/1.1 200 OK Content-Type: text/html; charset=utf-8 Content-Length: 180 <html> <head> <title>An example layout</title> </head> <body> <h1>Hello Alex</h1> <p>Lorem ipsum dolor sit amet, consectetur adipisicing elit.</p> </body> </html> If you found this post useful, you might like to subscribe to my RSS feed.
Alex Edwards Oct 19, 2013 -
For anyone new to building web applications with Go, it's important to realise that all incoming HTTP requests are served in their own Goroutine. This means that any code in or called by your application handlers will be running concurrently, and there is a risk of race conditions occurring. In case you're new to concurrent programming, I'll quickly explain the problem. Race conditions occur when two or more Goroutines try to use a piece of shared data at the same time, but the result of their operations is dependent on the exact order that the scheduler executes their instructions. As an illustration, here's an example where two Goroutines try to add money to a shared bank balance at the same time: InstructionGoroutine 1Goroutine 2Bank Balance 1Read balance ⇐ £50£50 2Read balance ⇐ £50£50 3Add £100 to balance£50 4Add £50 to balance£50 5Write balance ⇒ £150£150 6Write balance ⇒ £100£100 Despite making two separate deposits, only the second one is reflected in the final balance because the two Goroutines were racing each other to make the change. The Go blog describes the downsides: Race conditions are among the most insidious and elusive programming errors. They typically cause erratic and mysterious failures, often long after the code has been deployed to production. While Go's concurrency mechanisms make it easy to write clean concurrent code, they don't prevent race conditions. Care, diligence, and testing are required. Go provides a number of tools to help us avoid data races. These include Channels for communicating data between Goroutines, a Race Detector for monitoring unsynchronized access to memory at runtime, and a variety of 'locking' features in the Atomic and Sync packages. One of these features are Mutual Exclusion locks, or mutexes, which we'll be looking at in the rest of this post. Creating a Basic Mutex Let's create some toy code to mimic the bank balance example: import "strconv" var Balance = ¤cy{50.00, "GBP"} type currency struct { amount float64 code string } func (c *currency) Add(i float64) { // This is racy c.amount += i } func (c *currency) Display() string { // This is racy return strconv.FormatFloat(c.amount, 'f', 2, 64) + " " + c.code } We know that if there are multiple Goroutines using this code and calling Balance.Add() and Balance.Display(), then at some point a race condition is likely to occur. One way we could prevent a data race is to ensure that if one Goroutine is using the Balance variable, then all other Goroutines are prevented (or mutually excluded) from using it at the same time. We can do this by creating a Mutex and setting a lock around particular lines of code with it. While one Goroutine holds the lock, all other Goroutines are prevented from executing any lines of code protected by the same mutex, and are forced to wait until the lock is yielded before they can proceed. In practice, it's more simple than it sounds: import ( "strconv" "sync" ) var mu = &sync.Mutex{} var Balance = ¤cy{50.00, "GBP"} type currency struct { amount float64 code string } func (c *currency) Add(i float64) { mu.Lock() c.amount += i mu.Unlock() } func (c *currency) Display() string { mu.Lock() amt := c.amount mu.Unlock() return strconv.FormatFloat(amt, 'f', 2, 64) + " " + c.code } Here we've created a new mutex and assigned it to mu. We then use mu.Lock() to create a lock immediately before both racy parts of the code, and mu.Unlock() to yield the lock immediately after. There's a couple of things to note: The same mutex variable can be used in multiple places throughout your code. So long as it's the same mutex (in our case mu) then none of the chunks of code protected by it can be executed at the same time. Holding a mutex lock doesn't 'protect' a memory location from being read or updated. A non-mutex-locked line of code could still access it at any time and create a race condition. Therefore you need to be careful to make sure all points in your code which are potentially racy are protected. Let's tidy up the example a bit: import ( "strconv" "sync" ) var Balance = ¤cy{amount: 50.00, code: "GBP"} type currency struct { sync.Mutex amount float64 code string } func (c *currency) Add(i float64) { c.Lock() c.amount += i c.Unlock() } func (c *currency) Display() string { c.Lock() defer c.Unlock() return strconv.FormatFloat(c.amount, 'f', 2, 64) + " " + c.code } So what's changed here? Because our mutex is only being used in the context of a currency object, it makes sense to anonymously embed it in the currency struct (an idea borrowed from Andrew Gerrard's excellent 10 things you (probably) don't know about Go slideshow). If you look at a larger codebase with lots of mutexes, like Go's HTTP Server, you can see how this approach helps to keep locking rules nice and clear. We've also made use of the defer statement, which ensures that the mutex gets unlocked immediately before a function returns. This is common practice for functions that contain multiple return statements, or where the return statement itself is racy. Read Write Mutexes In our bank balance example, having a full mutex lock on the Display() function isn't strictly necessary. It would be OK for us to have multiple reads of Balance happening at the same time, so long as nothing is being written. We can achieve this using RWMutex, a reader/writer mutual exclusion lock which allows any number of readers to hold the lock or one writer. Depending on the nature of your application and ratio of reads to writes, this may be more efficient than using a full mutex. Reader locks can be opened and closed with RLock() and RUnlock() like so: import ( "strconv" "sync" ) var Balance = ¤cy{amount: 50.00, code: "GBP"} type currency struct { sync.RWMutex amount float64 code string } func (c *currency) Add(i float64) { c.Lock() c.amount += i c.Unlock() } func (c *currency) Display() string { c.RLock() defer c.RUnlock() return strconv.FormatFloat(c.amount, 'f', 2, 64) + " " + c.code } If you found this post useful, you might like to subscribe to my RSS feed.
Alex Edwards Oct 4, 2013 -
I wrote a short Bash script to automatically reload Go programs. The script acts as a light wrapper around go run, stopping and restarting it whenever a .go file in your current directory or $GOPATH/src folder is saved. I've been using it mainly when developing web applications, in the same way that I use Shotgun or Guard when working with Ruby. You can grab this from the Github repository. File: go-reload #!/bin/bash # Watch all *.go files in the specified directory # Call the restart function when they are saved function monitor() { inotifywait -q -m -r -e close_write --exclude '[^g][^o]$' $1 | while read line; do restart done } # Terminate and rerun the main Go program function restart { if [ "$(pidof $PROCESS_NAME)" ]; then killall -q -w -9 $PROCESS_NAME fi echo ">> Reloading..." go run $FILE_PATH $ARGS & } # Make sure all background processes get terminated function close { killall -q -w -9 inotifywait exit 0 } trap close INT echo "== Go-reload" echo ">> Watching directories, CTRL+C to stop" FILE_PATH=$1 FILE_NAME=$(basename $FILE_PATH) PROCESS_NAME=${FILE_NAME%%.*} shift ARGS=$@ # Start the main Go program go run $FILE_PATH $ARGS & # Monitor the /src directories in all directories on the GOPATH OIFS="$IFS" IFS=':' for path in $GOPATH do monitor $path/src & done IFS="$OIFS" # Monitor the current directory monitor . Usage The only dependency for this script is inotify-tools, which is used to monitor the filesystem for changes. $ sudo apt-get install inotify-tools Once you've downloaded (or copy-pasted) the script, you'll need to make it executable and move it to /usr/local/bin or another directory on your system path: $ wget https://raw.github.com/alexedwards/go-reload/master/go-reload $ chmod +x go-reload $ sudo mv go-reload /usr/local/bin/ You should then be able to use the go-reload command in place of go run: $ go-reload main.go == Go-reload >> Watching directories, CTRL+C to stop If you found this post useful, you might like to subscribe to my RSS feed.
Alex Edwards Sep 20, 2013 -
Processing HTTP requests with Go is primarily about two things: handlers and servemuxes. If you’re coming from an MVC-background, you can think of handlers as being a bit like controllers. Generally speaking, they're responsible for carrying out your application logic and writing response headers and bodies. Whereas a servemux (also known as a router) stores a mapping between the predefined URL paths for your application and the corresponding handlers. Usually you have one servemux for your application containing all your routes. Go's net/http package ships with the simple but effective http.ServeMux servemux, plus a few functions to generate common handlers including http.FileServer(), http.NotFoundHandler() and http.RedirectHandler(). Let's take a look at a simple (but slightly contrived!) example which uses these: $ mkdir example $ cd example $ go mod init example.com $ touch main.go File: main.go package main import ( "log" "net/http" ) func main() { // Use the http.NewServeMux() function to create an empty servemux. mux := http.NewServeMux() // Use the http.RedirectHandler() function to create a handler which 307 // redirects all requests it receives to http://example.org. rh := http.RedirectHandler("http://example.org", 307) // Next we use the mux.Handle() function to register this with our new // servemux, so it acts as the handler for all incoming requests with the URL // path /foo. mux.Handle("/foo", rh) log.Print("Listening...") // Then we create a new server and start listening for incoming requests // with the http.ListenAndServe() function, passing in our servemux for it to // match requests against as the second parameter. http.ListenAndServe(":3000", mux) } Go ahead and run the application: $ go run main.go 2021/12/06 15:09:43 Listening... And if you make a request to http://localhost:3000/foo you should find that it gets successfully redirected like so: $ curl -IL localhost:3000/foo HTTP/1.1 307 Temporary Redirect Content-Type: text/html; charset=utf-8 Location: http://example.org Date: Mon, 06 Dec 2021 14:10:18 GMT HTTP/1.1 200 OK Content-Encoding: gzip Accept-Ranges: bytes Age: 254488 Cache-Control: max-age=604800 Content-Type: text/html; charset=UTF-8 Date: Mon, 06 Dec 2021 14:10:18 GMT Etag: "3147526947+gzip" Expires: Mon, 13 Dec 2021 14:10:18 GMT Last-Modified: Thu, 17 Oct 2019 07:18:26 GMT Server: ECS (dcb/7EEF) X-Cache: HIT Content-Length: 648 Whereas all other requests should be met with a 404 Not Found error response. $ curl -IL localhost:3000/bar HTTP/1.1 404 Not Found Content-Type: text/plain; charset=utf-8 X-Content-Type-Options: nosniff Date: Mon, 06 Dec 2021 14:22:51 GMT Content-Length: 19 Custom handlers The handlers that ship with net/http are useful, but most of the time when building a web application you'll want to use your own custom handlers instead. So how do you do that? The first thing to explain is that anything in Go can be a handler so long as it satisfies the http.Handler interface, which looks like this: type Handler interface { ServeHTTP(ResponseWriter, *Request) } If you're not familiar with interfaces in Go I've written an explanation here, but in simple terms all it means is that a handler must have a ServeHTTP() method with the following signature: ServeHTTP(http.ResponseWriter, *http.Request) To help demonstrate, let's create a custom handler which responds with the current time in a specific format. Like this: type timeHandler struct { format string } func (th timeHandler) ServeHTTP(w http.ResponseWriter, r *http.Request) { tm := time.Now().Format(th.format) w.Write([]byte("The time is: " + tm)) } The exact code here isn't too important. All that really matters is that we have an object (in this case it's a timeHandler struct, but it could equally be a string or function or anything else), and we've implemented a method with the signature ServeHTTP(http.ResponseWriter, *http.Request) on it. That's all we need to make a handler. Let's try this out in a concrete example: File: main.go package main import ( "log" "net/http" "time" ) type timeHandler struct { format string } func (th timeHandler) ServeHTTP(w http.ResponseWriter, r *http.Request) { tm := time.Now().Format(th.format) w.Write([]byte("The time is: " + tm)) } func main() { mux := http.NewServeMux() // Initialise the timeHandler in exactly the same way we would any normal // struct. th := timeHandler{format: time.RFC1123} // Like the previous example, we use the mux.Handle() fnction to register // this with our ServeMux. mux.Handle("/time", th) log.Print("Listening...") http.ListenAndServe(":3000", mux) } Run the application, then go ahead and try making a request to http://localhost:3000/time. You should get a response containing the current time, similar to this: $ curl localhost:3000/time The time is: Mon, 06 Dec 2021 15:33:21 CET Let's step through what's happening here: When our Go server receives an incoming HTTP request it hands it off to our servemux (the one that we passed to the http.ListenAndServe() function). The servemux then looks up the appropriate handler based on the request path (in this case, the /time path maps to our timeHandler handler). The serve mux then calls the ServeHTTP() method of the handler, which in turn writes out the HTTP response. The eagle-eyed of you might have also noticed something interesting: the signature for the http.ListenAndServe() function is ListenAndServe(addr string, handler Handler), but we passed a servemux as the second parameter. We were able to do this because the http.ServeMux type has a ServeHTTP() method, meaning that it too satisfies the http.Handler interface. For me it simplifies things to think of http.ServeMux as just being a special kind of handler, which instead of providing a response itself passes the request on to a second handler. This isn't as much of a leap as it first sounds — chaining handlers together is very commonplace in Go. Functions as handlers For simple cases (like the example above) defining new a custom type just to make a handler feels a bit verbose. Fortunately, we can rewrite the handler as a simple function instead: func timeHandler(w http.ResponseWriter, r *http.Request) { tm := time.Now().Format(time.RFC1123) w.Write([]byte("The time is: " + tm)) } Now, if you've been following along, you're probably looking at that and wondering: How can that be a handler? It doesn't have a ServeHTTP() method. And you'd be correct. This function itself is not a handler. But we can coerce it into being a handler by converting it to a http.HandlerFunc type. Basically, any function which has the signature func(http.ResponseWriter, *http.Request) can be converted into a http.HandlerFunc type. This is useful because http.HandlerFunc objects come with an inbuilt ServeHTTP() method which — rather cleverly and conveniently — executes the content of the original function. If that sounds confusing, try taking a look at the relevant source code. You'll see that it's a very succinct way of making a function satisfy the http.Handler interface. Let's reproduce the our application using this technique: File: main.go package main import ( "log" "net/http" "time" ) func timeHandler(w http.ResponseWriter, r *http.Request) { tm := time.Now().Format(time.RFC1123) w.Write([]byte("The time is: " + tm)) } func main() { mux := http.NewServeMux() // Convert the timeHandler function to a http.HandlerFunc type. th := http.HandlerFunc(timeHandler) // And add it to the ServeMux. mux.Handle("/time", th) log.Print("Listening...") http.ListenAndServe(":3000", mux) } In fact, converting a function to a http.HandlerFunc type and then adding it to a servemux like this is so common that Go provides a shortcut: the mux.HandleFunc() method. You can use this like so: func main() { mux := http.NewServeMux() mux.HandleFunc("/time", timeHandler) log.Print("Listening...") http.ListenAndServe(":3000", mux) } Passing variables to handlers Most of the time using a function as a handler like this works well. But there is a bit of a limitation when things start getting more complex. You've probably noticed that, unlike the method before, we've had to hardcode the time format in the timeHandler function. What happens when you want to pass information or variables from main() to a handler? A neat approach is to put our handler logic into a closure, and close over the variables we want to use, like this: File: main.go package main import ( "log" "net/http" "time" ) func timeHandler(format string) http.Handler { fn := func(w http.ResponseWriter, r *http.Request) { tm := time.Now().Format(format) w.Write([]byte("The time is: " + tm)) } return http.HandlerFunc(fn) } func main() { mux := http.NewServeMux() th := timeHandler(time.RFC1123) mux.Handle("/time", th) log.Print("Listening...") http.ListenAndServe(":3000", mux) } The timeHandler() function now has a subtly different role. Instead of coercing the function into a handler (like we did previously), we are now using it to return a handler. There's two key elements to making this work. First it creates fn, an anonymous function which accesses — or closes over — the format variable forming a closure. Regardless of what we do with the closure it will always be able to access the variables that are local to the scope it was created in — which in this case means it'll always have access to the format variable. Secondly our closure has the signature func(http.ResponseWriter, *http.Request). As you may remember from a moment ago, this means that we can convert it into a http.HandlerFunc type (so that it satisfies the http.Handler interface). Our timeHandler() function then returns this converted closure. In this example we've just been passing a simple string to a handler. But in a real-world application you could use this method to pass database connection, template map, or any other application-level context. It's a good alternative to using global variables, and has the added benefit of making neat self-contained handlers for testing. You might also see this same pattern written as: func timeHandler(format string) http.Handler { return http.HandlerFunc(func(w http.ResponseWriter, r *http.Request) { tm := time.Now().Format(format) w.Write([]byte("The time is: " + tm)) }) } Or using an implicit conversion to the http.HandlerFunc type on return: func timeHandler(format string) http.HandlerFunc { return func(w http.ResponseWriter, r *http.Request) { tm := time.Now().Format(format) w.Write([]byte("The time is: " + tm)) } } The default servemux You've probably seen the default servemux mentioned in a lot of places, from the simplest Hello World examples to the Go source code. It took me a long time to realise it isn't anything special. The default servemux is just a plain ol' servemux like we've already been using, which gets instantiated by default when the net/http package is used and is stored in a global variable. Here's the relevant line from the Go source: var DefaultServeMux = NewServeMux() Generally speaking, I recommended against using the default servemux because it makes your code less clear and explicit and it poses a security risk. Because it's stored in a global variable, any package is able to access it and register a route — including any third-party packages that your application imports. If one of those third-party packages is compromised, they could use the default servemux to expose a malicious handler to the web. Instead it's better to use your own locally-scoped servemux, like we have been so far. But if you do decide to use the default servemux... The net/http package provides a couple of shortcuts for registering routes with the default servemux: http.Handle() and http.HandleFunc(). These do exactly the same as their namesake functions we've already looked at, with the difference that they add handlers to the default servemux instead of one that you've created. Additionally, http.ListenAndServe() will fall back to using the default servemux if no other handler is provided (that is, the second parameter is set to nil). So as a final step, let's demonstrate how to use the default servemux in our application instead: File: main.go package main import ( "log" "net/http" "time" ) func timeHandler(format string) http.Handler { fn := func(w http.ResponseWriter, r *http.Request) { tm := time.Now().Format(format) w.Write([]byte("The time is: " + tm)) } return http.HandlerFunc(fn) } func main() { // Note that we skip creating the ServeMux... var format string = time.RFC1123 th := timeHandler(format) // We use http.Handle instead of mux.Handle... http.Handle("/time", th) log.Print("Listening...") // And pass nil as the handler to ListenAndServe. http.ListenAndServe(":3000", nil) }
Alex Edwards Sep 12, 2013 -

I've recently moved the site you're reading right now from a Sinatra/Ruby application to an (almost) static site served by Go. So while it's fresh in my head, here's an explanation of principles behind creating and serving static sites with Go. Let's begin with a simple but real-world example: serving vanilla HTML and CSS files from a particular location on disk. Start by creating a directory to hold the project: $ mkdir static-site $ cd static-site And then add a main.go file to hold our code, and some simple HTML and CSS files in a static directory. $ touch main.go $ mkdir -p static/stylesheets $ touch static/example.html static/stylesheets/main.css File: static/example.html <!doctype html> <html> <head> <meta charset="utf-8"> <title>A static page</title> <link rel="stylesheet" href="/stylesheets/main.css"> </head> <body> <h1>Hello from a static page</h1> </body> </html> File: static/stylesheets/main.css body {color: #c0392b} Once those files are created, the code we need to get up and running is wonderfully compact: File: main.go package main import ( "log" "net/http" ) func main() { fs := http.FileServer(http.Dir("./static")) http.Handle("/", fs) log.Print("Listening on :3000...") err := http.ListenAndServe(":3000", nil) if err != nil { log.Fatal(err) } } Let's step through this. First we use the http.FileServer() function to create a handler which responds to all HTTP requests with the contents of a given file system. For our file system we're using the static directory relative to our application, but you could use any other directory on your machine (or indeed any object that implements the http.FileSystem interface). Next we use the http.Handle() function to register the file server as the handler for all requests, and launch the server listening on port 3000. It's worth pointing out that in Go the pattern "/" matches all request paths, rather than just the empty path. Go ahead and run the application: $ go run main.go Listening on :3000... And open localhost:3000/example.html in your browser. You should see the HTML page we made with a big red heading. Almost-Static Sites If you're creating a lot of static HTML files by hand, it can be tedious to keep repeating boilerplate content. Let's explore using Go's html/template package to put shared markup in a layout file. At the moment all requests are being handled by our file server. Let's make a slight adjustment to our application so the file server only handles request paths that begin with the pattern /static/ instead. File: main.go ... func main() { fs := http.FileServer(http.Dir("./static")) http.Handle("/static/", http.StripPrefix("/static/", fs)) log.Print("Listening on :3000...") err := http.ListenAndServe(":3000", nil) if err != nil { log.Fatal(err) } } Notice that because our static directory is set as the root of the file system, we need to strip off the /static/ prefix from the request path before searching the file system for the given file. We do this using the http.StripPrefix() function. If you restart the application, you should find the CSS file we made earlier available at localhost:3000/static/stylesheets/main.css. Now let's create a templates directory, containing a layout.html file with shared markup, and an example.html file with some page-specific content. $ mkdir templates $ touch templates/layout.html templates/example.html File: templates/layout.html {{define "layout"}} <!doctype html> <html> <head> <meta charset="utf-8"> <title>{{template "title"}}</title> <link rel="stylesheet" href="/static/stylesheets/main.css"> </head> <body> {{template "body"}} <footer>Made with Go</footer> </body> </html> {{end}} File: templates/example.html {{define "title"}}A templated page{{end}} {{define "body"}} <h1>Hello from a templated page</h1> {{end}} If you've used templating in other web frameworks or languages before, this should hopefully feel familiar. Go templates – in the way we're using them here – are essentially just named text blocks surrounded by {{define}} and {{end}} tags. Templates can be embedded into each other using the {{template}} tag, like we do above where the layout template embeds both the title and body templates. Let's update the application code to use these: File: main.go package main import ( "html/template" "log" "net/http" "path/filepath" ) func main() { fs := http.FileServer(http.Dir("./static")) http.Handle("/static/", http.StripPrefix("/static/", fs)) http.HandleFunc("/", serveTemplate) log.Print("Listening on :3000...") err := http.ListenAndServe(":3000", nil) if err != nil { log.Fatal(err) } } func serveTemplate(w http.ResponseWriter, r *http.Request) { lp := filepath.Join("templates", "layout.html") fp := filepath.Join("templates", filepath.Clean(r.URL.Path)) tmpl, _ := template.ParseFiles(lp, fp) tmpl.ExecuteTemplate(w, "layout", nil) } So what's changed here? First we've added the html/template and path packages to the import statement. Then we've specified that all the requests not picked up by the static file server should be handled with a new serveTemplate function (if you were wondering, Go matches patterns based on length, with longer patterns take precedence over shorter ones). In the serveTemplate function, we build paths to the layout file and the template file corresponding with the request. Rather than manual concatenation we use filepath.Join(), which has the advantage joining paths using the correct separator for your OS. Importantly, because the URL path is untrusted user input, we use filepath.Clean() to sanitise the URL path before using it. (Note that even though filepath.Join() automatically runs the joined path through filepath.Clean(), to help prevent directory traversal attacks you need to manually sanitise any untrusted inputs before joining them.) We then use the template.ParseFiles() function to bundle the requested template and layout into a template set. Finally, we use the template.ExecuteTemplate() function to render a named template in the set, in our case the layout template. Restart the application: $ go run main.go Listening on :3000... And open localhost:3000/example.html in your browser. You should see the markup from all the templates merged together like so: If you use web developer tools to inspect the HTTP response, you'll also see that Go automatically sets the correct Content-Type and Content-Length headers for us. Lastly, let's make the code a bit more robust. We should: Send a 404 response if the requested template doesn't exist. Send a 404 response if the requested template path is a directory. Send a 500 response if the template.ParseFiles() or template.ExecuteTemplate() functions throw an error, and log the detailed error message. File: main.go package main import ( "html/template" "log" "net/http" "os" "path/filepath" ) func main() { fs := http.FileServer(http.Dir("./static")) http.Handle("/static/", http.StripPrefix("/static/", fs)) http.HandleFunc("/", serveTemplate) log.Print("Listening on :3000...") err := http.ListenAndServe(":3000", nil) if err != nil { log.Fatal(err) } } func serveTemplate(w http.ResponseWriter, r *http.Request) { lp := filepath.Join("templates", "layout.html") fp := filepath.Join("templates", filepath.Clean(r.URL.Path)) // Return a 404 if the template doesn't exist info, err := os.Stat(fp) if err != nil { if os.IsNotExist(err) { http.NotFound(w, r) return } } // Return a 404 if the request is for a directory if info.IsDir() { http.NotFound(w, r) return } tmpl, err := template.ParseFiles(lp, fp) if err != nil { // Log the detailed error log.Print(err.Error()) // Return a generic "Internal Server Error" message http.Error(w, http.StatusText(500), 500) return } err = tmpl.ExecuteTemplate(w, "layout", nil) if err != nil { log.Print(err.Error()) http.Error(w, http.StatusText(500), 500) } }
Alex Edwards Aug 24, 2013 -
I've never really known what to do with my personal site. Over the years it's been a dumping ground for links to different projects, and played host to various half-hearted attempts at blogging. But it's never really had much in the way of an actual purpose. I decided to start afresh and relaunch this site with more of a focus. After speaking to the guys from Techzing, I'm going to hunker down and focus my efforts on learning Go really well, with the aim of possibly doing some consultancy work around it in the future. So over the coming months and maybe even years, I hope to create a lot of useful content for anyone else doing the same. Because it's also full redesign of the site, I'll do a little colophon. The site is now just static content, although I use Sass for stylesheets and Markdown for writing blog posts (both of which are compiled on my local machine before publication). Some custom Go code handles the routing and templating, and it's all hosted on Heroku. For development I used Ubuntu as my operating system, Sublime Text as my editor, Git for version control, and Dropbox for real-time backups. So with the mandatory first new post out of the way, I'm looking forward to doing a lot more with this site in the future!
Alex Edwards Aug 17, 2013
Select an article to read.
Keyboard shortcuts
- j / k
- Next / previous article (also n / p)
- g / G
- First / last article
- Enter / o / v
- Open in the reader
- Middle / ⌘-click
- Open the article source in a background tab
- Space
- Page down (Shift = up)
- s
- Star / unstar
- m
- Toggle read
- A
- Mark all read
- r
- Refresh feeds
- u
- Go to Unread
- t
- Add a tag
- /
- Search
- ?
- This help
- Esc
- Close / back to list